Rock climbing: advice for beginners and more. How to learn to climb a rope? Preparatory exercises, tips and climbing techniques You will immediately learn to climb because
Trees come in a wide variety of types and shapes, and each of them requires a different approach. Although most people think of tree climbing as a child's activity, it is often quite dangerous and challenging. First of all, you should inspect the tree and make sure that it is firmly planted on the ground and can support the weight of your body. If you regularly climb trees, invest in the necessary equipment and ropes to enable you to scale the tallest trees.
Steps
Part 1
Precautionary measures- If possible, wear flexible shoes with sufficiently grippy soles. If you are wearing shoes with hard or slippery soles, it may be better to take off your shoes and climb the tree barefoot.
-
Examine the tree from the side. Choose a tree with thick, strong branches at least 15 centimeters in diameter that can support your body weight. Before you begin to conquer a tree, step back a sufficient distance from it and examine it entirely. Avoid trees with the following danger signs:
- Strange shape or bend of the trunk. Climbing sloping trees is easier, but also riskier.
- Deep cracks.
- Large areas with or without sunken bark.
- A forked top in coniferous trees is a sign of deterioration. This does not apply to deciduous trees, but even then, do not try to climb to the very top.
-
Check the ground around the tree. Get closer to the tree and look at the bottom of the trunk and the ground one meter around it. If you notice the following signs of damage and drying out of the tree, it is dangerous to climb:
- Fungi growing on the tree itself or around its base.
- There are many dead branches on the ground under the tree. A small amount of dead branches around the trunk is normal, but if there are too many, it is a sign that the tree is dying.
- A large hollow or several smaller holes at the bottom of the trunk.
- Roots protruding strongly from the ground, dug up or cracked soil around the trunk (a sign of uprooting).
-
Consider weather conditions. Even if you find a perfectly suitable tree, adverse weather conditions can increase the danger. Adhere to the following rules:
- Never climb trees during a storm or strong wind.
- In rainy weather, the trunk and branches become slippery, which significantly increases the danger.
- In cold weather, wood becomes brittle. In this case, move up slowly and check the strength of each branch before standing on it.
-
Look around the area. Before you start climbing a tree, you should check the area around it. Pay attention to the following hazards (not all of them may be visible from the ground, so be careful while climbing).
When lifting, choose large living branches. Once you are on the first branch, take the safe route to the next one. Try to grab branches as close to the tree trunk as possible. Do not grasp branches with a diameter of less than 7-8 centimeters with both hands and do not transfer your entire body weight to them. If you have to stand on such a branch, place your foot perpendicular to the depression between the branch and the trunk.
- Avoid debris from broken branches and dried branches. A dry branch can break off at any moment.
- If, when picked up by the branches, the bark easily falls away from them, then the tree may be weak and dying. In this case, return to the ground.
-
Follow the three point rule. When climbing without a rope, you need to have three of your four limbs firmly resting on the tree at any given time, and these support points must be different parts of the tree. If you place both feet on the same branch, this is considered one fulcrum. If you are sitting or leaning lightly on a branch, this is not considered reliable support, since if you lose another support, it will not help you in any way.
- The rocking and running methods described above for reaching the lower branch are not safe during the subsequent climb. Only a very experienced person can afford to climb onto a higher branch without suitable foot supports.
-
Stay close to the tree trunk. Try to stand as straight as possible, with your pelvis under your shoulders. For greater balance, wrap your arms and legs around the tree. If the tree has a thin trunk, wrap your arms or thighs around it to gain a better grip and cushion a possible fall.
Be wary of precarious tangles of branches. In some places, branches may grow too close together so that bark forms between them. However, this bark is unreliable, and the branches often turn out to be less durable than they seem at first glance.
Check each support point before placing your body weight on it. The appearance of a branch can be very deceiving. Do not transfer the weight of your body to untested support points.
- If soft pieces fall off the tree, it means it is rotting. Trees rot from the inside, and a healthy-looking tree with normal bark may rot in the middle. In this case, return to the ground immediately.
-
Determine the safe maximum height. When climbing with a rope, stop before the trunk becomes thinner than 10 centimeters in diameter. It is possible that you will have to stop much earlier if you notice that the branches are not strong enough or are swaying under the pressure of the wind.
-
Descend carefully and slowly. Stay alert while descending. Try to go down the same route you took to climb the tree (assuming it was safe enough).
- When descending, dried branches and other hazards are less visible. Remember to check each foothold before you step on it.
Wear comfortable clothes. Clothes should be loose enough so as not to restrict your movements, but not to hang loose, otherwise they will catch on branches. Remove loose jewelry and accessories, especially from the neck, as they can also get caught on branches.
Part 3
Lifting with equipment-
Stock up on the right equipment. If you're looking to take up tree climbing as a hobby (or even professionally as part of a forestry or rescue service), you'll need the proper equipment to stay safe. It includes the following:
- Dynamic rope. This light thin rope is literally thrown onto the branches. A small weight is attached to it.
- Static rope. This rope is less elastic and does not stretch as much as the "dynamic" rope used in rock climbing.
- Safety harness and helmet. You can use a standard mountaineering helmet. However, you will need special straps for tree climbing, as climbing equipment can reduce blood circulation in your legs.
- Rope with Prusik knot. This rope is used for climbing. It is attached with a carabiner to the dynamic rope and safety belts. You can also use a special leg mount.
- Branch protection. It is also called cambium protection. This device allows you to protect the branches from friction, so the rope will last longer. Tube-like metal devices are better suited for this, rather than leather devices.
-
Choose the right tree. If you need to throw a rope onto a branch, it should be no thinner than 15 centimeters in diameter. Thinner branches may break. The thicker the branch, the better. You should also remember the following:
- The tree must be healthy. If it is old, diseased or dry, look for another tree.
- The tree should be located away from dangerous places: power lines, animals and bird nests.
- The tree must be large enough for your team. For large groups of people, a large deciduous tree with a large branch spread is best. On coniferous trees it will be comfortable for only 1-2 people.
- Can you climb this tree? You should not climb a tree if it is prohibited.
- Finally, think about the position of the tree. Is it easy to approach? Will it have a nice view? What animals can you see from above?
-
After choosing the right tree, inspect it carefully. Just because a tree is tall, stable and in a good location does not mean it is suitable for climbing. Consider four factors:
- View from afar. Trees are often better visible from a sufficient distance. This makes it easier to understand whether it stands level and whether its branches are reliable. In addition, you will be able to see if the electrical line wires are hidden in the branches.
- Earth. It is also important what ends up under the tree. You don't want to end up in a web of roots, a beehive, a pit of rotten branches, or poison ivy.
- Trunk. If the trunk has areas without bark, this may indicate disease or other problems with the tree that are weakening it. If the tree has two or three trunks, look at the base where they emerge. There should be no weak points.
- Crown. There may be dry branches at the bottom of the tree (they don't have enough light), but if the branches are dry at the top, it means the tree is dying. Avoid all trees with a lot of dead branches, especially at the top.
Part IV
This is the fourth installment in a series of articles on climbing training and is aimed at intermediate level athletes (around 6b+/6c or V3/4 bouldering).
Future articles will be aimed at higher level climbers.
Well, welcome to the next level. 90% of climbers reach it but never get past it. Largely because they simply don’t want it and are content with what they have. However, those who want to move on need to change their approach to training.
You can't continue doing the same thing you've always done. You will simply bang your head against a concrete wall. You have to constantly change your approach: where you climb, what you climb and how you do it. I can't even tell you how many climbers I've seen climb the same boulders or routes day after day. The same movements, the same logic and everything is the same - and they still wonder why they are not progressing. As a result, the conclusion is usually drawn that further growth is the lot of young or genetically predisposed monsters. I think that anyone who devotes enough effort to it can rise to a higher level. It is not at all surprising that climbers who have been marking time in one place for a long time can “shoot up” and significantly improve their results after changing their approach to training.
In this article, we will continue the theories put forward in past publications and bring new concepts to your training. But first, let's meet our imaginary hero:
Name: Vanya Polotochnikov
Occupation: imaginary character
Climbing Experience: 1-2 years, 2-4 times a week
About Me: I have been training regularly for the last year, 2-4 times a week, and have been steadily improving my level. I believe that my level of climbing is characterized primarily by the level of onsight, so I want to raise it both in sport climbing (indoor or on the rocks), and in bouldering or trad. I have problems with heavily overhanging routes, I can’t position myself and distribute forces correctly.
Footwork + Body Positioning - Overhangs
As you move from verticals to overhangs, gravity picks up. Vertical or positive walls redistribute your weight to your feet, reducing the impact of gravity. However, on overhangs, almost all of it falls on your hands, and you get much more tired. However, there are ways to reduce this unpleasant effect. The techniques described in previous articles help us climb more efficiently and with balance. However, we have only scratched the surface of their study. Let's dig deeper.
The turning technique works on overhangs almost better than on vertical routes. It allows you to take a lot of the load off your arms and bring your body closer to the wall, giving you the ability to make longer, more energetic movements.
As I said in my first article, a rock shoe consists of several parts: the inner and outer edge, the toe, the heel. We've mostly talked about the hems, but now let's take a look at the toe and heel.
Heel grips
Top British athlete Ed Hamer demonstrates heel grip
I use this technique whenever possible. As a child, I was weak and fat and could not even do a single pull-up, unlike my comrades. Therefore, when it came time to climb overhangs, I had to find workarounds for this, rather than take everything with brute force. I remember that my friend and I once tried a rather tricky problem, invented on the heavily overhanging “bow of the ship.” We both reached for the same pinch, but we couldn’t resist this nasty thing. My comrade was very strong... but what can I say - he was the champion of Britain. However, this movement did not work out for him either. What can we say about me? This was a turning point in my development. I suddenly realized that you don't have to be super strong to climb hard routes. I threw my heel over my hand and made a static movement, after which I climbed to the top, which put my friend into a state of complete intoxication.
Heel grips are simply an irreplaceable thing for overhangs. All you have to do is hook your heel into the toe and press down hard, providing another point of contact with the wall. This is much more effective than just walking out on your toes (which we’ll also talk about now). In addition to redistributing weight, heel grips can provide the opportunity for rest, longer movements, and better balance.
On less overhanging walls, using your heel can be the difference between the stability of your position. If I'm rolling out onto a positive flat toe, I'll often put my heel on it instead of my toe, which allows me to get closer to the wall and make my position more stable.
Toe grips
The meaning of this element is clear from the name. On overhanging routes, toe grips will give you extra rest and allow you to stabilize your position. The most convenient cases for using a sock are elements protruding from the wall, such as buttresses, reliefs and large grabbers.
 |
Toe grip
Here are some examples:
- Use on holds - in this position there are no other foot holds that would allow you to maintain stability for the next movement. In this case, a toe grip is necessary and, with proper pressure, provides a good contact point.
- Use on corners and bends - by hooking your toe, you will significantly stabilize your position.
- Rest - The toe grip can allow you to take some stress off your hands and rest. At the same time, a two-leg grip can give you complete rest for both hands.
- “Bicycle” - with the toe of one foot we press on the toe, with the toe of the other we hook it.
Clinging toes
This element is often forgotten, but this is also a kind of art. If we climb along a vertical wall, then we press on the toe and thus stretch higher. However, the nature of the overhanging surface prevents us from getting the same effect by simply pushing off the toe from the toe.
 |
Grab the hold with your toe
Try to press on the hold not parallel to the wall, but, as it were, to pick it up with your toe away from you and slightly downward, as if trying to pry it and pull it out of the wall. If you go into any climbing store and look at all these modern models of climbing shoes, you will notice that many of them have a toe that is curved at the end, as if it were a beak or a claw. This is precisely what is necessary for such a movement.
How to learn all this?
It's simple. Stop fooling around and start climbing more overhanging routes. Many climbers I know don't want to do it because, you see, they don't like it and climbing overhanging walls won't give them anything. It is not right. Overhang climbing will improve your technique, make you stronger, and make you feel better on any route. And why not learn something new?
Try adding overhangs to your warm-up and observe with simple examples where and how this technique works so that you know how to apply it correctly on real routes.
Movements on the wall
Is moving along a wall just a matter of technique and body positioning? Of course not, the correct location does not solve everything. Climbing dynamics also have a lot to learn. For example, when should you climb quickly, and when is it better to take a section slowly and steadily? With each stage of development, the questions facing the climber become more specific, and their solutions become more important for further growth.
 |
Tim Bolger "resting" on the Ciudad de Dios - 9a/+ route in Santa Linya, Spain
We've all seen Adam Ondra literally run up the wall. For example, I don’t know how to climb that fast, but to argue that increasing the speed of climbing without sacrificing efficiency is undoubtedly a good turn. On vertical and positive routes, where everything is about balance, speed can be sacrificed, but on overhangs, where every second drains your strength, sometimes it would be nice to speed up.
When I was in Spain this year, I had the chance to chat with my friend Tom Bolger - perhaps the most talented British climber. Every day he sees the most elite athletes climbing on the crags of Santa Linha, Rodellare and Disblia. And in his opinion, choosing the right speed on a route is an invaluable skill that is inherent in most top climbers. For the first 8-10 meters of his project (30-meter 9a+), he climbs almost without stopping, making only barely noticeable pauses for rest between movements. When he reaches a resting spot, he stops, stabilizes his breathing, and after a minute or two speeds up again to tackle the next bouldering section. Another minute of rest - and he proceeds to the next, easier one. He has more control over his movements, but is still quite fast and flexible. This approach seems to me to be the most effective for completing difficult routes.
To master this technique, include elements of it in your training. Every time you approach a new route, try to see where you need to speed up, where you should climb slowly and carefully, and where you should try to hang and rest. If it's a redpoint route, run some sections of the route with a top rope, trying to increase your normal speed, and see how that affects the overall feel and tightness of the muscles.
Increasing your climbing speed may seem difficult at first, but if you do it regularly, the necessary skill will soon come. I would advise including a couple of easy routes or traverses in your training as a warm-up and try to climb them quickly, but not at the expense of technique. No need to rush ahead. Try to figure out how to do each movement a little faster.
Dynamic movements
Many climbers just don't understand what it's like to be dynamic, some say they lack the strength, but I think it's all a matter of ignorance.
Dynamics is a very important element of technology. If you are a boulderer, then the ability to move dynamically is simply necessary and usually comes in the early stages. If you are a “rope climber,” then this skill will help you raise your level, since you won’t get far with static movements. If you are climbing trad, then, it seems to me, you will not want to jump without unnecessary necessity, but there are also routes where you cannot do without it.
After warming up, 30 minutes of climbing with deliberately dynamic movements will significantly improve your technique. Look for large holds on the wall and practice on them:
- Make long, dynamic movements from one hold to another
- Standing with your feet on one hold, jump up and down on the holds with both hands
- Try increasing your climbing speed by introducing dynamic elements into it.
Trying a variety of movements will give you the new skills you need to improve.
Redpoint Tactics
In the previous article we talked about reading the route. This is very important for onsighting, but in redpoint climbing, thinking through your tactics in advance will give you additional advantages.
Practicing movements
Many climbers, as a rule, after a failure, climb a difficult section again, preferably to the top, and then descend down until the next attempt. Some don’t even climb to the top, but simply go down for the next attempt. This practice is common among trad climbers, but is rarely used in route climbing. When going through a redpoint route, you need to learn the key moves as accurately as possible. If you fail, it is better to do the following:
- Think about why you snapped.
- Try to link all the move sequences if it is important for the next attempt.
- Go through the entire route from quickdraw to quickdraw, trying to pay attention to all the elements: resting spots, footholds, stitches, key movements, etc.
It's a mistake to quit working on a route and start a new attempt after a breakdown, even if you think it's all about fatigue. I used to do this too and paid for it by falling 5 meters from the top of the 70 meter 8b+ because I was too lazy to learn the final sequence after the key section.
Rest between attempts
Even if you fall off at the very beginning, take enough time to rest before returning to the route. And the point here is not only in the physical stress from which you need to recover, but above all in the psychological stress that you experience. I need a five-minute rest even after just mentally visualizing the course. This is true for any discipline and some aspects of recovery in one will take longer than in another. For example, if you fail badly on your 20-meter project, you will be exhausted both physically and mentally and will take 30-45 minutes to recover before the next attempt. If you are exhausted from the bouldering top, then the fatigue will be mainly of a physical nature, and you will be ready for the next attempt in about ten minutes. But having fluttered from the thread, you will spend a long time collecting the remnants of your nerves until you prepare yourself for the next approach. This process can take from a couple of hours to several weeks.
The point is that resting until full recovery, no matter how long it may be (we are not taking into account specific training), does not reduce your chances of passing.
Body Training: Strength Endurance
Strength endurance is a term that can often be heard among climbers, and often misinterpreted. The correct definition is:
"Ability to perform moderate to vigorous intensity movements for extended periods of time"
Not many people know this, but strength endurance matters for most single-pitch routes. Any climb where you feel the grind but still have to keep going with fairly heavy movements is a strength endurance route. I often hear that classic European routes require more endurance than, for example, English island routes. This is true to a certain extent. I would say that they also require strength endurance. Since there are no rest areas along the route that would guarantee full recovery, you will be in the anaerobic zone and your strength endurance will work.
We have already looked at the training cycle for developing endurance. Now it's time to bring in the strength component here. It will include a number of exercises, some of which you will already be familiar with from previous articles, while others will be new. When training strength endurance, it is important to maintain the required level of load (just like when training regular endurance).
3x3 cycles
The same 4x4 cycles as before, with the only difference that there are three of them (but more difficult). When training endurance, we focused on 3/4 of our capabilities (watch to understand). In strength endurance training we will aim for level 4/5. This means that after finishing the approach, we will be almost completely clogged, and a couple of movements will separate us from failure.
I usually start this type of training with a hard route, then maintain the fatigue level by climbing slightly less difficult ones.
Bouldering cycles
Select a bouldering problem based on the strengths of 8-12 moves in length. Repeat this five times, resting only long enough to magnetize and approach the wall again. You need to choose a level of intensity that will last you a maximum of four approaches.
Climbing cycles
Perhaps the most common way to train strength endurance is at climbing walls. It involves climbing difficult routes, but on bouldering walls. The beauty is that you can tailor the climbing to suit you. For example, if you are going to go somewhere to Margalef, set the routes in your pockets.
I like to change the style of routes throughout the cycle, combining a variety of climbing styles. If I’m in the strength phase, then I reduce the number of moves to 15-25, if I’m training strength endurance, then I make the routes longer (25-35 moves), just routes 35-50 moves long will bring me endurance. I'm planning on going to the short courses at Malham Cove next month so I'm training on 15-25 turn routes. It's a really fun approach to training, especially in a group with friends where you can participate in the choreography together and benefit from watching each other. The competitive nature of man plays an important role here. Plus, while your friend is climbing, you use this time to rest (I would always wait until full recovery before attempting the next attempt).
 |
Bouldering cycles
Repeat cycles
Same idea as bouldering repeats, but only for regular routes. Do 3-4 repetitions of the route with a rest of 1-2 minutes. This is a great strength endurance training tool that will surely take you to the anaerobic limit. Routes should be no more than 15-35 movements long. As you progress, reduce your rest time. Try reducing the rest duration to 30 seconds or a minute over time, or increase the difficulty.
It is important to come up with routes that are interesting and effective. The ideal route should consist of movements, each of which is no more difficult or easier than the others. There should be no rest areas on the route, it should be a uniformly difficult climb that will achieve the desired anaerobic effect.
The difficulty should be around your onsight level (one or two grades below your maximum onsight) so that you can repeat a route you've already learned even if it's very crowded.
Original: Ukclimbing.com
Author: Robbie Philipps
Translation: Alexey Zubenko
- Methods of rope climbing.
- What are the benefits of doing this exercise?
- Rope climbing techniques.
- Typical beginner mistakes.
- CrossFit complexes containing this exercise.
Basic methods of rope climbing
There are three main ways to climb a vertical rope:
- in two steps;
- in three steps;
- without legs.
They are called basic because all other methods are essentially derivatives of them; only the technique and manner of performing the movement are slightly modified. These varieties originate in army physical training, where they are successfully performed to this day. In addition to army training, a special provision for rope climbing is provided for in the GTO standards. In addition, the rope is an integral attribute of gymnasts’ training; many elements are practiced with its help.
The three options listed above are the most basic; athletes of almost any level of training can begin to study them, if there are no serious contraindications related, first of all, to the muscular motor skills of the hands. There are also several more complicated variations of rope climbing, such as legless climbing with additional weights, legless climbing with jumping movements, or climbing with only one hand, but these are recommended only for well-physically and functionally trained athletes. An inexperienced athlete simply cannot cope with such a serious static-dynamic load and risks injury.
What are the benefits of rope climbing?
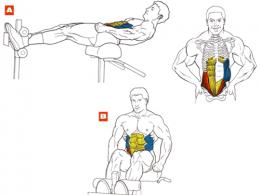
Climbing a rope (especially in a way without using legs), the athlete works a huge number of muscle groups (the latissimus, rhomboid and trapezius muscles of the back, rear deltoids, biceps and forearms), trains strength endurance and explosive power, and increases grip strength. The static load is also carried by the abdominal muscles and neck muscles. Our dexterity and coordination also increases, and a huge number of small stabilizer muscles are worked out, which are difficult to use when working with free weights or in exercise machines.

By working with our own body weight, we do not create an axial load on our spine, and also do not overload our joints and ligaments.
Climbing the rope gives us an excellent opportunity to work almost all the large muscle groups of our torso in a fairly short time - in just a few approaches, which is why this exercise has gained immense popularity in CrossFit.
In functional training, we perform climbing within complexes, which increases the effectiveness of our training and introduces the necessary variety. For people who are fond of martial arts, the skill of rope climbing will also be extremely useful - well-developed hands and forearms will allow you to more easily perform various throws and grabs, and will help you feel more comfortable and confident when fighting on the ground.
In addition to the above, hanging on a rope for a long time is a kind of isometric load on the arms, which will lead to microtraumas of your tendons, after the restoration of which you will feel a good increase in strength in pressing and pulling movements. But remember that as with any other exercise, all these benefits are only achievable with proper technique. Choose a technique with which you do not feel any discomfort, practice this movement until it becomes automatic and move on to studying more complex variations.
Rope climbing techniques
There are several types of rope climbing techniques. Let's look at each of them in detail:
- Starting position: the athlete holds the rope tightly with his hands and feet (the toe of one foot and the heel of the other foot).
- Push off the rope with your legs, bend them and grab the rope a little higher in the same way.
- Without letting go of the rope with your feet, alternately move your hands higher and repeat the movement.

There are two ways to climb a rope in two steps.
First way:
- Starting position: one hand is fully straightened and clasps the rope above head level, the other hand is held at chin level. We grab the rope with our feet with the toe of one foot and the heel of the other.
- We push off with our feet and try to pull ourselves up on the arm that is located higher.
- With the other hand we intercept the rope higher, at the same time we pull up our legs and take the starting position.

Second way:
- Starting position: hands are located at the same level just above the level of the head, one is located immediately below the other. We hold the rope with our feet in the same way - toe and heel.
- Push off with your legs, grab the rope a little higher, pull yourself up, intercept the rope and hang with straight arms.
Rope climbing without using legs
- Grasp the rope with both hands, one should be slightly higher than the other, bend your legs slightly or bring them out in front of you.
- Maintaining the position of your legs and body, rise up, alternately changing hands and using the latissimus dorsi and forearm muscles.

© Jale Ibrak - stock.adobe.com
This video demonstrates various rope climbing techniques:
If you have just recently started doing CrossFit and are not yet ready for rope climbing, start training with a lead-in exercise: pull yourself up the rope with your hands, starting the movement from a sitting position. The legs do not work, but only rest their heels on the floor. As soon as you have risen as high as possible and fully straightened your knees, begin to lower yourself down again, while the movements should be coordinated and monotonous, your palms should be removed at the same distance from each other. This will give you a good understanding of the biomechanics of movement and improve the strength of your hands and forearms.
In order to make this exercise easier for you, and to improve rope climbing, you must separately perform the elements that make up this exercise. Pay special attention to grip strength: practice hanging on a rope, on a horizontal bar and on a towel suspended from a bar - this will strengthen your hands and forearms, and your own weight will not seem so heavy when climbing the rope.
Learn to do one-arm pull-ups, this will greatly facilitate the process of learning how to climb a rope without legs. Do pull-ups and other latissimus dorsi exercises to build your strength.
Once you have mastered at least one method of rope climbing, make this process more extreme - try to climb the rope in the shortest possible time, without resting between approaches. This way you will increase strength endurance and the overall physical potential of your body, and more complex climbing options will be easy and relaxed.
Training video for beginners, summary exercises:
Typical beginner mistakes
Listed below are the main mistakes that inexperienced athletes make when studying this element. They do not contain anything particularly dangerous, but deviations from the correct technique will significantly complicate your learning of this already difficult exercise. These errors are not so much technical errors as deviations from the generally accepted rules of rope climbing, so I do not recommend ignoring this information.
- The athlete grasps the rope not with his feet, but with his hips. You are unlikely to be able to squeeze the rope with your thighs with enough force to balance comfortably. Use only the above method - the toe of one foot and the heel of the other foot.
- Do not use gloves when climbing ropes– this will not protect your skin from the appearance of calluses, do not believe in this myth. In addition, when using gloves, your grip strength will develop much more slowly.
- Don't jump off the rope, especially if it is fixed at a high height. This is perhaps the only moment where you can get seriously injured. If you land poorly, you can damage your ankle or injure the metatarsal bones of your foot, which can knock you out of the training process for several months.
- Don't slide down the rope. Yes, of course, it’s faster this way, but the pain on the skin of your palms is unlikely to allow you to do a few more approaches.
- Don't forget to use magnesium, this will improve the grip of your palms on the rope and reduce the risk of unclenching your palms at the most inopportune moment.
Crossfit complexes
The main method of rope climbing used by athletes from all over the world in CrossFit is without legs. There is, of course, a certain logic in this: the more complex the exercise, the more effective it is. It is this version of rope climbing that requires maximum concentration and dedication from the athlete, especially if it is necessary to perform it within the framework of complexes in an explosive manner and with a minimum rest interval. However, if your training does not imply consistently good results in climbing without legs, you can replace this method with one that you are better at.
Below are several complexes, by performing which you can check whether you are ready for truly difficult functional training. Extreme load on all muscle groups, very high level of intensity. Do not forget to warm up thoroughly before performing these or similar complexes.
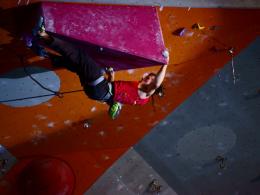
The search for ways to relieve stress has driven us higher this time. Having previously cut her nails shorter, Masha Botvinina went to one of the largest climbing centers in Moscow, Big Wall.
Do you want to add some color to your life? We'll tell you how. For example, rock climbing in an indoor climbing wall has a lot of advantages: physical activity plus a killer charge of endorphin and adrenaline. This cocktail can instantly relieve stress and get rid of the autumn blues. On top of everything else, it is absolutely safe, although at first glance it’s hard to believe.
At the center they gave me all the equipment: a safety system (a belt that will fasten me to the belay), a bag of powder (magnesium) so that my hands would not slip, and special boots - climbing shoes. All this can be rented, or you can come with your own equipment (some even bring their own ropes). By the way, for better “adhesion” to the wall, the toes should be squeezed into a kind of fist, so the actual size of the climbing shoes is smaller than the standard one. For example, they gave me boots of size 39.5 (and I actually have 37), and they pinched me - and they even pitied me, as a beginner.
“People don’t climb the wall because of a good life!” — my coach Sergei Gennadievich Lukyanchikov joyfully said, fastening the harness on me. By the way, Sergei Gennadievich has more than 20 years of teaching experience, and his students have participated in world climbing championships several times. He also constantly makes jokes, and his colleagues call him a “notorious climber.”
By the way, I'm afraid of heights. Not that much, but I'm afraid. There is a 13-meter wall, steep and strewn with multi-colored holds. These are special ledges, tightly screwed to the wall, along which you need to climb. As they explained to me, they come in different types: “handles”, “throwbacks”, “grips”, “minuscule”. While you’re climbing, you don’t really think about what the hold is called, but a couple of times I came across a hold in the shape of a fish :-). Holds of the same color indicate a route. The color of the holds does not affect the difficulty level of the route, but there are signs at the bottom that indicate the difficulty. Each free route has a rope hanging from above, one end with two carabiners for the climber, the other for the belayer.
So, Sergei Gennadievich buckled me up and ordered me to climb the red holds. For the first seven meters, under the encouraging tips of the coach, everything went easily, only I had to make sure that I climbed more on my feet, and not hang on my hands - this was necessary to save energy. My reflexes were not ready for this. And then I looked down and realized that my reflexes were not ready for this either. I was seized by panic: there were small holds under my feet and hands, the floor was far away, there was emptiness behind me, and a hold in the shape of a hare was grinning in front of my eyes.
Seeing that I was quietly dying on the wall, Sergei Gennadievich, clearly familiar with similar symptoms, commanded to let go of the wall. I squeaked something, closed my eyes, grabbed the safety rope and hung. Oddly enough, this technique worked, I felt much better and I continued climbing, with a feeling of special satisfaction having stepped on this hare.
After the above incident, nothing further clouded my path to the top. Having safely reached the very top, I began to descend using a safety rope. To do this, you just need to push off the wall with your feet and slide down, and the belayer will do the rest (although, if you want, then nothing prevents you from going down in the same way as you went up, that is, using your arms and legs).
In the same way, I climbed several more routes. For example, on a wall with imitation of natural stone (they say this is an exact copy of the rocks in Bulgaria). By the way, on this wall there is automatic insurance - that is, it is not the person below who insures you, but an automation somewhere under the ceiling. Moreover, she pulls quite strongly, as if urging you upward. Maybe that’s why I climbed this wall the fastest.
For beginners, it is easiest to climb a wall with a positive slope because there is less use of your arms. It turns out that you get tired less and get used to leaning on your feet more.
I can’t help but tell you about my attempt to climb a wall with a negative slope. This requires thoroughly toned arms and abs. And preferably two months of constant training at the climbing wall! In general, I proudly overcame a height of 2.5 meters and am absolutely pleased with myself :)
At the end of the lesson, the trainer taught me how to work with the belay, as the belayers below do: move the rope fastened to me with my hands. Of course, there is nothing particularly complicated here, but practice in this matter is simply necessary. I was entrusted with insuring the carbine. I can report that he was not injured during the ascent and descent :)
General impression, of course, amazing: a huge adrenaline rush. In your head you understand that thanks to insurance everything is 200% safe, but the feeling of pride in yourself and the feeling of fear you have overcome does not leave you. Plus, this is an excellent physical activity for all muscle groups; in the process, “fat” mass is actively burned.
The brain also works actively on the wall: you need to calculate your movements, the ability to move from one hold to another. Here you literally forget about everything. There is only you and the clues, everything else remains in another world, and after training, problems at work or at home no longer seem so serious.
The coach said that beginners usually progress very quickly, and after 2-6 months they confidently climb routes on negative slopes. Children, of course, learn the fastest. During classes, I saw a girl of about 5 years old (the minimum age at which you can start) and a boy of about 7 years old. They climbed like spiders with long arms and legs and a web of insurance.
Basic rock climbing techniques!
All rock climbing techniques come down to the concept of ergonomics. In the case of rock climbing, this means that climbing should be as economical as possible in terms of effort, and technical movements should serve the purpose of climbing the route as economically as possible.
Why, you ask?
If you are climbing a route that is a little more difficult than your strength and you cannot climb it, then you need to save your strength. To achieve the goal, you must make movements more accurately and quickly and, as a result, climb the route. It turns out that you use the principle of ergonomics both in climbing techniques and in the strategy of how to climb a route.
This is the main secret of rock climbing!
Here we can highlightbasics of technology :
Correct foot placement.
When climbing it is common to use:
1) Climbing toe (most often used both for simple climbing and for technical movements, such as rolling onto the toe, picking up a hold with the toe);
Correct placement of the toe on the hold (on the toe, the foot is placed along the center line of the rock). With this position, you will be able to turn in the other direction without removing your foot from the hold, and the load will remain in your leg throughout the entire movement.
 Incorrect foot placement. With repeated repetition of such a position of the leg, the entire technique as a whole will suffer and, subsequently, the results in rock climbing will be affected.

2) Heel of the climbing shoe (used for rolling out onto the heel, as well as for picking up a hold with the heel);
3) Placing the rock flat (rarely used, mainly when climbing spreaders or when placing the rock on terrain without holds);
 The point of correctly positioning your legs is to ensure that the maximum weight of the center of gravity falls on your legs. To do this, there are several tips and even separate training sessions on leg positioning techniques:
1) It’s worth starting by climbing up any angle to understand how the weight of the whole body can be distributed on the legs;
 2) Learn to correctly change legs on holds. Changing legs is carried out in such a way that the weight of the center of gravity is minimally transferred to the hands during the change of legs. The best option is to learn how to change legs using the “wedge method,” when the heel of the standing leg begins to fall down, and the toe of the leg that stands on the toe wedges itself between the toe of the standing leg and the terrain.
It is important to point out the mistake that beginner climbers most often make. This mistake is changing legs using the jumping method. During this movement, the load goes into the hands and if the grips are extreme, then the hand clogging increases, as well as the risk of falling. There are exceptions when professional climbers use the jumping method of changing legs, but this is more likely due to the fact that other options for changing legs on a given route are simply impossible and the hold is very small;
 3) When climbing, make sure your heel is higher than your toe. This rule applies to the leg that bears a large load, or both legs (if the load is distributed approximately in half);
4) To better load your legs, try to use the “straight arms priority” rule. This means you should climb with straight arms more and only bend your elbows when necessary. If you climb on your hands with bent elbows, then part of the load will go to this block and the load on your fingers will increase, although it could go to your legs;
5) When setting your feet, try to place your feet accurately and smoothly, this will increase not only the beauty of your climbing, but also your technique with results on extreme routes;


6) Excellent training for establishing leg technique: at the RockTopia climbing wall (10 meters high), climb the holds with your hands, and place your feet only on the terrain. You need to start with the simplest routes and follow all the points described above. Further (if you cope) the complexity of the route can be increased.
To effectively evaluate your own climbing, ask a friend to record your climbs on video and immediately after climbing, evaluate yourself from the outside.
Maximum distribution of the weight of the center of gravity (butt) on the legs (most often this position is used when the center of gravity is closer to the wall)
Priority of direct hands (during climbing, your arms should be straight most of the time. This will save strength by not bending the muscles in the elbows, and your technique will not suffer while performing correct technical movements).
Also, during the first 10 rock climbing lessons, you are introduced to the basic technical movements: roll-up, roll-out, arm crosses, leg crosses, the correct change of legs on one hold, the correct change of hands on one hold, and they will also tell you what dynamics are, what grips are , and will show how jumps are performed (this is dynamics with both legs lifted off).
Perhaps these are the main points of rock climbing technique. As you improve these elements, you will need to supplement them with various nuances: after all, the whole consists of little things, and the more you know them, the cooler you will be! Goncharov Oleg