Plank for weight loss: how to do it right, what types are there, how much and how often you need to do it + reviews and videos
If there is no time to visit the gym, but there is a need to strengthen the main muscle groups, tighten the stomach and correct posture in a short time, then a simple plank exercise will effectively help with this.
What effect can be achieved by regularly performing the bar?
The bar is included in the training system of bodybuilders, as well as general physical training programs for many professional athletes, and is often used in yoga and fitness. And it is not at all accidental - this static exercise strengthens and tones all major muscle groups:
- press,
- back,
- buttocks.
Performing the exercise regularly, you solve several problems at once:
- improve posture;
- train tendons and ligaments;
- strengthen the core muscles responsible for maintaining the spinal column, pelvis and hips;
- struggling with lumbar and cervical osteochondrosis;
- reduce the risk of developing osteoporosis;
- make arms and legs slimmer;
- reduce the volume of the waist;
- fight cellulite by improving blood and lymph flow.
This effect is achieved by limiting muscle tension to overcome gravity and balance the whole body to maintain a horizontal position.
Static exercises allow you to build muscle mass faster than dynamic ones.
Any type of plank is best performed at the end of a workout before stretching, when all the muscles are already warmed up and prepared.
Will plank help you lose weight?
You should not hope that the implementation of the plank in itself will save you from extra pounds and excess body fat. You can't do without proper nutrition and special training. But the bar can speed up the process of losing weight, since the body expends more energy on performing static exercises, which means that calories will be spent more intensively. But static exercises help to build muscle mass faster than dynamic ones. The body becomes more embossed, toned and looks slimmer.
When a plank can hurt
Contraindications for this exercise are:
- hypertension - as exercise increases blood pressure;
- problems with the joints - a serious load falls on them, which in this case will not be beneficial;
- vertebral hernia or spinal injury;
- recently undergone caesarean section (up to six months) - due to the risk of suture divergence;
- any chronic disease in the acute stage.
There are many types of planks. They are united by a common principle - the correct starting position: from the crown to the pelvis, the spine is straight, the neck continues the spine, being in line with it, and the chin is strictly perpendicular to the spine. Do not allow deflection (lordosis) in the spine, so as not to injure the lower back.
It is advisable to include the bar in training 3-4 times a week for 3-4 sets. You need to start with 30 seconds, and then gradually increase the holding time to 2 minutes or more.
Table 1: Classic Elbow Plank Hold for Four Sets for Beginners
| First approach | 30 sec |
| Second approach | 1 minute |
| Third Approach | 1 minute 30 seconds |
| Fourth Approach | 2 minutes |
Unaccustomed to some, it is difficult to immediately endure such a time. In this case, hold the bar for as long as you can. With each workout, the muscles will grow stronger, and the task will no longer seem overwhelming.
Table 2: Recommended 30 Day Plank Training Program for Beginners
| Day |
retention time slats |
Day |
retention time slats |
| The first | 20 sec. | Sixteenth | 2 minutes. 40 sec. |
| Second | 25 sec. | Seventeenth | 2 minutes. 50 sec. |
| Third | 30 sec. | Eighteenth | 3 min. |
| Fourth | 35 sec. | Nineteenth | 3 min. 20 sec. |
| Fifth | 45 sec. | Twentieth | 3 min. 30 sec. |
| Sixth | 1 minute. | Twenty first | 3 min. 35 sec. |
| Seventh | 1 minute. 10 sec. | Twenty second | 3 min. 40 sec. |
| Eighth | 1 minute. 20 sec. | Twenty third | 3 min. 50 sec. |
| Ninth | 1 minute. 30 sec. | Twenty-fourth | 4 min. |
| Tenth | 1 minute. 40 sec. | Twenty fifth | 4 min. 20 sec. |
| Eleventh | 1 minute. 45 sec. | 26th | 4 min. 25 sec. |
| Twelfth | 1 minute. 50 sec. | Twenty seventh | 4 min. 30 sec. |
| Thirteenth | 2 minutes. | Twenty-eighth | 4 min. 40 sec. |
| Fourteenth | 2 minutes. 10 sec. | Twenty-ninth | 4 min. 50 sec. |
| Fifteenth | 2 minutes. 30 sec. | Thirtieth | 5 minutes. |
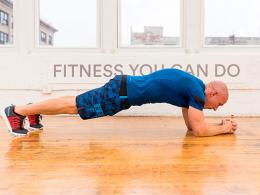
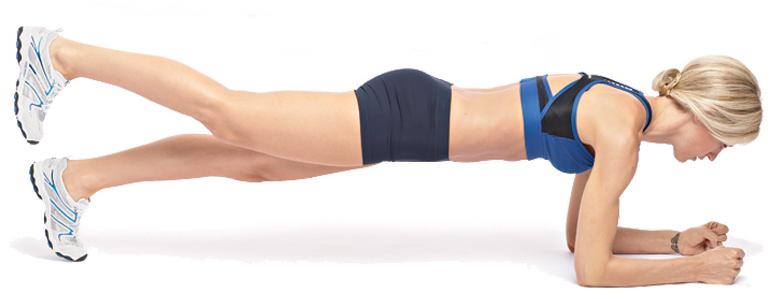
Classic plank at the elbows
- Place your elbows shoulder-width apart, strictly under the shoulder joints.
- Brushes are best brought together, but can be kept in parallel.
- Do not strain your hands - they should be considered only as a fulcrum.
- Tighten the press and pull it in, the stomach should in no case sag. Plank is one of the few exercises that allow you to work the lower abdominal muscles.
- The hardest part is keeping your back. Do not bend the spine, keep the lower back flat, otherwise you will subject the vertebrae to a negative load.
- Keep your legs straight without bending your knees.
- Do not lift your head up - look at the floor.
- Breathe evenly, calmly, do not hold your breath.
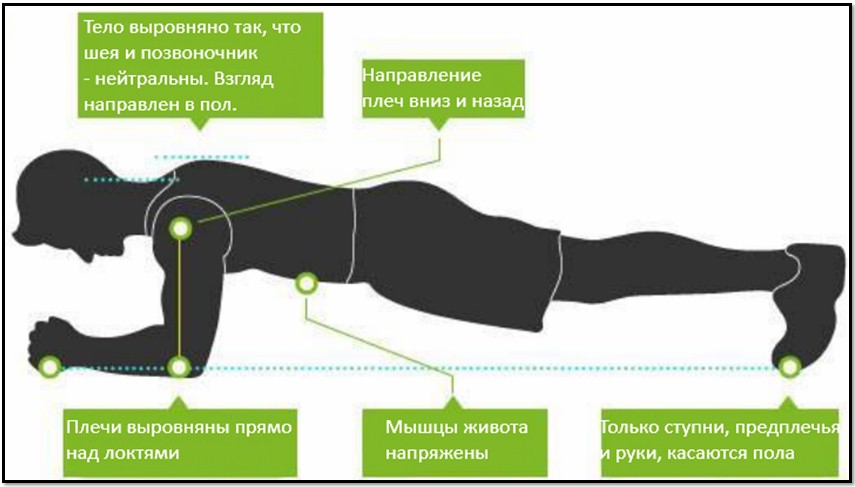 If you follow all the recommendations, there will be no problems with the spine
Secrets of the right plank:
- It will be easier to keep the spine in the correct position if you squeeze the gluteal muscles and keep the tension until the end of the exercise.
- Tighten and straighten your legs - they are responsible for the stable position of the body.
- Spread your feet wider, and you will immediately feel that it will become easier to maintain the correct balance.
Common Plank Mistakes
Common mistakes newbies make:
- Arching up or sagging down in the lumbar region.
- Incorrect position of the head: it can be pulled up (this is the most dangerous, as cerebral circulation is disturbed) or lowered down.
- Incorrect position of the hands: above or below shoulder level.
- Bending the legs at the knees.
These errors apply not only to the classic plank - they are encountered in the performance of any of its varieties. The photo clearly shows the main mistakes in the exercise, which must be avoided.
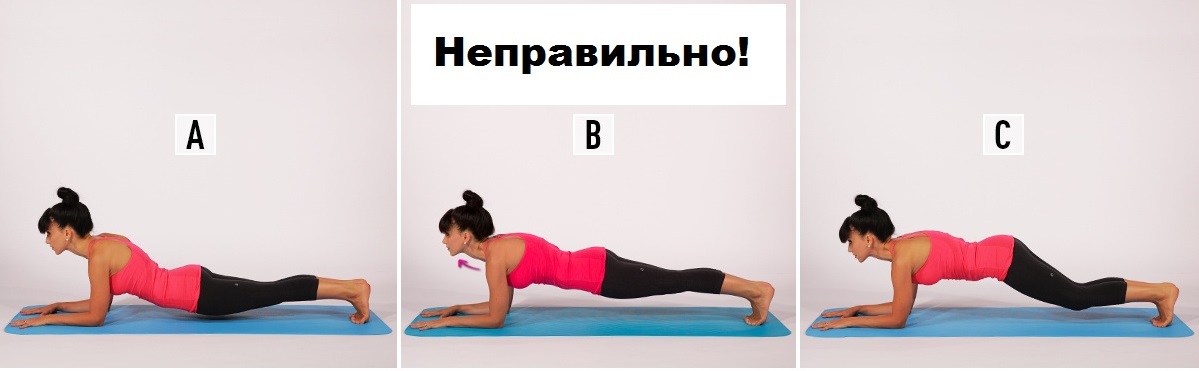 In all cases, the main principle of the bar is not observed - there is no perfectly even line of the neck, spine and legs
Classic plank with straight arms
The main work falls on the muscles of the hands and the press. The principle of correct execution is the same - an even spine and a right angle between it and the chin, the gaze is directed to the floor.
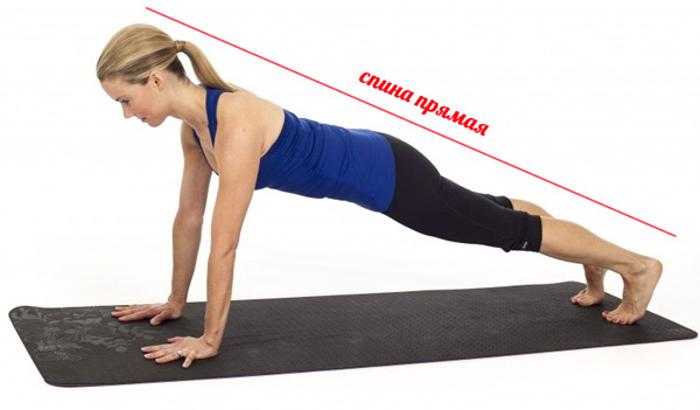 Legs and back form a single straight line
A flawless plank on outstretched arms looks like this:
- Emphasis on the palms, hands are located strictly under the shoulder joints.
- The back is straight, the pelvis is tucked up.
- The muscles of the press are maximally tense.
- Feet shoulder-width apart, with emphasis on the toes, leg muscles tense, knees extended.
Stay in that position for as long as you can stand. Don't let it scare you that in the last moments the muscles begin to tremble from overexertion. After completing the exercise, you can rest for a minute and make another attempt. The second approach can be a little more complicated by placing the feet together. In this position, it will be more difficult to maintain balance. You can perform the plank on straight arms daily, or you can only do it on training days - it all depends on your goals.
Are you already able to easily cope with the classic plank and are able to withstand it for several minutes? Then it's time to make the exercise harder.
It helps to strengthen the muscles of the press, the anterior surface of the thigh and buttocks. There are fewer reference points, it is becoming more and more difficult to balance, the muscles of the press and the front surface of the thigh will have to work most intensively.
- From the initial position of the classic plank on the elbows, lift one leg one at a time, holding it for 30 seconds, then repeat the same procedure with the other leg.
- Raise your straight leg just above your shoulders, point your toes inward, towards you.
 You should move on to this exercise after mastering the classic plank.
The principle of the exercise is the same, only the arms will be extended, resting on the palms. Back muscles are connected to intensive work.
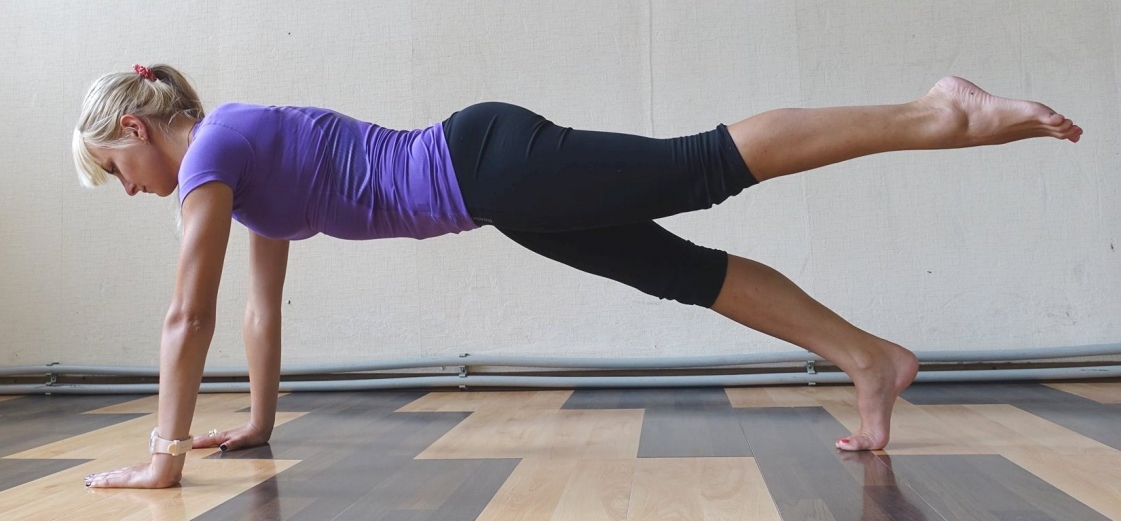 The toe of the raised leg can be directed towards you, or you can stretch it out, the main thing is to keep the balance
You can learn how to properly perform the plank at home in a video from fitness expert Denis Semenikhin.
Video: Classic and Complicated Plank Technique
The option is even more difficult: it is difficult to balance a body that tends to fall sideways. The exercise makes the core muscles work with an increased load, and it is possible to perform it only if you have mastered all the previous options well.
- From the position of the classic plank on your elbows, stretch one arm in front of you and try to hold out for a few seconds, as long as you can stand it. Keep your arm straight, palm inward.
- Then repeat the same steps with the other hand.
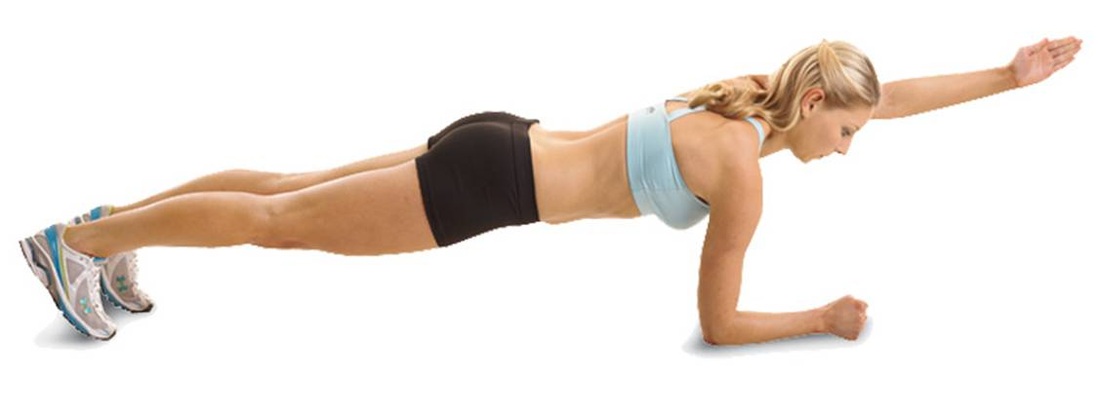 Exercise for advanced athletes
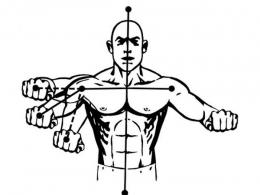
Plank with raised arms and legs
The exercise is not for beginners. There are only two reference points, so it will be extremely difficult to keep the balance. The load on the body increases significantly.
- Take a starting position in a classic plank.
- At the same time, raise your leg just above shoulder level and extend the opposite arm in front of you (for example, the right leg and left arm and vice versa).
This exercise is for:
- to work out the oblique muscles of the abdomen, the broad muscle of the thigh, deltoid, peroneal and gluteal muscles;
- creating a muscular corset around the waist;
- reduction of back pain;
- improve posture and coordination.
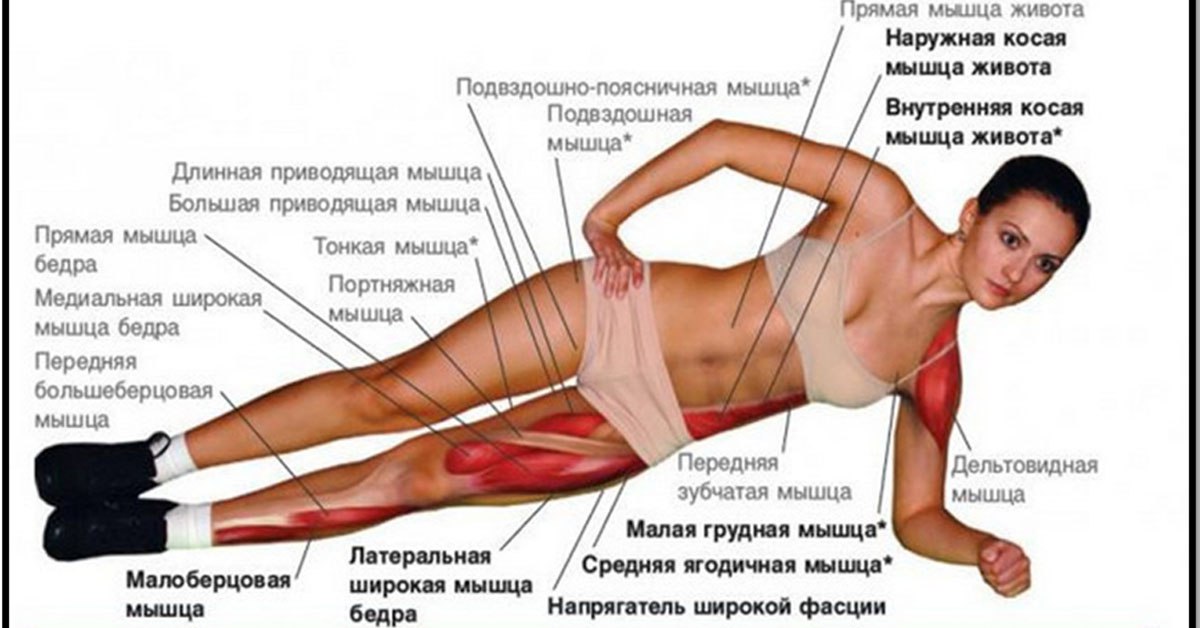 The red color highlights the muscles that bear the greatest load.
- Starting position: lying on your side, lean your hand on your elbow, bring your legs together, one above the other.
- Tighten your abs and buttocks.
- The neck and spine form a single line; do not forget that the chin with the spine should form a right angle.
- Lift your hip off the floor and stretch into a line, with your elbow firmly on the floor.
- Hold this position for as long as possible, at least 30 seconds.
- Then rest for a minute, turn to the other side and repeat the exercise.
Over time, you need to bring the retention of the bar to several minutes. When you have mastered the side plank well, it will be possible to complicate it.
Option one:
- Starting position: side bar with an emphasis on the elbow. The second hand can be put on the belt. Pull the body into a string, tighten the press, pull in the buttocks, the neck is a continuation of the spine, the gaze is directed straight ahead (position B).
- Slowly lower the pelvis down, lightly touching the floor with it, return to the starting position (position A).
- You need to perform 3 sets of 10 repetitions. Breaks between sets - 1 minute.
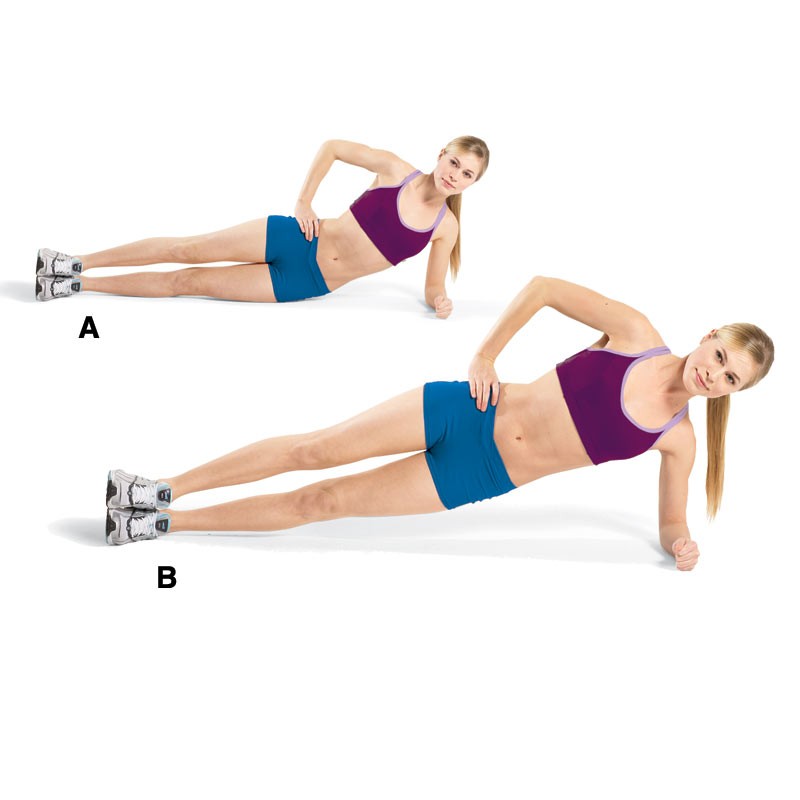 Exercise will help to recover from fat folds on the sides
Option two:
It is for advanced athletes who have mastered the side bar with the failure of the body. The exercise is complicated by the ejection of the leg. All muscle groups are involved here, the internal muscles of the legs and the stabilizing muscles are being intensively worked out.
- Starting position: side bar on an outstretched arm. Take the other hand behind your head.
- Stretch your straight lower leg forward at a right angle to your body and parallel to the floor, hold in this position for a count of ten.
- From this position, lower yourself down, but do not touch the floor with your thigh. Stay in this position for up to 10 counts as well.
- Return to the top position again, raising the pelvis and without removing the outstretched leg, hold for up to 5 counts.
- Lower yourself down, hover with your leg outstretched, counting to five.
- Repeat the same steps above and below, but already counting to four, then to three, and to two.
- In conclusion, you will need to lower the pelvis 10 more times and return to the starting position.
- Then take a rest for 1-2 minutes and repeat the same steps for the other side of the body.
Video: side plank technique with body failure and leg ejection.
Fitball Plank
If you have a fitball in your arsenal, then why not use it to diversify the bar?
Option one
- Starting position: lie on the fitball with your stomach, use your hands to move forward until your legs rest on the ball, while they should not be bent at the knees. With the tips of your toes also rest against the projectile. Place your hands shoulder-width apart and bend at the elbows. You don't have to move them back and forth. The neck is a continuation of the spine: do not throw your head up, look down. Tighten your abdominal muscles as much as possible.
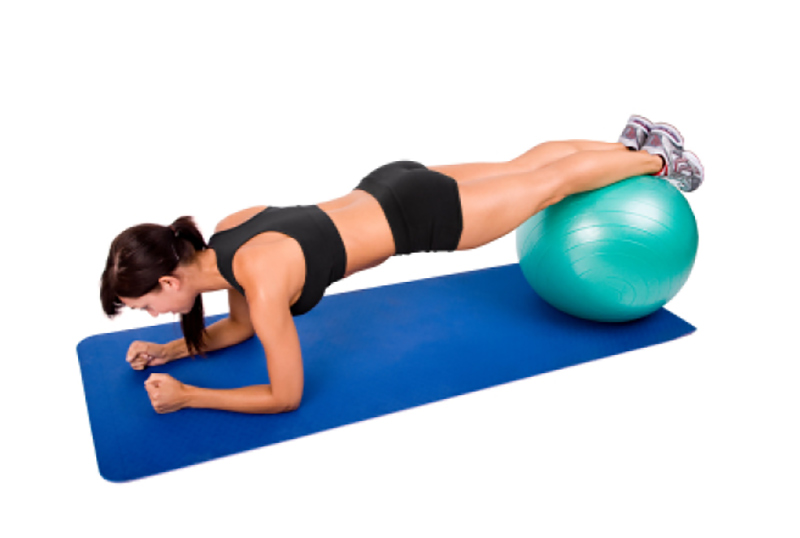 Emphasis on the elbows reduces stress on the joints
- Hold your body in this position for as long as you can. Keep your head, upper back, and buttocks in line. The most difficult thing is to keep the lower back so that it does not bend to the floor. Do not lower your head down and do not lift it up, otherwise problems with the cervical spine cannot be avoided.
- Then rest a bit and do one or two more sets. The break between sets is 1 minute.
When the static bar on the fitball is well mastered, and you can hold it for several minutes, you can complicate the exercise by giving it dynamics.
Option two, it is well suited for stretching:
- Take the starting position, as with a static plank, but do not bend your arms at the elbows, but keep them straight and shoulder-width apart. Focus on the palms, which should be located strictly under the shoulder joints. Only the instep of the foot with emphasis on the toes should be on the ball.
- Exhaling, rest your hands on the floor, pull the fitball to the body, bending your knees. At the same time, the abdominal muscles begin to work with a special load. Return to starting position. Repeat the exercise 8 to 10 times.
- Resting for a minute between sets, repeat the procedure 2 more times. As you master the exercise, the number of approaches can be increased to five.
The exercise is complicated by alternate turns of the body to the side.
Video: technique for performing a dynamic plank on a fitball with knee bending
Experienced athletes are able to hold the bar for up to 10 minutes. So we can recommend a ten-minute complex for daily workouts:
- Classic bar on outstretched arms - 2 minutes.
- Classic bar on the forearms - 2 minutes.
- Plank on the forearms with a raised leg - 1 minute for each leg.
- Rest - 1 minute.
- Side plank on the forearms - 2 minutes.
- Side plank with leg raised - 1 minute for each leg.