Twine crafts: a step-by-step master class for making useful and beautiful products (95 photos). Twine crafts: a step-by-step master class for making useful and beautiful products (95 photos) Jute rope flower step by step
Twine, previously used only at the post office and only for industrial purposes, today, with due perseverance and patience, can become an excellent basis for practical and decorative crafts. This technique is called jute filigree and does not require a large number of elements: just a rope skein, scissors and glue.
Twine art is also distinguished by its simplicity of execution: a master class on twine crafts does not take much time. Below are the best ideas that will be an excellent training for beginner craftsmen, and for more experienced craftsmen - inspiration for new creative ideas.

Vase from any container
A glass, tin can, a bottle, a glass and any other container can easily become an aesthetic vase for flowers or storing small things, if you correctly wrap it with twine and decorate it with decorative elements. It is done like this:
- Prepare the necessary materials and tools: container, rope, glue and scissors.
- Wash the jar, bottle or glass thoroughly, dry it.
- Treat with glue (in whole or in part).
- Carefully, tightly and evenly wind the twine, starting from the bottom towards the neck.
- Cut the thread, preventing it from unraveling, generously smear with glue and discreetly hide.
- Wait for complete drying.
- Decorate the product with painting, appliqué, beads or flowers.
There are even more ideas on the site https://podelkimaster.ru see photos of finished crafts

In a similar way, you can update any home or garden item: a flower pot, jars of cereals, boxes, furniture items. You can not cover the entire surface with twine, but stick strips, leaving gaps.


Small basket
Ideas and methods for making twine crafts do not end with one wrapping: with due diligence, you can make a full-fledged basket or box. To do this, you need to find a plastic container of the required size and shape, scissors, glue, a crochet hook and follow the plan:
- Make cuts at the same distance on top of the plastic container.
- Wind the thread vertically through the notches.
- When finished, cut and glue.
- Wind the twine from below in vertical lines, using a hook if necessary.
- Then the product is turned over and the bottom is fixed with glue.
- Let dry and pull out the container.

Spheres and hemispheres
You can also come up with a purpose for “knitted” spheres, which are unusual containers or decorations. Perfect for beginners, but we make a similar twine craft step by step like this:
- We inflate a balloon.
- Randomly wrap with twine.
- We cut the thread and fix it by passing it under the bottom thread.
- Coat with glue, removing excess with a paper towel.
- Dry for days.
- Blow the balloon and take it out.
- Leave whole or cut off the “neck”.


Souvenir in the form of a turtle
Beautiful novelties of twine crafts are opened by toy souvenirs, for example, a turtle. It is done simply:
- We draw the outline of a turtle or print a suitable template from the Internet.
- In accordance with it, cut out a piece of foam rubber.
- We glue both parts.
- We wrap the paws, head and tail with twine.
- The upper cardboard part is coated with glue, on which a thread is laid in circles, imitating a turtle shell.
- We draw eyes, decorate.

Acorn garland
An excellent decoration will be a garland of acorns made on the basis of twine, containers from kinder surprise, wire and coffee beans.

Instructions on how to make a craft with your own hands are as follows:
- Make the required number of acorns: take a container, glue the wire, coat with glue and tie with a thread, from the bottom up, fix the grains like a hat.
- Connect the acorns in clusters, which in turn are strung on a single wire or twine.
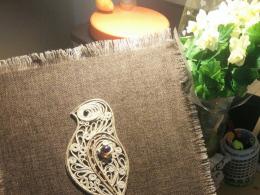
- If desired, complement the composition with “oak leaves”, which are made from pieces of burlap, pasted over with twine at the edges.

openwork flowers
Twine crafts can complement compositions from third-party materials, and openwork flowers are among such decorations. Also, such curlicues, which have an unusual design and light weight, can become the basis for a pendant, earrings, brooches.

Flowers are made according to the following algorithm:

- The threads are cut into strips of even length.
- If necessary, the twine is painted with stain.
- The strips are cut into segments of seven centimeters.
- Each piece is aligned and one end is left twisted.
- Collect the flower as stamens using a wire with beads at the end.

There is another option: twist five circles of the same diameter in a tight spiral, put them on top of each other and fix with glue. With a contrasting thread (white paper twine), draw the edges of each petal and designate the core.


humble wreath
A hoop wrapped with twine or a square frame decorated with lush flowers or other decorations can fit into any interior as an interesting wall composition. The craft is easy to do: the main thing is to wrap the frame tightly, to prevent overlaps or the formation of voids.

The described ideas are easy to implement, having received original accessories, decor and gizmos instead of boring twine that will decorate any interior or become an unusual gift. The filigree technique will not cause difficulties, and the given photos of twine crafts will be a good start in arts and crafts.

Photo of twine crafts


Such a charming vase with a bunch of jute twine can be a great gift for friends and colleagues.
We will need:
- pipe from linoleum;
- titanium glue and glue gun;
- Twine, of course, plain, bleached and stained;
- scissors;
- scotch;
- wire;
- cardboard;
- file (I glue on a transparent folder);
- and all kinds of flowers for flowers: coffee, pistachio shells, tangerine skins and salt dough for stamens.

At one end, I wrap it with cardboard to thicken it and smooth everything with adhesive tape, and on double-sided tape I begin to wrap the future vase with twine.

Here she is already wrapped with twine.

Now we make leaves or grass. We draw a sheet on paper, put it in a folder, squeeze it along the contour with glue and lay out the twine. Two circles with ordinary twine, and then bleached (bleached in Whiteness).

After bleaching, the twine becomes a little thicker and fuzzy, then I scroll it a little between my fingers. Here is one leaf. You need a lot of these, I was tortured to make them, and even their size is large.

And we begin to stick on the Titan to the vase. It is better to glue when the leaf is still wet from the glue, then it will take any shape and it is easy to bend it.

Already finished here. I made a couple of leaves dark. And then I made an edging or a leg, I don’t know how to say it correctly. A strip at the very bottom of the vase.

I just glued the twine into such a strip of the desired length. My folder size turned out to be small, so I had to finish one more piece like this.

And glue it on the bottom, moisten it with plenty of glue to give it even greater hardness.

And let's move on to the flowers. We draw a circle and draw it out in the form of a droplet and lay it out with twine.

And while the glue is not high, i.e. while the flower is still wet, roll it into a bag with a small hole at the bottom.

But I wanted to add colors and since I will have tangerine roses in the bouquet, I decided to make them red. Painted with a water stain Larch. I just poured it into a plate and dipped bleached twine there to make the color richer. Then we just wring it out, you can rinse it in water, otherwise the twine will be a little harsh and dry.

Here I made some more flowers.

Then we measure the twine of the desired length, glue it into two threads. This will be the stem. We put it through the hole at the base of the flower and glue it to the vase, as you like the glue gun better.

Here is one flower closer. First, I painted the tip of the stamens in a dark color, but then I made all of them pale yellow (salt dough).

That's how I did it! It's almost done, it remains to decorate the top to give it a finished look.

I made these small leaves of various shapes.

And she began to glue the vase to the neck.

It turned out like this.

Now the vase is ready! Let's spin.


I made tangerine roses, pistachio flowers and coffee balls. And then I glued everything on the burlap, cut out the squares, loosened the ends and glued the flowers.

Then she wrapped wires of different lengths with twine, wrapped them with ordinary twine and bleached twine, and then twisted it into spirals. I rolled them on a stool.
And then I pasted all the flowers on the glue gun and also decorated them with coffee beans.

Now it remains to insert the bouquet into the vase. Since my vase is tall, I filled it with Styrofoam almost to the top and stuck spirals into it.


That's all, the vase and bouquet are ready! I like it so!!! If desired, you can remove the bouquet and insert a carafe of water into a vase and put fresh flowers in it. But I like that too!

Once again the bouquet is closer.


Well, in order to understand the size of the vase, I invited my Maska for evaluation.

And here is such a pistachio flower. Master class on it.

Here you can see the synthetic winterizer and roses better.

And flowers closer.

Coffee ball.

Spirals.


No matter where I put it.


And again, hello, dear friends. Today I have prepared for you a simple master class on how to make flowers with your own hands. The work is so simple that even a beginner can do it. So let's hold on!
For work, we need the following materials:
- scissors
- sheet file
- ruler
To begin with, we make a circle with a diameter of 3 cm from ordinary twine. To do this, we grease the thread with glue along the length and turn the circle.
The result is this.

Then we make loops from segments of 5 cm and glue on one side of the circle in a circle. For the petals, I used red.

On top we glue another circle of only a smaller diameter.

That's all! The flower is ready. Now it can be used in different flower arrangements or decorate a box with it, for example.

Thanks to everyone who read the article to the end! If you liked my master class, share the article on your social networks! Maybe he will help someone.
Thank you all for your attention! I wish you creative success and a wonderful flower mood!