You can restore vision - exercises and gymnastics. Gymnastics for the eyes. Exercises to restore vision
23-05-2010, 12:04
Description
Eyes... How many of you are really aware of the role that the eyes play in our daily life, and how many know what and how to do in order for your eyes to be healthy? Unfortunately, this question can be answered in the negative. Very few are fully aware that among the impressions perceived by our sense organs from the environment, visual ones are of particular importance, since about three-quarters of the information that enters our brain passes through the eyes. The loss of sight, therefore, for a developed, cultured person is an irreparable loss, not to mention everyday troubles due to this state of affairs.
Eye axioms:
1. Everything that is good for the body is good for the eyes.
2. Body exercises they also have a beneficial effect on the eyes, but the eyes are never enough only with these exercises - they also need their own.
3. Eye exercises have their full effect, that is, they strengthen and develop vision, only if they are performed systematically daily and several times during the day. It takes a lot of time to restore health, including eye health, but who wants to be healthy he finds the time.
4. eye fatigue- one of the expressions of the general fatigue of the body. The eyes, like any other organ, need rest: the very ability of the eyes to work presupposes their rest, and rest for them is relaxation of the psyche, exercise and sleep. The eyes are self-healing and self-healing.
5. At the heart of everything visual impairment there is tension and overstrain of the psyche.
Perfect vision is acquired only by relaxation. Make relaxation, even and joyful mood the style and norm of your life if you want to regain healthy vision.
6. Sunlight and vision of a black field with closed eyes- two powerful levers in the restoration and maintenance of healthy vision.
7. Glasses - an expression of impotence and helplessness of official ophthalmology. They are the key to further deterioration of your vision. So if you want to take off your glasses, then take them off. Remember that the whole difference between crutches and glasses is that crutches can no longer ruin your gait, while glasses ruin your eyesight incessantly and inevitably.
8. Eyes- this is not just an organ of vision and not only a "mirror of the soul", but also a tool with which we can
manage your mood, it is a subtle regulator of the state of mind. Control over your gaze is control over your psyche. Therefore, by controlling your own gaze, you can control not only yourself, but also other people.
9. The beauty of the eyes- this is not a consequence of tinting and casting shadows, but an expression of the spiritual beauty and spiritual wealth of the individual.
Dynamic and static eye exercises
Starting position for all exercises: sit straight or stand straight (Tada-sana), and best of all, take the lotus position (Padmasana); breathe rhythmically with full breath, focus your attention and all thoughts on your eyes, look straight ahead. The muscles of the body and face should be relaxed.
Preliminary exercises:
1. Massage
Carefully, without pressure, massage the skin of the lower eyelids with your middle fingers, after closing your eyes, for 10-20 seconds.
2. Blink
Squeeze and open your eyelids quickly without straining them. Blink for 30-60 seconds. Close your eyes and relax them. Rest for a minute like this. Such a rest should be arranged for the eyes at the slightest appearance of fatigue, interspersed with a long series of exercises. This exercise gives the eyes a good rest, increases blood circulation in them.
Comment. Both of these exercises, if performed before the exercises of other groups, help to focus attention on the eyes, and are also an excellent sedative.
Group of exercises - focusing the gaze
BHUR-MADIA-DRASHTI
(focusing on the point between the eyebrows)
Bring your gaze up and inward, focusing it at a point between the eyebrows. Breathe rhythmically, look into the space between the eyebrows calmly and without compulsion. Don't blink. Do not lift your head up, keep it straight. When tired, return to the starting position and blink several times.
Comment. At first, it will be difficult for you to hold your gaze between the eyebrows for more than a few seconds. In this case, you need to repeat the exercise several times. Gradually work up to a few minutes. Close your eyes, relax them and rest for half a minute. If possible, do the exercise 2 more times.
In addition to the general strengthening effect on the eyes, focusing on the point between the eyebrows, to a much greater extent than other exercises, contributes to the development of mental concentration skills. This is very important for further improvement in yoga.
NASAGRA-DRASHTI
(focusing on the tip of the nose)
1. Bevel eyes down and inward, focusing on the tip of the nose. With good mobility of the eyeballs, the wings of the nose and a strip of skin above the upper lip will be visible. Breathe rhythmically. Look without looking away, without straining your eyes and eyelid muscles, and without blinking. Don't think about anything, just watch carefully. Do not lower your head down, keep it straight. When tired, return to the starting position and blink several times.
Comment. At first, do the exercise for 10-20 seconds. Gradually extend this time until slight tearfulness and pain in the eyes appear. In the future, you will develop the ability to look at the tip of the nose for 365 minutes without any tension. In conclusion, close your eyes, relax them and rest for half a minute. Repeat 2 times.
2. Without turning your head, turn your eyes as far to the left as possible. Stay in this position. Don't blink. When tired, return to the starting position. Repeat 2-3 times.
3. The same, but to the right.
Repeat 2-3 times, then blink several times and rest for half a minute, closing your eyes.
4. Raise your eyes as high as possible, looking up, but not reducing it to a point between the eyebrows. Do not raise your chin, the head does not change position. Look without blinking. When tired, return to the starting position. Repeat 2-3 times.
5. Lower your eyes as low as possible while keeping your head straight. Do not reduce your gaze to one point. Don't blink. When tired, return to the starting position. Repeat 2-3 times, then blink several times and rest for half a minute, closing your eyes.
6. Squint your eyes to the lower left corner (on the left shoulder). Focus on your left shoulder and look at it carefully, without blinking. Do not turn your head to the left. The back is straight. When tired, return to the starting position. Repeat 2-3 times.
7. The same to the right side with a focus on the right shoulder - 2-3 times.
8. Squint your eyes to the upper left corner 2-3 times.
9. Squint your eyes to the upper right corner 2-3 times. Blink a few times and rest for half a minute with your eyes closed.
Comment. Gaze concentration exercises increase the ability of the lens to focus vision at different distances, develop the strength of the eye muscles, and develop the ability to focus. And a few more exercises of this kind.
10. Look at some object directly in front of you and turn your head left and right without taking your eyes off this object.
11. The same, but now instead of turning your head from side to side, raise and lower your chin.
12. Look at some object, describing circles with your chin clockwise and counterclockwise.
13. Blink for half a minute, close your eyes and rest for a minute. Open your eyes. Start describing the horizontal figure eight with your eyes - 7 times.
14. The same, but in the other direction - 7 times.
15. Now describe with your eyes a vertical figure eight - 7 times.
16. The same, but in the other direction - 7 times.
17. Now the same movements (No. 5-9), but with closed eyes.
18. Open your eyes, blink several times and, closing your eyes again, rest for a minute.
Group of exercises - eye rotation in a circle and figure eight
1. Starting position: the gaze is directed forward. Then raise or lower your eyes and describe with them from this starting point 7 circles of maximum radius in a clockwise direction. Movements should be smooth, without jerks. The head is always motionless.
2. The same, but counterclockwise.
3. Repeat exercises 1 and 2 2-3 times, then blink and rest for a few seconds, closing your eyes.
4. Now the same movements (No. 1-3), but with closed eyes. This exercise requires even more concentration.
Comment. Performing these exercises, turn your eyes to the left, right, up and down as far as possible. Remember the constant clarity of the image of objects while moving and stopping the eyes, achieve this clarity not through volitional effort, but by focusing attention. Unlike the previous group of exercises, where the continuity of movement occurs due to successive microcontractions of the eye muscles, when turning the eyes, the gaze quickly moves from one edge of the field of view to the opposite one with a delay of several seconds in each position.
Group of exercises - eye movement to the sides
1. Up-down-7 times.
2. Left - right - 7 times.
3. Straight - up - straight - down - 7 times.
4. Straight - left - straight - right - 7 times.
5. Look diagonally: upper left corner - lower right corner - 7 times.
6. Lower left corner - upper right corner - 7 times.
7. Upper left corner - straight - lower right corner - straight - 7 times.
8. Lower left corner - straight - upper right corner - straight - 7 times.
9. Squint your eyes to the left: up - down - 7 times. At the same time, try to keep your gaze moving on the wall in a straight line perpendicular to the floor.
10. Squint your eyes to the right: up - down -7 times.
11. Raise your eyes: left - right - 7 times.
Try to keep your gaze moving along the ceiling in a straight line perpendicular to your bridge of the nose.
12. Lower your eyes: left - right - 7 times.
At the same time, the gaze moves along the floor in a straight line.
13. Combined movement: upper left corner - lower right corner - lower left corner - upper right
Angle - upper left corner - lower left corner - upper right corner lower right corner - 7 times.
14. Give freedom to your imagination: for example, describe with your eyes half-circles, all kinds of geometric shapes, or simply rotate them in the most random way, while achieving clarity of the image. We remind you once again that the movements do not have to be fast. The main thing is concentration.
15. Blink a few times, close your eyes and rest for a minute.
16. The same exercises (No. 1-13), but now with closed eyes.
Comment. Just do not think that in a closed version you can perform these exercises at any time and in any situation. This will not happen because even with your eyes closed, your eye movements will be visible, and you, being in society, can scare someone from the uninitiated or think something like that about you. So be careful.
Having done all these exercises, you thus fully loaded all six groups of major muscles. This series of exercises and the previous one train and strengthen the muscles of the eyes, increasing your ability to focus accurately. The exercises of these two series are dynamic, they are easier than static ones (the first series), the implementation of which requires a long fixation of the gaze at certain points. After these exercises, you are ready to do the exercises of the next group with maximum benefit.
Group of exercises - changing the focal length
Comment. This group combines the most important exercises - those that strengthen the annular muscle, strengthen the rectus and oblique muscles surrounding the eyeball, and thereby maintain the elasticity of the eyeball and lens. In addition to doing the exercises with both eyes at the same time, do them also separately, with each eye separately, especially the one that focuses, that is, focuses, worse. Have patience, don't expect immediate results, and take pleasure in celebrating every step you manage to take forward.
1. Maximum tension and relaxation of the muscles of the eye.
Comment. It is performed with each eye separately, while the unused eye is covered with a palm in such a way as to avoid pressure on the eyeball. The closed eye remains open.
1) Bring a small object very close to your eye, such as the tip of a ballpoint pen or the eye of a needle, trying to see clearly and clearly all its details.
Hold this position for a while.
The annular muscle of the eye is extremely tense, the lens is in a state of greatest convexity. The oblique muscles are tensed to the maximum, and the eyeball is lengthened to the extent that its own elasticity now allows it.
2) Now your task is to expand, to swing this amplitude of elasticity of the eyeball and lens, on the one hand, and the degree of tension and relaxation of the oblique and annular muscles, on the other. To do this, you need to use the power of contrast: look into the distance for a moment and return to the starting position again. Again look into the distance and again return to the starting position.
3) Now bring the object a little closer to the eye, still holding its clear vision.
4) In conclusion, look into the distance, thereby relaxing the eye muscles.
5) Do the same with the other eye.
The following exercises in this group are modifications of this.
2. The gaze is focused on the finger. Keep your finger in the starting position at a distance of 40-50 cm in a straight line from the face. Now the finger either approaches the eyes, then moves away to the distance of an outstretched hand - 10 times. Achieve such a sharpness of the image of the finger so that the skin pattern is clearly visible on it.
3. Starting position: the same. But now the finger moves left to right -10 times.
4. Now the finger approaches and moves away diagonally from left to right - 10 times.
5. The same, but from right to left - 10 times.
6. Look at the tip of the nose, and then into space. The tip of the nose and the point in space should be approximately in the same direction, so that when the gaze is shifted, the displacement of the eyeballs is minimal. Repeat 10 times.
7. Look at the tip of the nose, then at the tip of the finger. Now the finger is motionless, keep it at a distance of 20-30 cm from the face. The finger and tip of the nose should also be oriented in the same direction as far as possible, for the reason just mentioned above. Repeat the exercise 10 times.
8. Finger - space. The above remarks hereinafter remain in force - 10 times.
9. Nose - finger - space - finger nose - 10 times.
10 Nose - space - finger - space - nose - finger - nose. This exercise is best performed rhythmically - 10 times.
11. Blink a few times, close your eyes and rest for a minute. Such a rest, we repeat, should be given to the eyes at the slightest appearance of fatigue, interspersed with a long series of exercises.
12. When possible, do this exercise: look into the distance, changing focus: 5 m, 10 m, 20 m ... 100 m, 150 m, 200 m, 300 m ... 1 km, 1.5 km, 2 km, and vice versa.
Comment. Do not make any effort and do not strain while looking. There should be ease in performing the exercises. When doing these exercises, do not be afraid to experiment carefully, while maintaining relaxation in seeing at the far and near points. If you look without compulsion, you cannot harm your eyes. If you take a deep breath and then exhale every time you look into the distance, you will be pleasantly surprised by the sharpness of vision returning to you.
Each time you manage to get a glimpse of better vision, it means that the next glimpse will be easier for you and will last longer. Remember always - in the myopic eye there is vision. When you learn to relax the two oblique muscles that keep the eye constantly elongated, the eye will flatten and you will be able to see far as well as near.
As you do exercises #6-10, you will notice a curious phenomenon called the rocking illusion. To you, who know the structure and function of the eye, we think that the cause of this sensation is clear, and therefore we will not take the place of explaining it, but will talk about the significance of this phenomenon.
When the rocking, visual or mental (remember the power of imagination), is successful, the person may experience a feeling of relaxation, which manifests itself as a feeling of general rocking. This sensation is associated with any object that is seen, felt or realized by a person. You can imagine this movement in any part of the body to which your attention is directed. It can be associated with the floor on which you sit in the lotus position, or with any object around you. Swinging can be represented by the building in which or near which you are sitting, and the whole world around you.
When a person becomes aware of this rocking, he loses the memory of the object from which it began. And as long as you are able to maintain a sense of such movement in a direction opposite to the actual movement of the eyes or the movement that you imagine mentally, relaxation will continue. However, if the direction of this movement changes, then tension will appear. It is quite easy to imagine everyone swaying with their eyes closed. Following this, it is possible to do this with open eyes. Later, the feeling of relaxation that accompanies the rocking can be achieved without being aware of this latter, although the rocking effect itself is achieved only when a person thinks about it.
Remember that there is only one reason for failure to achieve the illusion of rocking. This reason is tension. Swinging comes by itself, without any effort, if the movement of the gaze is carried out correctly. Swinging does not create relaxation, but it is evidence of it.
The better your vision is at the moment, the greater the amplitude of these strokes. If in one eye this amplitude is less than in the other, then work with this eye additionally, covering the best eye with your palm in the manner that has already been indicated more than once. Keep in mind that movement and the illusion of swaying are often best achieved by resting the eyes, closing them, and swaying. By this alternation between resting and moving the eye, people with very imperfect vision have sometimes achieved temporary or permanent improvement in vision in as little as a few weeks.
Group of exercises - general strengthening exercises
EXERCISES FOR THE DEVELOPMENT OF OBSERVATION
Comment. These exercises are, strictly speaking, neither dynamic nor static. Again, this is a relaxation exercise. Their action becomes especially valuable after the previous groups of exercises have been completed.
1. Open your eyes very wide and look like this without blinking for a few moments.
Then blink several times - 3 times.
2. The same movement, but now, having relaxed the cheeks and muscles of the neck, also lower the lower jaw. The mouth remains closed - 3 times.
3. Without tension and without blinking, look straight ahead, trying to clearly see everything in your field of vision, that is, not only what is directly in your line of sight, but also to the left, and to the right, and above, and below it .
Or rather, even to say, try to clearly see just everything that is not directly in your line of sight. If tired, blink a few times and close your eyes.
Comment. This exercise should be done often enough, because it develops not only peripheral vision, but also observation, as well as the ability to see in the dark. However, make sure that it does not come at the expense of your ability to centrally fixate.
4. With your eyes closed, massage your eyelids by gently stroking them with your index and middle fingers in the direction from the nose to the outer corners of the eyes.
5. Return to the starting position. With your eyes closed, carefully place the tips of your index, middle, ring and little fingers on your eyeballs and feel the prana pass from your fingers into your eyes as you exhale.
Complete the entire cycle of exercises with glazing.
Comment. We repeat: it is advisable to perform the entire cycle of exercises while sitting in the lotus position. But if you have not yet mastered Padmasana, then do these exercises while sitting in a comfortable position on a chair or in an armchair. They can also be practiced while lying on the floor or in bed.
People often ask, "How long should we do these exercises?" We answer: until right habits of sight become subconscious in you. Then your eyes will be able to cope with their duties by themselves, because they will be in a relaxed state. Let's clarify our point with the help of such an ordinary example: when driving a car, you never think about which foot you should apply the brake with, because at the same moment the brain realizes this need, the brake is already pressed. This happens because we are dealing here with a well-established reflex that controls the foot. The same is true with the eyes. When the eyes, instead of staring at objects, learn to move and blink frequently, when vision begins to be accompanied by deep breathing, you will stop straining your eyes and will not force them to look, but allow them to see. This is the whole secret.
With the correct use of the eyes, vision will continually improve, just as a pianist develops fluency and power in his fingers when, having got rid of tightness in the fingers and stiffness in the back, he devotes some time to the exercise of the game. Make relaxed activities a way of life. Learn to use your eyes in a relaxed manner and you will avoid future vision troubles.
Are you saying that there is too much exercise? Yes, you have to admit it: there are really a lot of exercises, and they take a lot of time, but they are all important. And so we say to those who are dissatisfied once again: "Whoever wants to be healthy finds time!"
Here we give a complete cycle of exercises, but if time does not allow you to complete it in its entirety, then do the exercises at least selectively. Determine the most important for you and do not waste those free minutes that are given out even in the busiest day; do these exercises regularly, conscientiously and thoroughly.
Let's suppose that you have achieved excellent results in improving your vision, but then the day came when it seemed to you that it had deteriorated again. Don't be surprised and don't worry. Keep in mind that in general progress goes like this: improvement, then a temporary break, or even some regression. It is possible that at this time you physically or mentally did not feel well. Or was it just a pause during which nature redistributed the nerve force released as a result of your improvement in vision. Don't forget that straining your eyes depletes up to 90% of your Nerve Force. When this power is restored for later normal use, significant changes for the better occur throughout the human nervous system.
Study regularly, study with a firm belief in success, study with pleasure - and good results will not be slow to affect!
YOGIC EXERCISES FOCUSING THE LOOK ON LIGHT SOURCES FOCUSING THE LOOK ON THE CANDLE FLAME
Article content: classList.toggle()">expand
Most people sooner or later face vision problems. The lifestyle of a modern person negatively affects his health, especially in adulthood.
The most common eye diseases are considered to be fatigue after exercise (reading, working with a computer), myopia, farsightedness, astigmatism and others.
With many such ailments, a special technique developed by Professor Vladimir Georgievich Zhdanov can effectively fight.
The essence of Zhdanov's technique
The main postulate of his methodology is the inseparability of the connection between the spiritual and physical health of a person.
Professor Zhdanov is against wearing glasses because they are harmful to human health and proposes to eliminate vision problems with his own drug-free technique.
V.G. Zhdanov used well-known ophthalmic techniques to improve the vision of ophthalmologists and psychophysiologists Shichko and Bates.
Gymnastics for the eyes according to Zhdanov is only part of a whole philosophy, which includes separate nutrition (with separate consumption of proteins and carbohydrates and restriction of fats), as well as the rejection of negative emotions and bad habits that are harmful to health.
The main postulate of V.G. Zhdanova: "The inseparability of the connection between the spiritual and physical health of a person"
The main goal of Professor Zhdanov is to achieve the restoration and revival of the spiritual world of a person, which will then positively affect the function of all his organs and systems.
And you can master the full set of exercises for restoring vision using the Zhdanov method by reading our article.
Indications for the application of the technique and rules for implementation

Gymnastics for the eyes of Professor Zhdanov is suitable not only for people with visual impairment, but also for those whose work is associated with eye strain. Healing "palming" helps to relax the oculomotor muscles. Regular training allows you to restore the work of the eye muscles, improve cerebral circulation.
This technique is simply necessary for those who wish to restore vision according to the Zhdanov method on their own. without surgical intervention. Patients with common vision problems who exercise regularly report the effectiveness of therapeutic exercises. They refuse glasses and correct the work of the most important organ of the visual system.
The main conditions for the effectiveness of the application of this technique are the systematic and correct execution of each exercise. Only then can you achieve a striking effect from charging.
Exercise rules:
- Exercises must be performed with glasses removed.
- Exercises are done smoothly, without sudden movements.
- Exercises for serious pathologies are limited in the number of repetitions (3-4 times with severe myopia and 1 time after retinal detachment).
During breaks at work, it is also necessary to give your eyes a rest. This can be done with the help of small exercises: just write a few lines and patterns in the air with your eyes:

Restoring vision according to the Zhdanov method contains many exercises, consider the most popular ones.
palming
Palming (from "palm" - palm) - an exercise designed to relax the oculomotor muscles.
Execution sequence:
- Rub your palms until you feel warm.
- Tightly fold the fingers of each hand in the form of a ladle.
- Cross the fingers of the palms at a right angle.
- Cover your face with your palms so that the crossed fingers are located in the center of the forehead, and the nose is located between the little fingers.
The eyes should fall into the center of the dimples of the palms.

special instructions:
- The palms should be tightly pressed together and not have gaps in order to achieve complete darkness.
- Breathing through the nose is calm, eyes are closed.
- The elbows are fixed: either stand on the table or pressed to the chest.
- The head is held straight, being a continuation of the back.
- The emotional state during exercise should be calm, relaxed. It is important to say out loud or mentally the phrases: “My eyes are good, they give me joy, happiness, allowing me to see the beauty of this world. Every day my eyes see better than before.
- It is important to imagine your eyes healthy and vigilant.
- To remove residual visual images, remember how the lights slowly go out in the theater box, and how the hall plunges into complete darkness.
- The most important condition for successful palming- "dipping" into pleasant memories that were in life.
Getting out of palming:

Palming perfectly relieves eye fatigue after exercise
Palming perfectly relieves eye fatigue after exercise (TV, computer, reading). It is enough to devote three to five minutes of your time to it.
standing palming
It is carried out after solarization to relax the eyes and get rid of the sun "bunnies":
- Close your eyes and turn your back to the sun (light bulb, candle).
- Warm your palms by breathing on them, or by rubbing against each other.
- Put your palms on your closed eyes and relax. The legs are shoulder-width apart, the arms are bent at the elbows, the head leans forward.
- After the disappearance of the images before the eyes (“bunnies”), it is necessary to blink several times.
Exercise comments
This exercise is contraindicated after:
- Any surgical interventions on the eyes, before 6 months have passed since the operation;
- Retinal detachments.
Solarization of the eyes with a candle
Full version of the exercise:
- Stand facing the sun with your eyes closed. In this case, the starting position is standard: the legs are located at the level of shoulder width, the arms hang freely.
- The face and chest turn to the right, rolling on the right foot and turning the heel of the left foot up. The sun remains on the left side.
- We turn to the left. The sun is now on the right side. Repeat turns 20-25 times. We repeat the phrase aloud: "The sun is on the right, the sun is on the left ..."
- The eyes are closed. There is a feeling of solar "bunnies", about ten or twelve flashes. It is through the eyelid that the rays of the sun penetrate, which activate the work of the retina.
 Exercise comments:
In cloudy weather, use a candle. In this case, it is necessary to sit down and fix your eyes on a burning candle at a distance of a meter.
Head turns to the right and left in the amount of 15-20 repetitions.
You can replace the candle with a table lamp.
Exercise near - far
The essence of this exercise is to alternately shift your gaze from an object located near to an object located far away.
- Imagine that a butterfly has taken off and is slowly landing on your eyebrows. Follow the imaginary butterfly as it flies back to the ceiling.
- The butterfly flew to the wall, from where it landed on the tip of your nose. Examine it, blink and point it back.
- The butterfly sits on the floor, smoothly flying from there and landing on your upper lip.
This exercise is great for relieving eye strain during office work.
It is necessary to imagine a butterfly sitting on the ceiling. Consider it well.
Exercise comments: During the exercise, the internal longitudinal and transverse eye muscles are trained. The exercise allows the eye to relax, and can be used as an additional.
Charging with alternating eye movements

Note on exercises for the eyes of Professor Zhdanov: with pain in the eyes from an unusual load, you can stop for 2-3 days and then continue the implementation of the complex.
Morning exercises for the eyes according to Zhdanov
To strengthen the oculomotor muscles and improve vision, you need to perform special exercises. The duration of the workout is 10 to 15 minutes. While charging, relax and breathe evenly so that oxygen is evenly distributed throughout the body.
Sequencing:

Do not exert yourself excessively while charging. Calm breathing promotes uniform blood supply and recovery of the body. Morning workout should last no more than 15 minutes.
Gymnastics for farsightedness
In this complex, not only the eye muscles are involved, but also the hands. The main task of training is to activate the oblique muscles of the eyes. During exercise, you will alternately tense and relax your oblique muscles, trying to see the approaching or receding finger.
Exercises for farsightedness with the thumb:

Index finger workout:
- Clenching your right hand into a fist, stick out your index finger;
- Move the right hand to the face so that the outstretched finger is opposite the eyes;
- Look into the distance until the end of the workout;
- Move your finger to the right and left at a fast pace;
- Take your hand 20 cm to the left side, leaving it at eye level. Return the fist to the starting point;
- Take your hand to the right side, come back again;
- Do the exercise for 3 minutes.
Gymnastics according to Zhdanov with astigmatism
This complex relaxes the eye muscles, improves vision with astigmatism. In addition, these eye exercises according to Zhdanov will help prevent mimic wrinkles that occur due to eye fatigue.
 To prevent straining the eye muscles while reading, make sure that the lighting is bright.
If you notice that the letters are blurry, it means that your eyes are tired, and therefore you need to drop all your business and do special gymnastics.
With astigmatism, it is advised to use palming according to Zhdanov, described above. This simple exercise helps to warm up the eyes, relieve eye strain and increase blood circulation.
Myopia affects not only the elderly, but also young people. Constant sitting at the computer, in front of the TV screen, reading in poor lighting - all these factors lead to a decrease in visual acuity.
Someone on this background develops myopia (nearsightedness), someone, on the contrary, farsightedness. Be that as it may, the further progression of the pathology must be nipped in the bud. In this matter, exercises for the eyes will help to restore vision.
What is useful exercise for the eyes with myopia?
Eye exercises to restore vision in myopia are useful in that they:
- improve blood circulation;
- strengthen the muscles of the eyes;
- contribute to the improvement of accommodation;
- reduce visual fatigue.
Eye exercises to restore vision in myopia have a therapeutic effect due to all of the above properties. With the help of regular exercise, the muscles of the visual organs are trained, and this is one of the most important guarantees for increasing visual acuity.
But remember that exercises will give more results when combined with medical therapy prescribed by a doctor.
Eye exercises that improve blood circulation
Below is an effective set of exercises for the eyes with myopia in order to restore vision. Charging, which improves eye circulation, should be done daily, 2-3 sets throughout the day.
All eye exercises should be done in a relaxed but focused state. Do not make sharp jerks, do exercises with myopia gently.
№1
During this exercise, to restore vision, you must quickly move your eyes to the sides in a straight line. Charging is carried out in a sitting position.
№2
The principle of this exercise is identical to the previous one. However, in this case, the eyes must be driven up and down. The tempo remains fast, rhythmic. Repeat until eye fatigue.
№3
Just as quickly rotate your eyes first clockwise and then against it. Charging can be carried out both in a sitting and lying position.
№4
Close your eyes tightly, and then open them wide. Repeat 15 times. Performing this exercise helps to restore vision, and also relieves not only myopia, but also photophobia.
№5
Move your eyes from one corner to another, but do it diagonally. Exercise to exhaustion.
№6
Slowly bring your eyes to the bridge of your nose, then return them to their original position. Perform the exercise 10-15 times.
№7
This exercise is very easy to do. All you have to do is blink your eyes quickly, but avoid squeezing too hard. Carry out exercises until a feeling of fatigue appears in the eyes.
№8
To perform this exercise to restore vision with myopia, you need to stick a bright mark on the window glass, and then move away from it by 1 - 1.5 m. Look closely at the mark, and then look at the object behind it. Repeat several times. It is on this exercise that exercises to improve blood circulation in the eyes can be completed.
Exercises to strengthen the muscles of the eyes and restore vision
Regular exercises for the eyes with the following exercises will help achieve 2 goals at once: strengthen the eye muscles and relieve tension in the organs of vision. As in the previous case, everything must be done without any extra effort. These exercises do not require any special efforts.
№ 1
Open your eyes wide and try to draw an “airy” sign of infinity with them. Do the exercise slowly. Repeat 5-10 times.
№2
Extend your right hand, raise it to eye level and look at your thumb for a few seconds. Fix your gaze on it, and then slowly begin to move your hand to the side. The head should remain straight throughout the entire exercise. Repeat the charge, but in the other direction. Do not strain your eyes! Repeat several times.
№3
For a few seconds, look ahead of you, do not take your eyes off to one side. After that, raise your hand so that the thumb is 30 cm from your eyes. Look at him first, then look away and look into the distance a little. Do the manipulation 10-15 times.
№4
The position is the same. Stare at the tip of your finger for 5 seconds. After that, close your left eye, and continue to look at your finger with your right. Repeat the exercise, but with the other eye. Repeat 5 times. Such charging is excellent for restoring vision with myopia.
№5
For this exercise, take a pencil, then extend your arm in front of you. Move it slowly to the left - to the right, carefully following the pencil with your eyes. Your gaze should be firmly fixed on it. The head should remain straight and motionless.
№6
Stand up straight, put your feet shoulder-width apart. Place your hands on your belt. Slowly move your head to the left and right, looking up as you move the position of the head. Repeat the exercise 10-20 times in each direction.
№7
Open your eyes wide, then squint and lower your eyelids. Do the exercise at least 20 times. Such charging is very useful for the eyes, as it helps to see objects at a distance without squinting.
That's all the exercises for restoring vision in myopia, aimed at relaxing the muscles of the eyes and relieving their fatigue.
Exercises to relax the lens and improve accommodation
 Eye exercises for myopia to restore normal vision are not limited to the previously described charging methods.
There are several effective exercises that will help relax the lens of the eye and improve accommodation. They are described below.
№1
Sit up straight, back straight, head slightly raised. Close your eyes tightly, count to 5, then open your eyes for the same amount of time and look straight ahead. Repeat the charge 10-20 times.
№2
Bend your left arm slightly at the elbow, then raise it and move it slightly to the side. Fingers should be straight.
Without turning your head, try to “touch” your index finger with your gaze. Turn on your peripheral vision, keep your head straight throughout the exercise. Look away, then repeat the exercise, but with the other hand. The minimum number of repetitions is 5 times.
№3
Take a comfortable position, close your eyes. Gently, with your fingertips, massage your eyelids in a circular motion. Continue the exercise for 1-3 minutes.
№4
Stand or sit up straight with your back and head absolutely straight. Stretch your arm forward so that the palm is perpendicular to the midline of your face. Your gaze should be fixed on the tip of your index finger.
Slowly bring your palm closer to your face until the image in front of your eyes begins to double. Just as smoothly and gradually return the palm to its original position. Rest a little, then reload. The number of approaches is from 5 to 9 times per day.
This is the whole complex of exercises for relaxing the lens girdle.
Choose the approaches that are most suitable for you, and practice daily.
Give exercises to restore visual function, at least 15 minutes every 1-2 hours, and the results will not be long in coming.
It is very useful to do a light hydromassage every day twice a day - in the morning and in the evening. The first time you should first wash your eyes with warm, then with cold water. In the evening, on the contrary, it is necessary to first rinse your face with cool, then with warm water. It is important to ensure that the water does not burn the eyes, but simply warms them up.
A few more important tips to follow when doing exercises to normalize visual function when sitting at a computer for a long time, over papers or in front of a TV screen:
- it is necessary to carry out charging daily, breaking away from work on the computer for only 10-15 minutes every 1-3 hours;
- if you can’t do the exercises often, do them at least twice a day;
- all exercises must be done with a maximum range of motion, but without sharp jerks and overstrain of the eye muscles;
- after each approach, you need to sit with your eyes closed for half a minute to give them a rest.
These are the basic requirements and tips for conducting eye gymnastics. It is clear that you will not be able to perform all the previously described techniques in 1 day.
Choose for yourself the most optimal options for exercises, combine them with each other. You should not give preference to only one complex aimed at achieving a specific goal. It is important that classes have several effects at once: they relax the eye muscles, strengthen them, train and normalize blood circulation. Only in this way it will be possible to restore the full functioning of the visual organs.
Contraindications for gymnastics
Doing exercises using the above techniques is not recommended, or it is completely contraindicated in the presence of the following pathologies:
- retinal detachment;
- inflammatory lesions of the visual organs;
- bacterial, fungal, viral etiology of ophthalmic diseases.
Also, do not do gymnastics after undergoing ophthalmic operations. This applies not only to direct surgical intervention, but also to instrumental procedures aimed at restoring visual function. For example, you should not conduct classes on the above techniques after laser vision correction.
The fact is that stimulation of blood circulation can lead to the opening of bleeding or divergence of sutures, if any. The consequences of this can be the most serious, so do not risk your own health - it is better to wait until the rehabilitation period is over.
How to enhance the effect of exercise?
Ocular gymnastics is not the only method of treating myopia. In this matter, the regular “feeding” of the body with vitamins and elements necessary for the normal operation of the visual apparatus is of great importance. Therefore, adopt a few "golden" rules:
- Eat as many eggs, carrots, yellow peppers, avocados as possible. These products contain vitamin A, which is necessary to improve visual acuity and maintain it at a normal level.
- Eat sprouts of wheat, rye, fish, nuts - they are enriched with vitamin B, which is also important for the good functioning of the visual apparatus.
- Do not neglect foods containing a large amount of vitamin C. Citrus fruits, plums, apples, viburnum, blueberries - this is not the whole list of food products that can be consumed to replenish the balance of this substance. If you do not have the opportunity to eat fresh fruits or berries, you can use jams or jams. But only on condition that they were cooked at home.
The combination of eye exercises with proper nutrition is a very good and very effective combination in the fight against myopia. Observe the technique for performing all exercises, remember the precautions, and be careful during the exercise. Be patient, do not quit what you started halfway - success from classes can be achieved only if you persistently and regularly perform the previously discussed gymnastic approaches.
Article publication date: 03/01/2017
Article last updated: 12/18/2018
From this article you will learn: how important gymnastics after a stroke is for restoring lost brain functions, what exercises contribute to the resumption of movements in paralyzed parts of the body.
The recovery process after a stroke can be quite lengthy. Physical exercise is an integral part of an effective rehabilitation program for patients with acute cerebrovascular accident.
Doctors and scientists say that the most active recovery occurs in the first six months after a stroke. Unfortunately, it is impossible to predict the extent to which impaired brain functions will resume in each individual patient. In some cases, nerve cells are damaged temporarily, they can restore functioning after some time. In other patients, the brain manages to reorganize its work, switching lost functions to undamaged parts of it.
According to statistics, when performed correctly, the following results of the restoration of impaired functions are observed:
- In 10% of people who have had a stroke, there is a complete recovery.
- 25% have recovery with minor impairments.
- 40% have moderate to severe dysfunction requiring special care.
- 10% - there is a need for constant extraneous care.
- 15% of patients die shortly after a stroke.
If you refuse to carry out rehabilitation measures, including special sets of exercises after a stroke, these indicators deteriorate significantly.
Rehabilitation must begin during the stay in the hospital, immediately after the patient can perform its activities. After discharge from the hospital, exercises aimed at restoring lost functions are carried out in special rehabilitation centers or at home.
Typically, the training program is made up of rehabilitologists, physiotherapists, physiotherapists or neurologists.
Aerobic exercise
Aerobic exercise forces the body to use oxygen for energy. They are very useful for maintaining the health of all people, including stroke patients.
Aerobic exercise is good for the heart and lungs, helps control body fat, lowers blood pressure, increases stamina, and improves mood.
Even though stroke patients often have difficulty moving their limbs, it is important for them to continue to be physically active, especially at home. Examples of aerobic exercise are:
- walking;
- swimming;
- a ride on the bicycle;
- dancing;
- caring for a garden or vegetable garden.
 Types of aerobic exercise after a stroke
 Every stroke patient should try to maintain aerobic physical activity to the best of their ability.
Gymnastics to improve coordination and balance
These physical therapy exercises help to reduce the risk of falls, restore balance and coordination of movements.
Exercises for coordination and balance:
| Lite version | More difficult option |
|---|---|
| Stand on one leg for 30 seconds and then switch legs. For a more stable position, lean your hand on a table or chair. | Stand on one leg without resting your hand on a table or chair. Gradually increase the exercise time to 2 minutes. |
| Standing on one leg, take the other leg to the side at a 45-degree angle. Hold it in this position for a few seconds. To maintain balance, you can rely on any object. Then slowly lower your leg and repeat this movement 10 times. | Close your eyes while doing this exercise. |
| While lying down, stretch your right elbow to your left knee, and then your left elbow to your right knee. | Do this exercise while lying on an exercise ball to increase your range of motion. |
| In a standing position, place your right foot on the floor directly in front of your left, then your left foot directly in front of your right. Walk like this, maintaining constant contact between the heel of one foot and the toes of the other. | Do this exercise on an uneven surface. |

Gymnastics for the body
Therapeutic exercise after a stroke includes exercises for the trunk, which are necessary to reduce the risk of falls, maintain balance and a stable body position.
| Name | Description |
|---|---|
| Trunk twists | Sit on a chair, place your right hand on the outer surface of your left thigh. Keeping your back straight, use this hand to turn your torso to the left. Repeat the movement in each direction 15 times. |
| Side bends of the body | Sitting in a chair, lower your left shoulder towards your left thigh. Then return to the starting position, focusing on using the muscles of the torso. Repeat this movement to each side 15 times. |
| Torso forward bends | Sitting on a chair, clasp your hands together and straighten them out in front of you. Keeping your arms parallel to the floor, lean forward with your torso. Then straighten up using your back muscles. Repeat this movement 10 times. |
| Leg raise | Lying on the floor, raise your knees to your chest and wrap your arms around them. Holding one leg with your hand, lower the other to the floor. Then lift it back up to your chest, being careful not to use your leg muscles. Focus on contracting the muscles in your torso. Repeat 10 times for both legs. |
 Click on photo to enlarge
 Gymnastics for the legs
Stretching exercises
These exercises help prevent injury, increase range of motion, and improve blood circulation in the muscles. Sitting too long causes numerous health problems.
Gymnastics for stretching the muscles of the legs:
- Stand facing the wall and place your straightened arms on it at chest level. Then bend your elbows, leaning your whole body forward and keeping your feet pressed to the floor. At this time, you need to feel how the muscles of the back of the leg are stretched. Then align your arms at the elbow joints, pushing off the surface of the wall and assuming a vertical position.
- Lie down on your back. Then, using your hand, move your left leg over your right to the other side of your body. Hold it in this position for a while, then return to the starting position. Repeat this movement with the other leg. This gymnastics relieves the stiffness of the muscles of the lower back.
Exercises to Improve Mobility
The purpose of these physical therapy exercises is to improve the mobility of the affected leg in the hip and knee joints. Examples:
- Lie on your back, bend your knees so that the sole of the foot is on the floor. Keeping your legs together, tilt them to one side, then to the other. These movements help relieve stiffness in the joints.
- Lying on your back, pull your left knee to your chest and lightly press it with your hands. Repeat this movement with the right limb. This gymnastics improves mobility in the hip and knee joints.

Exercises to restore muscle strength
To restore the strength of the muscles of the affected leg, the following exercises are useful:
- Walking is the easiest physical activity to do after a stroke. If you are still unable to walk on your own, try using a walker or cane.
- The leg press is an alternative to walking. For this exercise, you need a special simulator in which, thanks to the strength of the muscles of the lower extremities, you lift a certain weight.
 The leg press machine helps restore leg muscle strength after a stroke
 Seated leg exercises
Seated exercise therapy exercises help comfortable recovery after a stroke.
| Name | Description |
|---|---|
| Ankle turns | Sit comfortably in a chair and do 20 ankle rotations to warm up the ankle joint. |
| Hamstring stretch | Remaining in a sitting position, reach your hands to your feet. You need to bend in the hip joints, and not in the back. Hold this position for 20 seconds, then slowly straighten out. |
| Exercise for the inner thigh muscles | Clench your fists and place them between your knees. Then try to bring your hips together. Hold this contraction for 8 seconds. |
| Exercises for the quadriceps femoris | Sitting on a chair, slowly raise your right leg so that it takes a position parallel to the floor. Then slowly lower it down, but do not put your foot on the floor. Repeat this movement 10 times for each leg. |
Gymnastics for hands
Passive hand exercises
Passive exercises are simple movements performed with the help of a healthy hand or an outsider. Early start of their implementation helps to prevent stiffness and spasticity of the muscles.
| Name | Description |
|---|---|
| Shoulder flexion | Lie on your back and join your hands on your chest. Raise the affected limb up to the ceiling with your healthy hand as much as possible. Then slowly lower your hands to your chest. Repeat the lesson several times. |
| Strengthening of the shoulder girdle | Lying on your back with your arms vertically above your body, lift your shoulder blades off the floor. The movement should resemble lifting the chest to touch the ceiling. Hold this position for a few seconds, then slowly lower your shoulder blades to the floor and repeat. |
| Flexion and extension of the elbow | Keeping your arms vertical above your chest, bend them at the elbows, lowering your clasped hands to your forehead. In this case, the shoulder should remain perpendicular to the body. Then slowly raise your arms to the starting position and repeat the exercise. |

Active hand exercises
Active rehabilitation includes functional and strength exercises.
Functional exercises that improve muscle control while helping you regain independence at home:
- Grab the fingers of the affected hand with the handle of the refrigerator or door. Practice closing or opening them.
- Hold the bag in your hand and carry it around the house. As muscle strength improves, increase the weight of the bag.
- Hold the tube of toothpaste in the affected hand and the toothbrush in your good hand. Try to squeeze the paste onto the brush.
- Turn the light on and off with the affected hand.
Therapeutic gymnastics in the form of strength exercises involves the use of dumbbells or other objects. To perform them, a person must be able to hold them in his hands.
| Name | Description |
|---|---|
| Bending the arms at the elbows | Sit on a comfortable chair and take dumbbells in your hands. Then bend your elbows and lift the weight towards your chest. Shoulders should be motionless and placed along the body. Then slowly lower your arms, straightening them at the elbows. |
| Strengthening the muscles of the shoulder girdle | Move your arms away from your body so that your upper arm is parallel to the floor and your forearms are vertical. The hands holding the dumbbells should be palm forward. Raise the dumbbells above your head with your arms fully extended. Then slowly lower them back to the starting position. |
| Abduction of hands | Sit on a chair, lower your arms with dumbbells to the sides of the body. Then, keeping the limbs straight, lift them to the sides to shoulder level. The body position should resemble the letter "T". Hold for 1 second at the top of the lift, then slowly lower your arms back to the starting position. |

Gymnastics to improve hand mobility
Performing such exercises after a stroke at home will help restore fine motor skills and regain control over the hand.
| Name | Description |
|---|---|
| Extension and flexion of the wrist | These muscle stretching exercises can be done passively (using your good arm) or actively. They help prevent stiffness of the affected hand. Place your forearm on the table, palm down, with your hand hanging off the edge. Then move the brush up and down, bending and unbending it. Then repeat these movements with your forearm palm up. |
| Flexion and extension of the thumb | Open your palm, extending all fingers. Then bend your thumb towards your little finger. After that, straighten it to its original position. Repeat this movement several times. |
| Other hand exercises | Count coins. Unclench clothespins. Play board games (checkers, chess). Collect puzzles. Play the piano. |

Scientific studies have shown that rehabilitation exercises after a stroke improve physical and mental health, movement in the affected limbs, balance and endurance. In addition, they strengthen the cardiovascular system, improve the quality of life and improve mood.
On cold days of winter, this problem is especially relevant.
And the causes of voice loss can be: infectious diseases such as laryngitis, tonsillitis. Increased vocal loads when screaming or, for example, during prolonged oratory action, exposure to dust, smoke, cold drinks are factors that affect the vocal apparatus, which consists of vocal cords located deep in the larynx, and from the pharynx, oral and chest cavities.
The strength of the sound coloring of the voice, the characteristic pronunciation of vowels and consonants are the elements that make up a complex system. Most often, voice loss occurs due to a disruption in the functioning of the ligaments; for such disorders, the presence of any congenital or acquired pathologies of the vocal apparatus is not necessary. But the voice sits down, hoarse and a whisper appears, and sometimes it is completely absent due to throat diseases. If you constantly train your throat and ligaments, these problems will not affect you or pass by.
It is useful to perform the following exercise cycle:
Squat on legs bent at the knees, put your heels apart, touch one thumb with the other, keeping the distance between the knees 1-2 fists. Keep your back straight, hands on your knees. Exhale, squeezing all the air out of yourself, straining your neck, throat and arms. The eyes are wide open, as much as possible you should try to reach the chin with your tongue. Maintain this pose for 6-10 seconds. Having taken the initial position, relax. When, after a few breaths and exhalations, the breath evens out, you need to try again to repeat the same exercises, you need to perform 6-10 such approaches every two hours. After two times you will feel relief.
The following set of exercises helped out more than once those whose voice was partially set.
1. Starting position lying. Breathing in, make sure that the stomach breathes. Holding your breath, exhale slowly while pronouncing the letter "C". The exercise is performed for 5 minutes. Then the sounds "Z" and "Sh" are pronounced.
3. Then hum the consonant "m", with the effect of "casting" the tip of the melody up, as when performing a lullaby melody.
4. With your mouth open, pull the consonant "H", control that the sound does not rattle.
Remember, if your voice is broken, first of all you need to be more silent. Any doctor, first of all, will prescribe a voice mode. It is impossible to sing, shout, even whisper through force; when whispering, by the way, the load on the ligaments is the same as when screaming.
Found a mistake in the text? Select it and a few more words, press Ctrl + Enter
Healing with breathing exercises
It is known that the vocal apparatus and breathing are an inextricable union. For the treatment of the vocal cords, breathing exercises according to Strelnikova are ideal. When it is performed, all parts of the body are included in the work, due to which there is a general physiological reaction of the whole organism, including the vocal cords.
You can use a harmonica to blow into it while inhaling and exhaling, without breaking away, the sound should be even. Inhale and exhale start from 20 seconds, increasing to 1 minute.
Another set of exercises has a great effect on restoring the functional ability of the vocal cords:
1. inhale and exhale with the nose, while exhaling we pull the sound I-I 5-6 times;
2. inhale through the nose - exhale through the mouth, while exhaling we pull A-A 5-6 times;
3. inhale through the nose - exhale through the mouth, while exhaling we pull C-C-C 5-6 times;
4. inhale through the nose - exhale through the mouth, while exhaling we pull Sh-Sh-Sh 5-6 times;
5. inhale through the nose - exhale through the mouth, while exhaling we pull F-F-F 5-6 times;
6. inhale through the nose - exhale through the mouth, while exhaling we pull X-X-X 5-6 times. An exercise called "Yawning Lion" perfectly relaxes the muscles of the jaw and relieves tension from the vocal cords. It is performed by throwing the head back, the mouth should be opened as wide as possible, while making a sound resembling a loud yawn. An open throat brings peace and relaxation. Exercises that help stretch the vocal cords and improve existing articulation are effective. The breath should be deep.
Inhale through the nose, exhale through the nose in three sets.
Inhale through the nose, exhale through the mouth. To produce friction between the palms of one another.
Inhalation through the nose, exhalation reminiscent of the action of cooling hot tea with the breath.
Inhale through the nose, exhale with a hiss.
Inhale through the nose, exhale whistling.
Excessive stress on the vocal cords, colds, stress can cause hoarseness or loss of voice. Experts recommend using complete silence to restore the ability to reproduce speech. Also, you should not strain your voice during such a period, attempts to pronounce words even in a whisper also cause no less tension on the vocal cords.
The vocal cords are an important organ of voice formation. This is the main element of the middle part of the pharynx. They are located on both sides of the larynx, stretched from front to back. These are elastic formations consisting of connective muscle tissue. There is a glottis between the vocal cords. As air leaves the lungs, pressure is created to bring the ligaments closer together. There is tension and
The larynx is an organ of the upper respiratory tract located between the pharynx and the trachea. This organ performs a respiratory function and forms a voice. The vocal cords are located in the larynx, they are transversely stretched and there is a gap between them. The voice is formed during the period of vibration of the vocal cords, when air passes through the glottis. The muscular apparatus of the larynx carries out its own.
Nodules on the vocal cords occur due to overload of the vocal cords. These are benign tissue growths, in most cases found in people of voice professions. At first, small seals appear, over time they harden slightly and become like corns. If the loads do not stop, then the nodules continue to increase. Nodules form in
The information on the site is intended for familiarization and does not call for self-treatment, a doctor's consultation is required!
11 ways to quickly restore the voice of an adult and a child
It doesn't take much effort to learn how to break your voice. It is enough to forget about a healthy lifestyle (smoking strong cigarettes, cold beer); experience great excitement; breathe in the cold through the mouth; get sick; tear the vocal cords with a scream (especially if you scream in a whisper). Acting in this way, you can part with the pronunciation of sounds partially or completely. In medicine, this phenomenon is called aphonia.
Reasons for losing voice
The voice disappears after talking in raised tones or long speeches in front of the audience. Singing, screaming, excessive emotionality adversely affect the human speech apparatus. Most often, a broken voice occurs in announcers, singers and speakers after a strong tension of the ligaments.
B Infection of the body with bacteria or viruses.
Aphonia can occur both as a result of a serious illness (syphilis, tuberculosis, scarlet fever), and from a common cold. To lose your voice due to a cold, it is enough to relax under the air conditioner in hot weather or catch bacteria from an infectious carrier.
The result of infectious diseases, often becomes laryngitis - inflammation of the mucous membranes of the larynx. Symptoms of laryngitis: dry cough, perspiration, pain when swallowing, difficulty breathing and fever. If left untreated, the disease can become chronic.
In rare cases, aphonia leads to: cardiovascular diseases, hormonal disruptions, impaired metabolism, stress, allergic reactions, disorders of the nervous system.
How to get your voice back
With the first symptoms of aphonia, you need to stop talking and give your vocal cords a rest. It is recommended to seek help from a doctor who will prescribe a further treatment regimen. It is impossible to take medicines without consulting a doctor, this will aggravate the problem and worsen the general state of health.
Folk methods for voice restoration in adults
Traditional medicine suggests solving this problem with the help of decoctions and infusions that will relieve pain and inflammation in the throat. Such treatment is not always safe, because it can cause allergic reactions.
Remember - self-treatment does not eliminate the need to visit a specialist doctor!
1 Grind turnips from the garden, take two tablespoons and cook for 15 minutes in 250 ml of water. Take 100 ml 4 times a day.
2 Take 3 tablespoons of sage, coltsfoot, eucalyptus, place in a thermos and pour one liter of boiling water. Infuse for 2 hours, then strain and consume a maximum of 30 ml 6 times a day. This infusion is suitable for inhalation.
3 Place one tablespoon of viburnum berries in a thermos, pour a liter of boiling water. Insist 2 hours, strain. Add honey and consume daily before meals, two tablespoons 4 times a day.
Warm mulled wine will also warm up the vocal cords. Mogul-mogul (1 egg) and 25 grams of cognac are suitable for restoring voice in adults. Cognac and eggnog are drunk, alternating: the first sip is cognac, the last is eggnog. After the procedure, you can not talk until the morning even in a whisper, go to bed thoroughly warmed up.
5 Inhalations with the addition of essential oils of cedar, tea tree, orange, lemon will also help to rehabilitate the voice.
Restoration of the voice of the baby
Dangerous consequences are observed when a child of three to four years old loses his voice. Often this happens with a cold. The child anatomically has a narrower glottis than an adult. Therefore, edema develops quickly, which can serve to close the glottis to a critical size and lead to death.
- For the first three days, talk as little as possible, it is advisable to be silent.
- Increase the amount of drinking. Abundant fluid intake should not cause swelling. With symptoms of a cold, alkaline drinks are perfect: mineral water without gas, milk with soda, decoctions, broths, infusions. Sour, too hot drinks should not be given.
- The child should receive warm boiled food, semi-liquid, steamed or stewed. Marinades, spices, salty, spicy dishes are contraindicated.
- The room needs to be ventilated periodically. Get rid of excessive dryness of the air by hanging wet towels or moisturizing the room in other ways.
- It is necessary to use vasoconstrictor drops with such a cold with caution, as they dry out the nasal mucosa, larynx and pharynx. After applying the drops, the child may experience discomfort.
- Perform voice exercises for ten days. After the voice has disappeared, gymnastics should be done lying down, after two days - sitting. Take a deep breath and exhale through your mouth. Then inhale and exhale through pursed lips. Repeat 10 sets three times a day.
The rehabilitation of the voice and the prevention of such problems by pedagogical methods are dealt with by the section of speech therapy - phonopedia. Phonopedic techniques are an effective, minimally invasive method of restoring, correcting or revealing the voice potential of children and adults.
Lessons are selected individually. The program contains breathing and relaxation gymnastics, trainings, the latest computer technologies are used. After classes with a phonopedist, the child acquires the skills of proper voice control.
Voice Rehabilitation Exercises
Special exercises help to restore the vocal cords. If you systematically repeat the restoring complex; doing exercises that strengthen the ligaments and throat can prevent future voice problems. Strelnikova's breathing exercises are great as a therapeutic and prophylactic tool, as they have a beneficial effect on all parts of the body, including the ligaments.
7 You can use a harmonica: blow into it while exhaling and inhaling, gradually increasing the execution time from twenty seconds to one minute. The sound produced must be even.
8 The following exercises perfectly restore the functioning of the ligaments:
- inhale and exhale through the nose, while exhaling stretch I-I-I;
- inhale through the nose. Exhale through your mouth while pronouncing A-A-A;
- inhale and exhale, as in the previous exercise, while exhaling, stretch C-C-C;
- Same. Exhaling, pronounce Sh-Sh-Sh;
- Same. Pull on the exhale F-F-F;
- Same. Stretch while exhaling X-X-X.
Perform each exercise six times.
9 The “Yawning Lion” will help relieve tension from the articulatory apparatus: open your mouth as wide as possible, throwing your head back, yawn, making a characteristic sound.
- Breathe in while lying down. Breathe belly. Hold your breath and exhale slowly while saying "S". Do it within five minutes. Then repeat, but already pronouncing "Z", "Sh".
- Inhale while lying down, linger, exhaling, pull "M" in a low chest voice.
- Sing a lullaby with the "M" sound.
- Pull "H" with your mouth open. The spoken sound should not rattle.
11 These exercises will help stretch the ligaments and improve articulation:
- inhale through the nose in three approaches - exhale through the mouth;
- inhale through your nose, exhale through your mouth, while rubbing your palms;
- inhale through the nose, exhale - as if you need to cool a hot drink;
- inhale through the nose. Exhalation hissing, through the mouth;
- inhale through the nose, exhale whistling.
What is contraindicated in aphonia
- If you have problems with your voice, you should try to speak as little as possible. You can't scream or whisper. When whispering, the load on the vocal cords is not reduced. You should also avoid singing.
- It is forbidden to eat: very hot, cold, spicy; salty foods; lemons; grape.
- Alcohol is not recommended, although alcoholic beverages in reasonable quantities and when used correctly can quickly return the voice at home.
Loss of voice is a serious problem, as speech skill is of great importance in the interaction of people. A healthy lifestyle, respect for the vocal cords, as well as special exercises that support the tone of the muscles of the articulatory apparatus will help prevent trouble. If the voice has disappeared due to a cold, it is not difficult to return it. The main thing is to start treatment on time and strictly adhere to the recommendations of the doctor.
Liked? Share with friends!
Have you read? Show your reaction!
Comments 1
Cancel reply
Thanks for the article, I learned a lot. I love to sing, not yet a professional, but I hope and believe that this is not far off. When my voice disappeared, the pharmacy advised Gomeovoks, this medicine is completely natural, I began to dissolve it and the next day my voice erupted, now I use it as a prophylaxis when there is a big load. Ligaments need to be protected, they say even in a whisper you can’t speak when the voice disappears, so as not to overstrain.
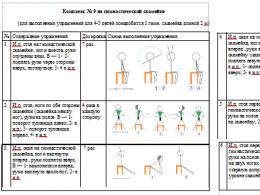
Exercises to restore voice after paresis of the vocal cords
The vocal cords play an important role in the process of verbal communication: the volume of the voice and its height depend on the degree of their closure and tension. With paresis of the vocal cords, their movements are limited, which may cause the voice to sound hoarse, weak, or absent. Problems with the vocal cords are associated with pathological processes that occur in the brain (tumors, strokes, TBI) or directly in the ENT organs. Hoarseness of the voice as a result of paresis of the vocal cords also occurs due to lead poisoning.
In the treatment of this disorder, the leading method is the use of special exercises to restore the voice after paresis. Voice gymnastics for paresis of the vocal cords includes mainly breathing exercises. Such gymnastics with paresis allows you to turn on the compensatory capabilities of the body.
Exercises are recommended for all categories of patients. Even with complete paralysis of the vocal cords, it is possible to restore speech communication by teaching the patient the method of obtaining speech sounds using the esophagus. A phoniatrist or speech therapist can conduct exercises with the patient.
Breathing vocal exercises for paresis of the vocal cords
With paresis, it is necessary to normalize breathing. After solving the initial task, the vocal folds will close due to the compensatory process: the healthy part of the larynx will go beyond the midline and approach the paretic part. In the event that the folds on the affected side will fluctuate at least a little, this will normalize the voice completely or improve it.
The very first breathing exercise that is performed with a patient with paresis resembles playing the harmonica. The patient should slowly, unhurriedly blow, voicing the blowing with a lingering sound of the same height. The duration of the exercise on the first day is 45 seconds. The duration can then be gradually increased to 2 minutes over two weeks. The frequency of daily repetition of exercises is up to 10 times a day at the beginning of work to restore breathing, and up to 15 times in the future.
When the exercise becomes less difficult for the patient, the duration of each of the inhalations and exhalations can be reduced. This exercise allows you to stimulate the muscles of the larynx due to their massage with an air jet, and lengthen the exhalation. Use the following breathing exercises:
- a quick shallow breath through the nose, then a long exhalation through the nose;
- inhale through the nose, exhale through the mouth;
- inhale through the mouth, exhale through the nose;
- inhalation and exhalation with one half of the nose, the second half is closed, then we change;
- inhalation through one half of the nose, the second is closed, and when exhaling, open the previously closed half and close the first.
How does bioacoustic correction work? Read about an effective method of treating neurological pathology.
Do you know who is eligible for Bobath therapy? Basic principles of rehabilitation.
Gymnastics to activate the muscles of the cervical and larynx
In order to strengthen the muscles of the cervical region and larynx, 1-2 weeks after the exercise to normalize breathing, you can start performing physical education complexes. The interval after classes to normalize breathing is observed in order to avoid congestion of the patient, as well as for the most complete mastery of all tasks.
To conduct classes, the patient sits on a chair. The following gymnastic complex is recommended:
- the patient puts his hands clasped together on the back of his head, then tilts his head back;
- the patient tilts his head forward, while his fists rest against the chin;
- the patient puts his hands on his ears and tilts his head to the right and left;
- performing movements with the lower jaw, it can be moved forward, down, left and right;
- clench and unclench your teeth;
- puff out cheeks;
- reach the tongue to the soft palate;
- raise the soft palate, as if yawning.
The exercises are easy to perform, do not cause overload in the patient. This gymnastic complex is recommended to be repeated up to 6 times during the day, each movement is performed 5 times. It is recommended to combine the proposed exercises with exercises in the physiotherapy room aimed at establishing diaphragmatic (deep) breathing. After performing these exercises for 1-2 weeks, you can move on to phoniatric exercises. The vocal apparatus will be more prepared by this moment: the exhalation will lengthen, slight fluctuations may appear in the paretic vocal fold.
Phoniatric gymnastics with paresis of the vocal cords
After the tasks of the previous stages have been solved, phoniatric gymnastics is performed, recommended for paresis of the vocal cords. Such gymnastics begins with the pronunciation of the sound "M". This sound does not require a strong tension of the vocal folds, the air stream is weak. Then you can perform other phoniatric exercises.
Brief pronunciation of this phoneme in a calm position of the larynx. When pronouncing, the air should be directed so that it is repelled from the hard palate. In the course of such work, the sonority and clarity of pronunciation should increase. You can also increase the duration of the sound. After the completion of this task ceases to cause difficulties, they begin to work with syllables.
Work with syllables is built like this: we add all the vowels to the long sound “M”, pronouncing them briefly and lowering the jaw. The syllables MA, ME, WE, MU, MO should turn out. After the exercise has ceased to be difficult for the patient, you can begin to pronounce syllables with other voiced consonants.
Further, the patient trains in pronouncing chains of syllables that are already familiar to him: MA-MA-MA, NA-NO-NU. They also train the pronunciation of chains of vowel sounds, for example, AU, AE, AOI, AUO and others. It should turn out easily, without tension, the voice is sonorous. Vowels must also be pronounced with the sound Y, for example, OY, HER, YU, HEY, AY, YAY. In this case, the vowel is pronounced short, and Y is long.
At the stage of automation, the patient trains in pronouncing words. At first it should be simple words with open syllables. Then the words can be complicated. The voice is considered restored if it sounds loud and sonorous enough and the patient's speech breathing is well organized. The duration of such work can be up to 4 months, it is especially effective when starting classes early.
Find out what activities help patients after a microstroke: rehabilitation and nutrition.
How to help patients with aphasia after a stroke: medication and exercise.
What will help patients recover from a stroke: drugs, exercises, exercise equipment.
Summing up
The recovery of the patient will be faster and more complete with the help of relatives and friends. All exercises require multiple repetitions during the day, which cannot be organized if only a speech therapist or phoniatrist deals with the patient. But even without the advice of specialists it is impossible to do, they will help to draw up a program and direct the help of relatives in the right direction.
you are being treated for paralysis of the left recurrent nerve 17 years have passed since I had this diagnosis. I am 25 years old waiting for an answer
The site has a form for contacting Israeli neurologists.
Breathing exercises for vocalists
Are you an aspiring vocalist, have never been on a big stage, but really, really want to learn how to sing? You need to take the first step - learn how to breathe correctly. We will introduce you to breathing exercises for vocalists. We suggest trying the effect of Alexandra Strelnikova's system. This woman once taught vocals, she personally restored the voice of herself and thousands of her students. Her system is a super-voice assistant for singing.
Why do you need gymnastics for the voice?
Who benefits from vocal exercises?
For advanced singers, it will help to warm up the voice and prepare for long-term stress
Beginning vocalists - will help in the production of breathing.
Strelnikova's gymnastics for vocals
The whole complex consists of 12 exercises. Strelnikova's breathing exercises for vocalists and voice restoration require compliance with the rules:
- Inhale - short and sharp. Like cotton. It is performed with the mouth closed, but the lips should close involuntarily.
- Exhalation - free (occurs as if by itself). Performed through the mouth.
- When inhaling, you can not raise your shoulders, inhale "into the stomach."
- All exercises are performed at the pace of the march. This is about 60 breaths per minute.
Exercises for beginners
If you are just learning Strelnikova's breathing exercises for the vocal cords from scratch, take 8 breaths - rest for a second. Then another 8 - and again rest. So we do 4 approaches. Then move on to the second exercise and the next.
Feeling dizzy? Don't worry, it's normal for beginners. A lot of oxygen has entered the body, and it has not yet got used to it. Take a break until the dizziness goes away and try again.
Gymnastics for voice restoration: exercises
Exercise "Palms". Stand straight, back straight, feet shoulder-width apart. The arms should be bent at the elbows, the elbows should be lowered down, and the open palms should be turned forward. On the inhale, sharply clench your palms into a fist, and on the exhale, slowly open them.
“Hug your shoulders” An exercise that warms up your voice right away. Vocalists preparing to perform: Do this one exercise before going on stage and you will immediately hear the effect. Stand up straight, keep your arms bent in front of you. “hug” yourself by the shoulders, as if throw your hands with force behind the shoulder blades. Inhale (exhale). Repeat 8 times and rest. You can't change hands!
"Head Turns". Stand straight, shoulders relaxed. Turn your head to the right and take a sharp breath, head to the left - inhale. Repeat 8 times and rest.
“Ai-Ai-Ai” - the exercise is called so because we take a sharp breath and shake our head from side to side - to the left shoulder and to the right. Don't lift your shoulders. Take 8 breaths - and a break.
How to learn gymnastics for the vocal cords
Do you want to learn how to sing professionally and breathe correctly? Come join us for vocal lessons. Choose one of the vocal gymnastics programs that is right for you.
Who: adults and children
Duration: 60 minutes
Who: adults and children
Duration: 30 minutes
Who: adults and children
Duration: 60 minutes
Shape Of My Heart.
Student feedback:
Maria is an excellent teacher, capable and ready to reveal the potential of even people who are incredibly far from good hearing. Individual approach to the selection of exercises and techniques. Thank you so much for starting an interesting journey of vocal development)
One of the unpleasant events can be the loss of a natural voice. Doctors do not always give sick leave. And if your work involves negotiating, then it’s a real disaster. How, then, to quickly recover and return to the usual way of life, where there is no place for silence?
Why is the voice missing?
A person has the ability to make sounds by inhaling air through the oral and nasal cavities. This uniqueness is called voice.
Once inside, air masses cause ligaments or vocal folds to create vibrations that are directly involved in sound vibrations. When at least one link in this chain is broken, the voice disappears.
Most often, voice problems occur during the cold seasons, when outbreaks of colds are noted. Voice functions can be impaired by hypothermia or infection. The voice may not disappear completely, but partially, with the ability to whisper. The cause of this disorder may be:
- Development of diseases
- Insufficient air humidity
- Overexertion of the vocal cords
- Severe shock or stress
- Postponed thyroid surgery
- Smoking for many years
- Swelling or burns of the throat
- Foreign body in the throat
- Vocal cord injuries
- Chemical or radiation therapy for cancer
- Food that scratches or irritates the mucous surface of the throat
The first place in popularity is, of course, the common cold. In this case, the ligaments may not be affected by the disease.
Symptoms
- Violation of the tone of voice
- The appearance of hoarseness, hoarseness
- Overpowering dry cough
- Sensation of a "lump" in the throat
Diseases
Damage to the nerves that regulate the tension of the vocal folds can occur. It can be caused by a stroke, brain tumor, traumatic brain injury, swollen lymph nodes, aortic aneurysm or tuberculosis, meningococcal, syphilis infections.
Diagnostics
You should seek medical help if you lose your voice if it has not recovered on its own within three days. You should contact an otolaryngologist. Diagnosis for prescribing a course of treatment will include:
The last two research methods are used to exclude the likelihood of developing a tumor. When it is detected, a biopsy is taken to establish the malignancy of the neoplasm.
The pharynx and pharynx of the patient is examined by an ENT using a special mirror. This manipulation is called pharyngoscopy. The course of treatment is prescribed after the diagnosis is made according to the results of the studies.
There are several tips that will help restore a shrunken or missing voice, if its absence is not caused by serious health problems. Follow these guidelines:
- Be quiet. This will allow your vocal cords to rest. During silence, you can wrap your throat in something warm. If you want to talk, then it is better to do it in a whisper.
- Drink warm drinks. The drink should be hot, but not scalding. Adding honey, ginger, lemon, viburnum to such drinks will bring even more benefits.
- Gargle. After 1-1.5 hours, wash it with herbal decoctions.
- Perform inhalations. You can do them both with the help of a special apparatus - a nebulizer, and over an ordinary pan.
- Calm your nerves. To do this, take a break from problems, do breathing exercises, take up a relaxing hobby.
- Breathe humidified air. Place a humidifier in the room or hang towels soaked in water.
- Eat right. If the ligaments are damaged, it is recommended to fill the diet with protein foods, vegetables and fruits.
Medical
It is not worth buying medicines for the treatment of the vocal cords on your own.
It is better to trust a specialist who, taking into account the cause of the disease, its severity and your contraindications, will make an appointment. When you lose your voice, write out:
- Tablets "Faringosept". Antibacterial agent for the treatment of the oral cavity.
- Lollipops or Septolete syrup. It has antimicrobial, antitussive, analgesic and softening effect.
- Tablets "Homeovoks". An effective remedy for the treatment of various diseases of the throat.
- Spray "Gexoral". It has an antiseptic, analgesic, enveloping and moisturizing effect.
- Spray "Ingalipt". Disinfects and relieves inflammation.
- Spray "Kameton". Combined remedy for the treatment of the oral cavity.
Folk methods of treatment
At home, you can perform many procedures that will greatly facilitate your well-being and help you quickly restore your voice.
Before using any of them, first consult a doctor, as there may be contraindications. Traditional medicine offers:
- Cocktail "Gogol-mogul". To prepare it, you will need 2 chicken yolks, sugar, 2 tbsp. honey, 100 ml of warm milk. Everything is thoroughly whipped. The 2 remaining proteins are whipped separately with sugar and added to the total mixture. Drink warm and best before bed.
- Hot milk with honey and a piece of butter.
- Herbal decoction for rinsing of chamomile, eucalyptus and calendula. Herbs are taken in equal parts (1 tbsp each) and poured with boiling water. After half an hour, strained infusion can be gargled. Apply it in this way every 2 hours, warming up to the optimum temperature.
- Warm compress. At night, put a gauze compress soaked in any warmed vegetable oil on the throat. Wrap a scarf over your neck.
- cabbage compress. Also performed at night. A cabbage leaf is smeared with honey and applied to the throat. From above everything is closed with a scarf.
- Inhalations with essential oils. Add a few drops of orange, cedar or lemon essential oil to a container of boiling water. Tilt your head over the container, cover yourself with a towel and breathe in the resulting steam. The choice of oil is made taking into account personal preferences and the absence of allergies.
Traditional medicine offers a very large number of different recipes for restoring the voice. Among them, you are sure to find something suitable for yourself. If there is no improvement from their implementation, then consult with an ENT.
Useful exercises
In speech therapy there is a large section called phonopedia. It is aimed at the treatment of sound and voice pathologies. A special technique for performing phonopedic exercises allows you to develop vocal cords and return to normal speech.
The program for each patient is developed individually. It takes into account the features of the voice disorder, the existing pathologies of the ligaments and the causes of the voice disorder. Training takes place in stages:
- Pronunciation of closed syllables with a combination of soft sounds.
- Pronunciation of direct syllables with sonorous consonants.
- Breathing exercises.
- Sound exercises similar to musical chanting.
- Psychotherapy.
- Correction of phonation and physiological respiration.
- Training the vocal apparatus with exercises.
- Automation.
The technique for performing some exercises can be found on the Internet, but without the supervision of a specialist, the proper effect of self-study may not work. Therefore, in case of serious disorders, treatment should be under the strict supervision of a speech therapist.
Food
If you lose your voice, the main and mandatory recommendation is to drink plenty of warm water. It can be teas, herbal infusions, fruit drinks, compotes, milk and even alcohol. From strong drinks warmed up, you can drink red wine, cognac or mulled wine with anise. Your daily diet should include:
It is not recommended to use spices and spices at this time or in minimal quantities. Your throat will be easier if the food is ground and eaten in a grated form. The softer it becomes, the less discomfort you will experience.
Preventive measures and prognosis
To avoid or minimize the risk of losing your voice, you should follow some medical recommendations. It is much easier to follow them than to restore the normal operation of your ligaments later:
- Let the ligaments "rest" and adjust the volume during a call.
- Quit smoking.
- Strengthen your immunity and temper.
- Nutrition should be balanced and correct.
- Avoid cold food.
- Avoid stressful situations and do not forget about rest.
The sooner you start the restoration of the ligaments, the faster and more successful the result will be. At the first manifestations of voice loss, take measures to eliminate them at home. If there is no improvement, consult a doctor and do not delay treatment.