Daily exercises to recharge and open the chakras. Exercise "Butterfly": open the chakras and improve energy
Physical exercises to open and recharge the chakras

Chakra 1 (muladhara)
 | |
 | Stand with your legs wide apart, turn your socks outward as far as possible, but so as not to experience discomfort in the knee area. Bend your knees as much as possible. As you train, you should be able to lower your buttocks to knee level. Get down and up a few times. |
Chakra 2 (svadhisthana)

Chakra 3 (manipura)

Chakra 4 (anahata)
|
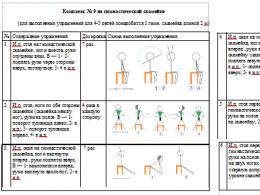
| This is an isometric positional exercise. Get on your hands and knees as shown in the picture. In this position, your elbows should not touch the floor. Hands are used as a support. By changing the angle between the buttocks and thighs, make sure that you begin to feel the tension between the shoulder blades. Men with developed shoulder girdle muscles will first feel tension in their shoulders, so be careful. Feeling the tension, take an isometric pose, bending forward, then arching back. You can push off from the hips and shins. The exercise is designed to open and charge the heart chakra, or will center. |
 | For opening the front of the heart chakra, find a large round object such as a barrel, ottoman, or bioenergetic chair for your back to lean on. With your feet firmly on the floor, lean your back on the support. Relax and let your chest muscles stretch. |

Chakra 5 (vishuddha)
Chakra 6 (Ajna)
Repeat the movements described in exercise for chakra 5, but only with the eyes.

Chakra 7 (sahasrara)
Rub the top of your head with your right hand in a clockwise direction.
To perform this exercise, sit comfortably in a chair or in the lotus position on the floor with a pillow. Straighten your back.
First, after calming down through meditation, focus on your first chakra. Imagine it as a whirlpool of red light rotating clockwise (when looking at your body from the side). The chakra is located directly below you: its funnel is directed downward, and its tip is directed to the lower end of your spinal column. Watching the chakra, inhale its redness, then exhale. Visualize red as you inhale. When exhaling, do not visualize, just see what color your exhalation is. Repeat the exercise until you can see the red light consistently on both inhalation and exhalation. If the red light on the exhale is dimmer or paler than on the inhale, then you need to balance your red energy. If the color is pale, then you need to add red to the auric field; if the color is cloudy and dark, then you need to cleanse your lower chakras. To do this, repeat the exercise until the color on the exhale is the same as on the inhale. This holds power for all chakras.
Having held the picture of the first chakra in front of your inner eye, go to the second, which is located 5 cm above the pubic bone. Visualize two whirlpools: one on the front of the body, the other on the back. See how they rotate clockwise, casting a red-orange light. Breathe in this light. Breathe it out. Repeat the exercise. Before moving on, make sure the color of the exhalation is the same as the color of the inhalation.
Having achieved a stable visualization of the first two chakras, move on to the third, located in the solar plexus area. In this place, you need to visualize two yellow whirlpools. Breathe yellow. Breathe in that color, breathe it out. Repeat the exercise until the color of the exhalation is the same as the color of the inhalation.
Move on to the heart. Take a closer look at the green whirlpools rotating clockwise. Inhale and exhale this color until the colors of exhalation and inhalation are equal. Look down to see all the other chakras (which you have already charged). Watch them rotate before moving on to the throat chakra.
For the throat chakra, inhale and exhale blue light from clockwise swirling whirlpools.
At the third eye chakra, one must visualize clockwise rotating whirlpools on the front and back of the head. The color of the whirlpools is purple. Repeat the above breathing exercises.
Now move on to the crown. This chakra has an opalescent white color. The chakra is located at the top of the head and rotates clockwise. Breathe in the white spit. Breathe it out. Repeat the exercise.
Look at all seven chakras rotating clockwise. Take a closer look at the flow of energy flowing through the main energy channel in the spinal column. This stream pulsates in time with your breath. When you inhale, the pulse wave is directed upwards, and when you exhale, downwards. See how all the chakras connect at their tips to this main stream, how the crown chakra forms the main entrance and exit of the stream, and the root chakra forms the entry gate for the energy entering your energy field. Observe how the energy enters your aura as you inhale. Now your entire field is filled with light energy, and the lower chakras are fully charged with positive energy.

Breathing exercises
Chakra 1 (muladhara)
Chakra 2 (svadhisthana)
 | Pose 2. Lie on the floor and raise yourself up on your elbows. Raise your feet to a height of 30 cm from the floor. Spread your legs and inhale. Exhaling, cross your legs at the level of the knees: the legs should be straight. Repeat the exercise several times, then raise your legs even higher and repeat the same exercise again several times. Do the exercise until then. until your feet are 70 cm from the floor. Then gradually lower your legs, performing the same movements. Relax and repeat the exercise a few more times. |
Chakra 3 (manipura)
Chakra 4 (anahata)
Chakra 5 (vishuddha)
Chakra 6 (Ajna)
Chakra 7 (sahasrara)
  | Sit on the floor with your legs crossed and arms outstretched above your head. Weave all fingers, except for the index fingers, which should be raised up. Inhale as you pull in your navel and say “sat”. Exhale as you say “us” and relax your navel. Breathe in this way at a fast pace for a few minutes. Now inhale and squeeze the energy from the base of the spine to the top of the head, tensing the sphincter muscles first and then the abdominal muscles. Hold your breath. Then slowly, maintaining muscle tension, exhale. Relax. Take a rest. If you do not like the mantra "sat - us", then use another one at your discretion. Repeat the exercise sitting on your heels. Take a rest. Repeat the exercise without reciting the mantra. Instead, breathe vigorously through your nose. |
And these are seven simple relaxation techniques.
("Abroad" 23, 1991)
1. Free breathing.
Headaches subside if you focus on breathing for just a few moments, adjust calm inhalation and exhalation. To do this, you need to perform a small exercise, which can be done sitting, standing or lying down. Place your relaxed hands on your stomach in the navel area and make sure that your hands fall and rise smoothly and slowly in time with your breath. Breathe calmly and evenly, while counting to three. Hold your breath for a moment, and then as you exhale, count to three again. After a new short breath hold, start all over again: calm one-two-three - inhale, hold, one-two-three - exhale, hold. It is not necessary to breathe especially deeply or very slowly. It also doesn't matter if you breathe through your mouth or nose. The main thing is uniformity. You will find the right rhythm yourself. As you inhale, imagine how cool freshness and peace fill you, penetrating into your body along with the air. And when you exhale, imagine that the tension leaves you along with the exhaled air. Within a minute or two, you will feel much calmer.
This exercise can be useful in and of itself. In addition, it gives a wonderful effect in combination with other exercises.
2. Relax the whole body.
This exercise makes sense if the headache could not be eliminated with the help of free breathing. It will take 20 minutes and a quiet place to complete it. Do this exercise at your convenience, in a chair or on a bed. First of all, take 10-15 breaths, as mentioned in exercise 1. Pay attention to the face, raise your eyebrows as high as possible. In this case, there is a feeling of tension on the forehead and around the eyes. Slowly returning to your normal state, you will feel how pleasant it is to relax.
Press firmly on the eyes to feel the tension around them, in the temples and on the bridge of the nose. Lower and enjoy relaxation. Gradually move on, tensing different parts of the body alternately, then slowly relaxing them. Give a wide grin to your mouth, while firmly clenching your teeth. Try to push the lower jaw forward. Slowly raise your shoulders as far as possible. Slowly turn your head to the right, then to the left until you feel the tension in the neck muscles. Raise your arms to shoulder height and spread your fingers wide. Squeeze your hands into fists. Tighten your back muscles, bend. Pull in your belly. Tighten your gluteal muscles. Bring your legs into tension. After each phase of the exercise, relax your muscles, rest for a few seconds. Perform all movements smoothly and slowly.
After completing this exercise, many feel amazing lightness, even a feeling of soaring. Some feel a pleasant heaviness and warmth. And you should always fully enjoy the pleasant relaxation before you rise to your feet.
3. Remove pain.
If you have already mastered the relaxing breathing techniques a bit (Exercise 1), you can apply them at the same time as using your inner vision (Exercise 4). Breathe calmly and measuredly. If you feel relaxed, imagine that with each exhalation, the pain seems to flow out of your head. Some at the same time clearly represent their pain in the form of various pictures. For example, pain appears in the form of a colored ball rising and slowly receding, or in the form of sea waves gradually receding from the shore. Some patients do not see any imaginary pictures, but feel how the pain becomes weaker with each exhalation. All this is in the order of things. After doing this exercise, wait a while and, if the headache persists, repeat the exercise.
4. An imaginary journey to beautiful lands.
Among the spiritual forces that any person can master is inner vision. A person purposefully causes the appearance of pictures created by fantasy before his eyes. Our brain reacts to such "waking dreams" as real events. And if someone very clearly imagines a terrible situation, he will have intermittent breathing, an increased heart rate and increased muscle tension. The opposite phenomena are observed when a person scrolls some kind of "pleasant movie" before his eyes. Take a seat in your imaginary theater, close your eyes, and start with breathing as in exercise 1. Once you feel relaxed, imagine that you are in a very, very pleasant place. Wherever you want - maybe in a flower meadow, on a white sandy beach, on the sea or on the shore of a forest lake. Look around at all the beauty around you, goof off, looking at the clouds floating above, inhaling the fresh air, or take a short walk, enjoying peace. For some people, fantasy works much more intensively, imaginary pictures seem more real if they smell certain smells, for example, the scent of roses or perfume.
After a few minutes, slowly open your eyes, returning to a familiar reality. Slowly rise to your feet so you don't get dizzy.
5. Sounds against pain.
If you find it difficult to work with imaginary pictures, you can support breathing relaxation with your voice. Find a place for this where no one will disturb you. Start breathing calmly with your mouth open and emit whatever sound you can with each exhalation. It can be a deep groan, a clear tone, or a sound you don't recognize at all.
Perhaps it will be laughter or sobs. Don't hinder them. Many people react in a similar way when they relax after a long period of stress.
6. From the eyes, from the head.
For a headache that is localized in the eyes, forehead, or temples, the method of eliminating pain through the eyes can help you. Inhale deeply, hold your breath for a short time, and then slowly and forcefully exhale the air. Open your eyelids wide and with a look, as it were, expel pain and tension from the eyes. After taking three or four breaths in this way, close your eyes, and then repeat the exercise again.
7. What is your pain like?
The ability of a person to see with the inner eye can be used in the following way: you can make yourself a picture of your headache. To do this, close your eyes, breathe calmly and evenly with your stomach, feeling gradual relaxation. Try to imagine your pain. What does she feel like? Does it have a specific shape and color? Perhaps it reminds you of some object you know well? For example, a metal hoop that tightens your forehead? Or is the pain like a sharp needle? Or does it appear in the form of a colored luminous ball, or perhaps in the form of a dull, unpleasant rumble, or something completely different? As soon as you visibly feel the pain, you can start working with it. You can mentally unbend the tight hoop and remove it from your head. The needle can be taken out and packaged so that it does not prick again. To cope with the incessant dull rumble in the head, one must imagine that there is a handle in the body with which the volume of the sound will decrease, and finally, the sound will turn off completely. You can simply discard a multi-colored ball or make it very small.
You may not be able to do this exercise the first time. This is fine. Try again. You can also learn inner vision.
After calming down and relaxing, focus all your attention on the root chakra. Imagine it as a whirlpool of red. While observing the chakra, inhale its red color, visualize it, and then exhale and see what color it turns out to be. Repeat the exercise until you can see the red light consistently on both inhalation and exhalation.
THE FIRST EXERCISE TO ACTIVATE THE ROOT CHAKRA
Take a comfortable position, relax.
Focus your attention on the coccyx. To accurately localize the visualization site, touch the coccyx with your finger.
Now imagine how a bright red ball the size of a fist begins to rotate counterclockwise.
Mentally fill the red color of this ball with the will to live and wisdom, so to speak, breathe into it the blazing bright red fire of life.
After that, try to imagine how you breathe with the root chakra. How to do it? Imagine that with each inhalation, the root chakra increases, and with each exhalation, it decreases. The air seems to pass through the red balloon. Remember that breathing is the absorption of information from our environment. Therefore, inhaling air through the red ball, you absorb information from the environment with the help of it.
Your main task is to “catch the wave”, that is, tune in to your own body in such a way that with each inhalation and exhalation you get the feeling that you are really breathing this particular energy clot of power.
To better tune into the sensations, try varying the “fire breathing” and deep breathing with a full chest.
Remember that by activating this chakra, you completely and completely block any negative energy influences directed against you.
To begin, focus on the Root Chakra Activation Exercise for five minutes. Having trained enough in this exercise, you will be able to clearly feel the root chakra in your body and will already regulate the time you have allocated for the exercise.
While you are working with this chakra, the blood flow in its zone improves significantly, and the body is intensively supplied with oxygen and extracts a huge amount of useful substances from the environment.
SECOND ROOT CHAKRA ACTIVATION EXERCISE
This exercise is similar to the previous one, with the difference that when working with the root chakra, in this case, you are also working with your subconscious mind.
Sit in a comfortable position that will help you relax.
Try to focus your attention on the coccyx by imagining a bright red ball of light spinning counterclockwise. Give the ball the two most important properties of the root chakra - the will to live and wisdom.
Begin inhaling these properties through your entire root chakra, as you notice how the red ball in your coccyx thickens.
Choose the rate and depth of breathing at which the maximum saturation of the chakra with the energy it needs will occur.
After that, similarly to the previous exercise, begin to inhale the information of the environment around you into the chakra at the pace and rhythm that you have chosen for yourself.
What does it look like in practice? Take a slow and extremely deep breath. After that, gradually begin to accelerate the pace of breathing. And at the end of the exercise, go back to slow, unhurried breathing.
EXERCISE "BURNING FIRE"
When doing this exercise, do not forget that the chakra has certain properties and rotates counterclockwise.
As you begin this exercise, focus on the red root chakra.
Use the first or second Muladhara Chakra Activation Exercise as a warm-up, whichever works best for you.
Feel the pulsation in the chakra.
Imagine a bright red fire burning in it. And as you imagine it, its temperature will become more and more.
Pretty soon you will feel warmth or even heat emanating from the chakra.
EXERCISE "KNOW THE EARTH"
Get up as comfortable as possible.
Do you feel your connection to the earth? Imagine that the flow of your breath descends to your feet, imagine your own roots.
What happens with your knees?
Can you say that you stand confidently on the ground, move confidently on its surface?
EXERCISE "MANDALA"
Did you stand in a comfortable, so to speak, “cozy” position? Now stand in the popular position of gymnasts - legs together, arms apart.
Slightly bend your knees.
Move your hips slightly.
Keeping your arms at shoulder height, take a deep, deep breath. Feel the air clear your lungs and spread through your chest. This is really very important. The fact is that behind the chest is the thymus gland, which has extremely important, but still little studied functions. In ancient times, in the East, the thymus gland was called the home of mood.
How do you hold your head? Carefully do the following movements: first tilt your head to the right and left, then forward and slightly back.
"Mandala" is considered a preparatory exercise necessary for seeing how a person knows how to consciously stand on the ground. Listen carefully to your body. Feel the ground under your feet. Discover your place on earth.
In fact, mandalas are images that help us better understand our own essence, our soul. In the exercises of the Ancient East, this is also the position of the body, which contributes to better spiritual concentration.
In the Mandala exercise we find our roots.
Among other things, "Mandala" strengthens our respiratory organs.
EXERCISE "SAVAGE DANCE"
Stand up straight with your legs wide apart and slightly bent at the knees. Interlock your fingertips at chest level, tighten the muscles of your abdomen, pelvis, and thighs. Lower your head slightly so that your chin almost rests on your chest.
Then jump up, stand in the “legs together, arms apart” position just described in the “Mandala” exercise, and then sit down a little and tilt your head back.
Experiment with both positions. As soon as you memorize them thoroughly, start the “dance”. Inhale in the “legs together, arms apart” position and exhale in the starting position.
Thanks to such extremely simple exercises, we discover our roots, learn to be surprised by life and feel our relationship with all the creatures and essences of our earth.
We feel the strength of our distant ancestors. And it's worth it.
EXERCISE "WIND MILL"
Stand up straight. Feet shoulder-width apart, knees slightly bent, arms relaxed along the body.
Start alternately rotating the body from left to right, waving your arms slightly. Try to remain relaxed while doing this (Fig. 1).
Rice. one
Repeat this exercise for one minute.
This is the simplest root chakra exercise used by almost all athletes. It trains the legs, back, arms and shoulder complex well.
Attention! Rotation and rocking of the body should not be too jerky. And slightly bent knees will protect your back from unwanted problems.
EXERCISE "GRASS IN THE WIND"
Stand straight, feet shoulder-width apart, knees slightly bent.
Start alternately raising your arms up, while slightly tilting your body to the left, then to the right. At the same time, slightly bend the knee, first with the left, and then with the right leg.
After that, raise both hands up and in this position lean first to the left, then to the right side (Fig. 2).
Repeat this exercise for one minute.
The Grass in the Wind exercise is ideal for training the legs and lower back. In addition, it has a beneficial effect on the muscles of the legs and arms.
Attention! During the exercise, the legs must be slightly bent at the knees. This way you will protect your back.

Rice. 2
EXERCISE "MOUNTAIN"
Stand up straight. The legs are tightly pressed to each other.
Bring your shoulders together, push your chest forward, lower your arms along the body.
Then raise your arms above your head, palms out. Stretch your whole body with all your strength.
Put your palms together, throw your head back and look up (Fig. 3).
By doing this exercise, you will understand what it means to stand straight. For most people, this will be a strange feeling, because most often we are used to hunching over and "hanging down in a dusty bag."

Rice. 3
Stand straight, feet shoulder width apart. Turn the toes out as much as possible, but without feeling discomfort in the knee area. Bend your knees as much as possible. Squat down and get up a few times.
Happened? Then try to swing your hips a little in a similar position. Move them back and forth as much as possible. Squat and swing your hips. Repeat this exercise three times.
Sit on the floor on your heels. Place your palms on your thighs. Inhale as you lean forward and bend your lower back. Then exhale and lean back. Repeat this exercise several times.
SVADHISTANA (CHAKRA OF SEXUALITY)
Sit as comfortably as possible - in a chair or in a lotus position on the floor, with a pillow. Keep your back straight.
Completely calm down and relax. After that, concentrate on the chakra of sexuality. Imagine two whirlpools: one in front of the body, the other - from the side of the back. See how they rotate, shimmering in a reddish-orange color.
Breathe in this light. Breathe it out. Then repeat the exercise.
REALIZE THE PRIMARY ELEMENT WATER
Stand in front of a mirror and examine yourself from head to toe, keeping your eyes on your hips the longest. See how they look like a crescent moon?
Take a deep breath, directing the flow of breath to the genitals, "fill" the space of your thighs with air.
EXERCISE "SICKLE OF THE MOON"
Lie on your side, trying to keep your body straight without arching. Feel the shape of a straight line. After that, focus all your attention on the hips. Breathe evenly and deeply. You can put your head on a straight outstretched arm or bend it at the elbow.
Raise your top leg slightly.
Feel a pleasant warmth rise to your thighs. There is a rush of blood to the genitals, maintaining their functions in a normal state.
You can do this exercise by slightly lifting both legs up. Take a few deep breaths in this position, and then lower your legs to the ground and relax, then lie on the other side. Repeat the exercise.
In addition, you can try to raise both legs at the same time and extend both arms above your head, then your body will actually imitate the crescent of the moon.
DAILY CHAKRA EXERCISES
Stand straight, feet shoulder width apart. Slightly bending your knees, begin to move your hips back and forth. Repeat this exercise several times.
Try to imagine that you are now inside a hollow cylinder. And it is this cylinder that you need to perfectly polish from the inside. Hips. How?
Put your hands on your hips and begin to rotate them so as to polish the entire surface of an imaginary cylinder.
Sit on the floor with your legs crossed. Grasp your ankles with your hands and take a deep, strong breath. Bend forward, puffing out your chest. Exhale, bend down as low as possible. Repeat this exercise several times while reciting the mantra of the sexuality chakra.
There is another option for breathing exercises to recharge the second chakra.
Lie on the floor on your back and raise yourself slightly on your elbows. Raise your feet to a height of 30 cm from the floor. Slightly spread your legs apart and take a deep breath. Exhaling air, cross your legs at the level of the knees: while doing this, the legs should be completely straight. Repeat the exercise several times.
In principle, it must be done until your legs are at a height of 70 cm from the floor. Then gradually begin to lower your legs, performing the same movements.
Rest, relax, and then repeat the exercise a few more times.
MANIPURA (SOLAR PLEXUS CHAKRA)
Sit as comfortably as possible - in a chair or in a lotus position on the floor, with a pillow. Keep your back straight.
After calming down and relaxing, focus all your attention on the third chakra, located in the solar plexus area. Visualize two whirlpools of yellow light. As you watch the chakra, inhale and exhale yellow light. Repeat the exercise until the color of the exhalation is the same as the color of the inhalation.
REALIZE THE FIRE
It doesn't matter what position you are in now: standing or sitting. Just put your hand or both hands on your stomach. Let one hand be a little lower than the solar plexus, the other a little higher.
Feel the pulsation of the veins of your body, feel your own breathing. Specially take a few deep breaths into the solar plexus area. Feel the fire burning in you?
THANK YOU TO THE SUN AND MOON
Lower your arms along the body and slightly bend your knees. Breathe out.
Straightening your legs, slowly turn your body to the maximum left, while raising your left hand to the side above your shoulder with your palm up, and pressing your right hand to the upper left chest near the heart. In this case, the head should be turned to the left, and the gaze should be directed above the raised hand. Muscle stretch should be maximum. Imagine that in the east, in the sky where you are pointing, the sun is shining. Take a breath.
Hold your breath for a short while and then return to the starting position. Breathe out.
Slowly turn your body to the right, raising your right hand up and pressing your left against the right side of your chest. Point your gaze above your right hand and visualize the full moon. Take a breath.
Hold your breath for a short while and then return to the starting position. Breathe out.
Do the exercise six times on each side. As you return to the starting position for the last time, relax.
Why does this exercise need to be done so many times? The fact is that in the East, sages from time immemorial knew that six and six equals twelve, and twelve is the number of the earthly circle. So they bowed six times to the sun, which warms the created world with life-giving warmth, and six times to the moon, which gives this world the power of growth. The rising and setting sun for them (morning and evening dawn) are presented in a female form, and the daytime and night sun (as the moon was called) - in a male form. Male and female energies coexist in union with each other, forming a sacred marriage.
This exercise is useful not only from a sacred point of view. It stimulates the kidneys and spleen, relieves muscle tension and prevents the deposition of fat in the lumbar region.
EXERCISE "HAND-ARROW", OR "GIVE OFF THE EXCESS"
The Arrow Hand exercise is also called Giving Back. The session is done while standing. The "Arrow Hand" opens the way for us to return excess energy and promotes self-healing of the body. Thanks to the power of our imagination, fresh vital energy rushes into our pores from space (the so-called body breath), and the recycled energy is given into space with the help of an “arrow hand”. All this teaches us to consciously control our forces and give energy to people or animals and plants.
Stand up straight (but with physical weakness and ailments, you can do this exercise while sitting on a chair). Feet shoulder-width apart, sixty percent of the body weight is transferred to the heels. Imagine that you are diving into the ground to a depth of nine meters.
Partially, the weight of the body is transferred to the coccyx: in this way we straighten the lumbar vertebrae. Shoulders are straightened.
The chin is slightly raised, the tongue rests on the upper palate.
Feel the continuity of the line from the sky through the point of the perineum to the earth. You are connected to the sky (yang) and rooted in the earth (yin).
At the very beginning of the exercise, slightly stick out the lower abdomen.
Bend your legs slightly.
Hands become arrows. The index and middle fingers are extended forward. Energy comes out through the pads of the outstretched fingers. The thumb touches the nail of the bent little finger and the bent ring finger.
Raise your arms to shoulder height and release the recycled energy through your index and middle fingers. With blockades of the shoulder joints, this can seem quite painful. Then slightly lower your hands down and focus on the return of energy with the help of the “arrow hand” to the ground.
Maintain this position for as long as possible (ten to forty minutes).
For self-healing, you can aim the “arrow hand” at weakened areas of the body and thereby share the healing energy with yourself.
EXERCISE "RELEASE THE ARROW"
Place your feet slightly wider than your shoulders, turn your body slightly to the right, move your left hand to the side, and bring your right hand closer to the upper chest: so that its palm is approximately at the left elbow. Clench the fingers of the right hand into a half fist, and the fingers of the left hand into a half fist with the thumb raised up. Look at the thumb of the left hand and imagine that the shaft of the bow is in the fist. The right hand lies on the bowstring and pinches the end of the arrow between the fingers. Breathe out.
With all your strength, stretch your right arm across your torso, as if you were pulling the string of a very tight bow. The half-fist of the right hand at the end of the movement should be at the right shoulder joint. Look into the distance through your thumb at an imaginary target. Take a deep breath and hold your breath.
Lower the bowstring, simultaneously opening your fists, but without removing the outstretched finger of your left hand. Take a sharp breath.
Move your right hand to the side, continuing to look through your thumb at the arrow that has been fired. Compare your outstretched arms to a flying arrow. Take a deep breath and hold your breath.
Without changing the position of the hands and looking at the finger, slowly tilt the body to the left: so that the left hand touches the ankle of the left leg. Breathe out.
Hold this position and inhale.
With an effort, start tilting the body to the right, at the same time moving the hands like a windmill so that the right hand is now at the ankle of the right foot, and the left with the outstretched finger is on top. While doing this movement, imagine that you are pulling an arrow out of the ground. Breathe out.
Hold this position and take three breaths and three breaths. Imagine at the same time how the torn arrow is sent back to heaven. On the third exhalation, slowly return to the starting position, but in the other direction.
Stretch the bowstring with your left hand. Take a deep breath and hold your breath.
Release the string. Take a sharp breath.
Take your left hand to the side: so that both hands are on the same straight line. Take a deep breath and hold your breath.
Tilt your body to the right, dragging your hands behind it. The trunk should not bend forward. Breathe out.
Hold this position and inhale.
Tilt your body to the left, moving your hands like a windmill. Breathe out.
Hold this position and take three inhalations and three exhalations, returning to the starting position on the last exhalation.
Repeat the exercise three times on each side. After straightening the body for the last time, take the starting position.
EXERCISE "Swordsman"
Place your feet shoulder-width apart. Lower your arms along the body and tighten your back muscles. Breathe out.
Slowly raise your arms to the sides up, stretching the body. In the upper position, cross your wrists. For women, the left wrist should lie on the right, and for men - vice versa. Take a breath.
Bend sharply so that your hands split the air vertically and stop low between your legs. Imagine that you are cutting a gap or a gap between the worlds with this movement. Breathe out.
Bypassing the starting position, raise your arms to the sides up while straightening the body, and strike down again with crossed wrists. Breathe in and out.
Now make nine secant blows. After the ninth beat, stand up straight (inhale) and take the starting position of the exercise (exhale).
This exercise has a positive effect on the functioning of the stomach, intestines, kidneys and lungs, and also perfectly strengthens the muscles of the back, legs and pelvis.
EXERCISE "PRAYING TO THE GODS"
Kneeling, without resting on your toes, stretch your arms forward with palms up. Breathe out.
Extend your arms out to the sides, palms forward. The fingers should be slightly spread out. Take a breath.
Rotate your body to the left. Breathe out.
Straighten up again. Take a breath.
Lean forward, lowering your pelvis on your heels and almost touching your knees with your head. At the same time as the bend, bend your arms at a right angle and place your elbows on the ground so that they are in line with your knees and in contact with them. The palms should be pointing down and lying on the ground. The fingers are closed. Breathe out.
Extend your torso as you kneel and extend your straightened arms in front of you. Hold your breath.
Spread your fingers and swing your arms out to the sides. Take a breath.
Rotate your body to the right. Breathe out.
Straighten up again. Take a breath.
Lean forward on your heels with your head down. Breathe out.
Repeat the exercise six times on each side. At the end, straighten your body, remaining seated on your heels. Take a breath. Then go to the starting position.
From a physiological point of view, this exercise develops the flexibility of the spine, improves the functioning of the heart, lungs, stomach and liver, and also relieves nervous tension.
DAILY CHAKRA EXERCISES
You will need an assistant to complete this exercise. Hold hands tight. One person should support the second, and the second himself at this time should jump as high as possible. While jumping, try to bring your knees to your chest. Jump for several minutes without a break. Then take a break and relax. It is important that during this little rest you do not hunch your back. After a short break, your partner will jump, and you will support him.
Sit on the floor with your legs crossed. Grasp your shoulders with your fingers so that with your thumbs, as it were, hold the shoulder from the back. Inhale and turn your whole body to the left. Then exhale and turn your whole body to the right. Breathe deeply and slowly. Be sure to keep your back straight while doing this. Repeat this exercise several times. Rest for a minute, relax. And then repeat this exercise again, but already on your knees.
There is another option for breathing exercises to recharge the solar plexus chakra.
Lie down on the floor. Pressing your legs firmly against each other, lift your heels twenty centimeters above the floor. After that, lift your head and shoulders off the floor, also holding them at a height of about twenty centimeters. Look at your toes. Stretch your arms out in front of you, pointing at them. In this position, try to breathe slowly but vigorously through your nose for thirty seconds. Relax. Rest for thirty seconds. And repeat this exercise several times.
ANAHATA (HEART CHAKRA)
Sit as comfortably as possible - in a chair or in a lotus position on the floor, with a pillow. Keep your back straight.
After calming down and relaxing, focus all your attention on the heart chakra. Take a closer look at the rotating green whirlpools. Inhale and exhale this light until the color shades of the inhalation and exhalation are equal.
RECOGNIZE THE AIR
Quite often they say: "In all honesty." That's what you're going to do - put your hand on your heart right now.
Feel your heart beating at your fingertips.
When the hand lies in the region of the heart, it always calms: breathing returns to normal, and we feel somehow more reliable. And this gesture is also a gesture of cordial invitation and good wishes.
EXERCISE "POWER OF THE WHITE TIGER"
Get on all fours. Keep your back straight.
Raise your leg as high as possible, bend it at the knee and take a few deep breaths. Lower your leg and rest a little in the starting position.
Then lift the other leg. This exercise strengthens the spine and back muscles and makes the body more flexible.
EXERCISE "LOOKING AT THE SKY DOG"
Lie on your stomach, feel the ground with your whole body, start the flow of your breath to the abdomen and listen to the rhythm of your breath. Do you hear how your heart beats?
Raise yourself on your hands, resting your toes on the ground, lift your body so high that only your hands and toes communicate with the ground.
Lift your head up and look up at the sky.
Try to stay in this position for as long as possible.
This exercise strengthens the spine, as well as the muscles of the abdomen and thighs, stabilizes breathing and strengthens the cardiovascular system.
EXERCISE "REVIEW THE HEART"
Slowly raise your arms and place your palms together at chest level. Your fingers should look up.
Sit down slightly and from this position, slightly move your hands clasped together to the left. Simultaneously with this movement, move your hips slightly in the opposite direction, that is, to the right. Eyes look at one point, straight ahead. Then repeat the movement so that the folded hands move to the right. Repeat the exercise eight times for each side.
Avoid abrupt, hasty movements: on the contrary, all your movements should be slow and smooth.
As it was already clear from the name of this exercise - "Revitalize the Heart" - it has a beneficial effect on the functioning of the cardiovascular system.
In addition, thanks to this exercise, blockades are removed from the area around the fifth thoracic vertebra. During and after the exercise, a pleasant warmth rushes to this area of the body. It diverges throughout the chest and back, rushes to the face. All this is a sign that energy has been re-opened to the previously blocked vertebra.
DAILY CHAKRA EXERCISES
This is a kind of positional exercise. Get on all fours. Try to keep your elbows off the floor. Hands in this case serve as a support. Tighten your shoulder blades. Feeling the tension, bend forward, and then bend back. At the same time, you can push off from the hips and shins.
This exercise ideally charges the heart chakra with positive energy.
There is another exercise for charging the heart chakra. Find a large round object, such as an ottoman, for your back to lean on. Firmly resting your feet on the floor, lean your back on the support. Relax and let your chest muscles stretch.
Sit on the floor with your legs crossed. Rest your fingers on the heart area, elbows wide apart. After that, start moving your elbows in such a way as if you were sawing firewood. Pull your arms up to your chest. Breathe slowly and deeply while doing this. Repeat the exercise several times. After that, rest, relax for one minute. And repeat this exercise, already sitting on your heels.
This exercise is ideal for boosting your energy levels.
VISHUDHA (THROAT CHAKRA)
Sit as comfortably as possible - in a chair or in a lotus position on the floor, with a pillow. Keep your back straight.
After calming down and relaxing, focus all your attention on the throat chakra. Visualize whirlpools of blue light. Inhale and exhale the blue color of the swirling whirlpools.
REALIZE
Think about the first thought that comes to your mind. And pay attention to how the neck reacts to the process of your reflections.
Lie down on the ground and breathe in through your nose. Keep track of what happens to you.
Stand up and inhale through your nose. Again, watch what happens to you.
Then tilt your head back slightly and focus all your attention on your throat. Breathe in through your nose.
Carefully place your finger on the Adam's apple and now try to inhale and exhale with your mouth - as if exhaling the sound "Ha" at the same time.
This type of breathing in the East is called "the breath of the winner." It has a calming effect on the human nervous system.
EXERCISE "WHEEL"
Slightly bend your knees and lower your arms along the body. Breathe out.
Tilt your body to the left and begin a smooth, but with maximum amplitude and strength, a circular synchronous movement of your hands along the course of the Sun to the left-up. Take a breath.
Tilt your body to the right and continue to move your hands in the direction of the Sun to the right and down. Breathe out.
Make nine circular movements in the course of the Sun, following your breath and imagining that you are starting a huge wheel that sets the galaxies, solar systems and planets in motion.
Stopping in the “hands down” position, make nine circular movements with your hands against the course of the Sun. Movement to the right up with the body tilted to the right corresponds to inhalation, and movement to the left down with the body tilted to the left corresponds to exhalation. When performing the exercise, make sure that in the lumbar region the body bends only to the left or right.
After doing 18 circles, take a break.
This exercise has a tonic effect and strengthens the muscles of the lower back, legs and shoulders.
EXERCISE "WE DISSOLVE THE CLOUDS"
Lower your hands down, crossing your wrists at a point just below the navel, palms inward. In women, the left hand covers the right, in men it is vice versa. Bend your knees and look straight ahead. Breathe out.
Straightening your knees, raise your crossed arms in front of you with a wide swing. In the highest position, as it were, plunge the brushes into the middle of the clouds, turning the palms first up and then to the sides. Take a breath.
With force spread your arms and lower them through the sides down, returning to the starting position. Breathe out. When performing the exercise, you need to make sure that the hands make a circular motion with the center in the shoulder joint.
Repeat the exercise nine times. Returning to the starting position for the last time, take the pose of the beginning of the exercise.
This exercise is based on rotational movements of the head and neck. Start moving your head in different directions. Move your head forward several times, up and down, then from side to side, up and to the left, down and to the right. Repeat this exercise in reverse order. Now make rotational movements of the head several times in opposite directions. The throat chakra responds well, so to speak, "responds" to sounds. Therefore, sing! Well, if you don't want to, make any other sounds.
Sit on the floor with your legs crossed. Straighten your arms at the elbows and squeeze your knees. Gradually begin to lean forward and then back. When moving forward, inhale air into the lungs, when moving backward, exhale. Repeat the exercise several times, then give yourself the opportunity to rest.
Now bend your back while simultaneously lifting your shoulders as you inhale and lower them as you exhale. Repeat these movements several times. Then take a deep breath, lift your shoulders and freeze for a while in this position. Breathe out and relax.
Then try to repeat the whole complex of exercises, but already sitting on your heels.
AJNA ("THIRD EYE")
Sit as comfortably as possible - in a chair or in a lotus position on the floor, with a pillow. Keep your back straight.
After calming down and relaxing, focus all your attention on the “Third Eye” chakra. You will have to imagine rotating swirls on the front and back of the head. The whirlpool light of the "Third Eye" chakra will have a purple hue. Inhale and exhale this color until the shades of exhalation and inhalation are equal.
REALIZE
How often do we, without noticing it, stroke ourselves on the forehead, as if we want to frighten away unpleasant thoughts, or to concentrate or relax.
Do this at least once quite consciously: gently stroke your forehead with your fingertips. Did you feel the wrinkle that was drawn on your face by care? Try to smooth it out.
And then, inhaling, draw the tip of the finger of your right hand along the point between the eyebrows, rise to the hair and, exhaling, remove your hand from the head. Then change your hand from right to left, also touching your forehead. Do this with each hand several times, and be sure to put the “resting” hand during this process on some other chakra.
Breathe slowly and evenly. Hand movements on the forehead should be soft and careful.
EXERCISE "HIPPO"
Lie on your back and wave your legs in the air.
Then wrap your hands around your feet and pull your legs towards you. Breathe deeply, practicing the so-called "winner's breath" during the exercise.
Exercise "Hippo" is both relaxing and exciting, activating the flow of energy throughout the spinal column. The flow of digestion is also stimulated.
EXERCISE "SHELL ON THE GROUND"
Imagine a large, beautiful sink with closed doors.
Breathe evenly and calmly during this visualization.
Sit on the ground with your legs wide apart, make yourself comfortable.
Now imagine how the force of gravity pulls and pulls you down. Stretch your arms forward, and tilt your head to the ground, and then lower it face down to the ground. And in this position, try to relax.
Slowly return to the starting position and lie on your back, pull your legs up to your stomach, hug them and sway a little from side to side.
The "Shell on the Ground" exercise has a relaxing effect, improves breathing, gives the body flexibility, helps to normalize metabolism and has a warming effect on the stomach and thighs.
EXERCISE "BIRD OF THE SUN"
Lie on your stomach. Put your hands under your head. Feel the ground on which you lie. Breathe evenly and deeply.
Raise your legs slightly and cross them, first putting your right foot on top of your left, and then vice versa.
Exercise "Bird of the Sun" harmonizes all the rhythms of the body, calms and relaxes the nervous system.
EXERCISE "PHOENIX SPREADS WINGS"
Stand straight, feet shoulder width apart. Let your arms hang loosely along your body.
Raise your arms to chest height, as if you are squeezing an imaginary ball in your hands. The right hand should be at the top (that is, her palm looks down), and the left hand should be at the bottom (her palm looks up). Shift your body weight onto your right foot, and step back a little with your left - in other words, stand in the pose of an archer. Slowly raise your left hand to eye level so that you can see your left hand. The right hand slides smoothly along the body.
Carefully look into your left palm, as if warming it with your eyes, and then turn your hand so that the palm “looks”, no longer at you, but outward. Now turn your head to the right and look just as carefully into your right palm, gathering your fingers into a cup. Shift your body weight onto your right leg. Hands again squeeze an imaginary ball. The right hand is at the top, the left is at the bottom.
Do this exercise eight times.
EXERCISE "CONSOLIDATION OF THE FOUR ELEMENTS"
Stand up straight and clench your teeth. Fold your arms down behind your back like wings, connecting them with your hands, palms back. For women, the left back of the hand should cover the right palm, and for men, vice versa. Exhale completely through your nose.
Tilt your head to your left shoulder and turn your eyes to the left. Take a breath.
Tilt your head to your right shoulder and turn your eyes to the right. Breathe out.
Tilt your head back and lift your eyes up. Take a breath.
Tilt your head forward and look down. Breathe out.
Repeat the exercise nine times.
Now make nine circular movements with your head in the direction of the Sun. Breathing may be voluntary.
Now perform nine circular movements with your head against the course of the Sun. Breathing also remains arbitrary.
This exercise strengthens the muscles of the eyes, helps restore vision, improves blood circulation in the vessels of the head and neck, relieves nervous stress.
DAILY CHAKRA CHARGING EXERCISE
This exercise is essentially very similar to the exercise for charging the throat chakra. The only difference is that this time you will have to rotate with your eyes. Start moving your eyes in different directions. Move your eyes forward several times, up and down, then from side to side, up and to the left, down and to the right. Then repeat this exercise in reverse order.
Sit on the floor with your legs crossed and wrap your fingers around your throat. Take a breath and hold your breath. At the same time, strain your stomach, trying to squeeze the energy up, like squeezing toothpaste from a tube. Raise your arms above your head, locking your fingers together, and release the energy through the crown of your head. Repeat this exercise again. Then rest, relax.
Repeat the whole set of exercises again, but already sitting on your heels.
SAHASRARA (PARIETAL OR CROWN CHAKRA)
Sit as comfortably as possible - in a chair or in a lotus position on the floor, with a pillow. Keep your back straight.
After calming down and relaxing, focus all your attention on the crown, or crown, chakra. Inhale and exhale its white light. Repeat the exercise. Observe how the energy enters your aura as you inhale.
REALIZE
Sit up straight or stand up, paying attention to how you hold your head. Gently tousle your hair, feel the skin on your head, gently tap on the skull.
Pay special attention to your own feelings during sunrise and sunset. Live these moments consciously.
EXERCISE "RAVEN"
Raise your arms to chest height, as if you were holding an imaginary ball at chest level. The right hand is on top (that is, her palm looks down), and the left hand is on the bottom (her palm looks up).
Shift your weight onto your left leg first. And, making a rotational movement of the waist, swap the hands so that the left hand is at the top, looking palm down. Now the right hand is squeezing the imaginary ball from below, and the right palm is looking up. The gaze is focused on the left shoulder (this is a very good point for concentration, especially when you imagine that you are looking at the shoulder seam of your shirt or sweater).
Now shift your weight onto your right leg. At the same time, you continue to stand in the same place, without moving anywhere. Hands change position, as if describing a figure eight at chest level.
The fingers during the “eights” movements should be slightly apart, and the arms should be slightly bent at the elbows.
In no case, making circular movements with your arms and body, do not jerk your head sharply. The movements of the neck should be smooth: smoothly look from the left shoulder to the right, and vice versa.
EXERCISE "SWIMMING FROG"
Stand up straight with your legs touching each other. The arms should hang loosely along the body. Throw your head back a little and smile.
Raise your arms to chest height with your palms facing down. Between the hands of both hands there should be a distance about the width of the palm of an adult.
Squat down slightly, transfer your body weight to your heels, slightly lift your toes, and with your hands make such a movement as if you are swimming in the water like a frog. Then the hands must be returned to their original position, and the body weight should be distributed over the entire foot.
Repeat these movements eight times, and then begin to perform this exercise in the opposite direction. You ask: how?
When the direction changes, the only difference will be that you will have to swim "like a frog" in the other direction. Sit down, and "rake" your hands behind your back.
DAILY CHAKRA EXERCISES
This exercise for charging the crown chakra is surprisingly simple.
Just rub the top of your head with your right hand in a clockwise direction. Take a breath and hold your breath. After that, rub the top of the head with your left hand counterclockwise and exhale.
Sit on the floor with your legs crossed and arms outstretched above your head. Weave together all the fingers, except for the index. Index fingers should be raised up.
Inhale while pulling in your belly at the navel and say: "SAT". Then exhale and say: "NAM", then relax the stomach. Breathe in this way for a few minutes, and the pace of breathing should be fast.
After that, inhale and begin to squeeze energy from the base of the spine to the crown, while tensing the abdominal muscles. Hold your breath. Then slowly, maintaining muscle tension, exhale. Relax. Take a rest. If you do not like the Sat-Nam mantra, you can use another one of your choice.
Repeat the exercise, but already sitting on your heels. Rest and relax again.
Then repeat the exercise without reciting the mantra. Instead, breathe vigorously through your nose.
SELF TREATMENT
Positions for self-treatment are the same as those described above, everyone chooses a convenient arrangement of hands for himself. Depending on the part of the body that you want to give Reiki to, try as much as possible to assume the most comfortable position for you (sitting or lying down).
It is very pleasant to lie in bed before going to sleep to put your hands in your “favorite” position and give yourself Reiki. In most cases, this leads to deep and relaxing sleep.
Reiki group session
It is always amazing for me to see the effect of Reiki on the recipient in group sessions. It is a very strong and beautiful feeling and pleasure to feel the touch of many hands. The recipient feels a multiple amplification of the Reiki energy. An unexpected and strong environment of Light and Love often causes strong emotional sensations in the recipient.
Group sessions are very effective for various kinds of ailments (physical and especially mental).
A group session is shorter than a full Reiki session as all positions are covered by the hands of many people. Energy is also enhanced as a result of the fact that a large amount of energy is directed at us at the same time. Everyone has the opportunity to experience a 10 minute group session (5 minutes front and 5 minutes back).
Short Reiki session
A short session is by no means a substitute for a full Reiki session.
A short session lasts 10-15 minutes, it is intended for cases when it is necessary to quickly raise the energy level of a person and achieve complete relaxation. And also if you do not have enough time for a full session, then hold a short session. Better to get some Reiki than none at all.
If we give Reiki to someone in the workplace, then we need to ensure that a short session does not exceed 15 minutes. Otherwise, the receiver may enter a state of deep relaxation and then be unable to return to his activity phase.
For a short session, give Reiki as follows:
1. Aura smoothing;
2. Energetic stroke;
3. Both hands on the shoulders from behind;
4. Charging the chakras (described in the chapter on working with the chakras);
5. Aura smoothing;
6. Energetic touch.
Working with chakras
Chakra work is one of the main methods of working with Reiki. For purposeful work with chakras, it is necessary to become familiar with the system of chakras and their position on the human body, as well as gain skills in applying the methods outlined below in a particular situation.
What are chakras?
Chakras are rapidly rotating energy centers in the form of spirals (or wheels), through which the physical body is connected to energy bodies. These energy centers, "transformers of vital energy", are located along the spine, but not in the physical, but in the etheric body of a person. There are seven in total. They open gradually, starting from the lowest, during the development of a person from a child to an adult. Some people develop faster, others slower, and besides, the chakras open in different people at different ages.
1. The first chakra is associated with the construction and reproduction of the temple of our body, with the sense of smell and the earth element.
2. The second chakra represents the attitude towards other human bodies (sex); it corresponds to the sense of taste and the element of water.
3. The third chakra is an important center for exchanging energy with other people; she represents light, heat, the sense of sight, and the element of fire.
4. The fourth is the heart chakra. This is the spiritual side of love, sympathy, empathy for others. It is associated with breath and the element of air.
5. The fifth chakra is associated with the concept of space; it denotes creative power, self-expression, communication. It corresponds to the sense of hearing and sounds. Its element is ether, the quintessence of the four basic elements: fire, water, air and earth.
6. The sixth chakra (third eye) is associated with the ability of spiritual vision, intuition.
It is connected with the concept of time and images.
7. The seventh chakra is the crown of being, higher consciousness, cosmic mind.
Each chakra is associated with a specific system of endocrine glands in the physical body. Energy bodies absorb energy that has high vibrations, transform it in the chakras, and then the converted energy through the chakras enters the corresponding endocrine glands.
An imbalance in one system leads to a direct imbalance in another system. This is where the importance of balancing the chakras comes from. Balancing the chakras brings balance to all systems.
For a clearer idea of how important chakra work is for spiritual growth, let's consider a few specific situations.
For example, if some karmic blockade is dissolved, and the corresponding chakras are not efficient enough, then the released energy cannot be integrated. When treating at subtle levels, such abnormal development occurs quite often. And vice versa, it is not always enough to “repair” some chakra for healing and improving living conditions, if unresolved problems at the karmic level are the cause of the disease. This treatment remains superficial.
The diagram below shows the position of the seven main chakras in the human body.
The five chakras are located along the spine, with each chakra having an entrance/exit and a starting point on the spine. The entrance / exit of the chakra is the contact to the outer world (aura), and the starting point is the contact to the inner world (the main channels on the spine that connect the Kundalini and the "Third Eye").
The main chakras in the front have an emotional coloring, and on the back - a strong-willed one.
The attached chakra table shows the relationship of each major chakra to the endocrine glands, body organs, senses and emotions.
All chakras are equally important!!!
System of the main seven chakras

Forms of damage and violation
chakra health
Three forms of dysfunction and damage to the chakras are known:
Location of the main chakras

1. Obvious defects (deformation, cracks or breaks);
2. Lack of binding to the internal energy system (ie, to the starting point on the spine);
3. Wrong position (shifted position).
With the help of Reiki, it is quite easy to eliminate the defects of the chakras. True, in the case of very serious damage, it will take quite a long time for the chakras to fully restore their working capacity. This is why regular treatment is important.
CHAKRA TREATMENT
Treating Obvious Chakra Defects
In case of deformations, cracks or ruptures of the chakras, it is recommended to apply the charging of the chakras. A description of this method is given in the chapter "Charging the Chakras".
The Reiki energy flowing through a defective chakra has a healing effect on it, glues cracks, tears and evens out the deformations of this chakra.
After purposeful work with a defective chakra, it is necessary to carry out a balancing of the chakras (described in the chapter "Balancing the Chakras"), since this chakra received a different energy charge after healing. As we already know, all chakras are interconnected, so the influence of other chakras can lead to a new imbalance of the healed chakra. If you balance all the chakras with the help of Reiki, you can avoid the above violation.
In conclusion, it is necessary to smooth the aura in order to integrate the released energy.
Treatment of the lack of binding of the chakra to the internal energy system
If the chakra is not tied to the internal energy system (i.e., to the starting point on the spine), it is recommended that you first place your hands on the chakra entry/exit at the back on your back. After 3-5 minutes, move on to charging the chakras. Finish the treatment also by smoothing the aura.
Chakra Misalignment Treatment
The misaligned position of one chakra or several chakras is corrected by balancing the chakras. In conclusion, the aura is smoothed out.
CHAKRA BALANCING
Below are two ways to balance the chakras: "seven-candlestick" and "sequential." I recommend that you try both methods and feel which of them affects you more favorably.
Chakra Balancing:
- harmonizes the chakras - each chakra separately and among themselves;
- enhances vital energy in the body;
- contributes to the healing of psychosomatics;
- encourages spiritual development;
- reveals the qualities of the heart;
- helps to know our true nature.
In general, balancing the chakras relaxes, calms, gives lightness, freshness and vigor.
THE METHOD OF THE SEMICANDLE
At the seven-candlestick we see one candle in the center and three candles on the right and left. At the same time, the relationship of paired candles on the right and left is clearly visible.
Correspondence to the seven-candlestick can be found in the seven main chakras, and the balancing of the chakras according to this method is based on this. It leads to the resonance of the energy of the three "higher" (mental-spiritual) chakras with the three "lower" (bodily-emotional) chakras. The heart chakra (the center of higher love) forms the center in this method.
The connection of our spiritual nature with our emotional and bodily nature is possible only through our heart, through its kindness, strength and love.
The purpose of the chakra balancing method described below is to develop these qualities, we always connect one "heavenly" chakra with one "earthly" chakra. This is how we connect Heaven to Earth.
Hold your hands in each position for 5 minutes until you feel an influx of energy, balance lying or sitting.
1. Place both hands side by side on the heart chakra, no matter which hand is higher or lower, and give Reiki.
2. Then place your top hand on your throat chakra and your bottom hand on your solar plexus chakra, again do Reiki.
3. Then put the upper hand on the third eye, and the lower hand on the sacral chakra, again give Reiki.
4. Then put your upper hand on the crown chakra and the lower hand on the root chakra, again give Reiki.
Now move your hands in the opposite direction.
5. Place your bottom hand on your third eye and your top hand on your sacral chakra.
6. Place your top hand on your throat chakra and your bottom hand on your solar plexus chakra.
7. Finally, place both hands again on the heart chakra.

Lie down for a few more minutes, listen to your inner feelings. And don't forget to end by thanking Reiki again.

SEQUENTIAL METHOD
CHAKRA BALANCING
This method is less time consuming and can be used when you don't have enough time.
Hold your hands in each position for 5 minutes until you feel the flow of energy, balance while sitting or lying down.
1. Place one hand on the sacral chakra and the other on the solar plexus chakra, no matter which hand is higher or lower, and give Reiki.
2. Then put your lower hand on the solar plexus chakra and your upper hand on the heart chakra, again give Reiki.
3. Then put your bottom hand on your heart chakra and your top hand on your throat chakra, again give Reiki.
4. Then put the lower hand on the throat chakra, and the upper hand on the third eye, again give Reiki.
Lie down for a few more minutes, listen to your inner feelings.
CHARGING THE CHAKRAS
Charging the chakras, as well as balancing the chakras, is one of the main methods of working with Reiki.
Hold your hands in each position for 5 minutes until you feel an influx of energy, carry out exercises while standing or sitting.
1. Hold one hand in front a few inches from the exit point of the sacral chakra and the other hand in the back a few inches from the starting point of the sacral chakra.
2. Then charge the solar plexus chakra in the same way.
3. Then, in the same way, charge the heart chakra.
4. Then charge the throat chakra in the same way.
5. Finally, charge the frontal chakra (Third Eye).
Lie down for a few more minutes, listen to your inner feelings.
Chakra Charging:
- charges each chakra separately;
- enhances vital energy in the endocrine glands, body organs, sense organs and emotions associated with each chakra;
- promotes the opening of the chakras.
Attention! After charging the chakras, one should definitely carry out a balancing of the chakras to harmonize the chakras with each other.
CHAKRA MEDITATION
This meditation harmonizes the energies in Your seven power centers, which will lead to the harmony of Your actions and thoughts in everyday life.
You sit comfortably in a chair, with a straight back, feet parallel on the floor, and breathing deeply and relaxed.
You come into contact with the power of Reiki, according to your degree.
After you feel the flow of Reiki energy, you close your ears with your thumbs, your eyes with your index fingers, put your middle fingers on both sides of your nostrils, so that you can alternately close the right or left nostril with them, and put the remaining fingers on your lips. Now close the left nostril and at the same time inhale deeply through the right nostril. Draw the air deep down until you feel it in the root (muladhara) chakra. Then exhale through the right nostril and close it with your finger. Now inhale deeply into the root chakra through the left nostril and then exhale through it.
Breathe in this way several times into the root chakra until it becomes warm.
Then inhale successively in the same way into the sacral (svadisthana) chakra, the solar plexus chakra (manipura), the heart (anahata) chakra, the throat (vishuda), the forehead (ajna) and finally into the crown (sahasrara) chakra.
After you have reached the crown chakra, return in the same way (inhaling and exhaling alternately through the right and left nostrils) back to the root chakra.
If You have mastered this exercise well, then during meditation You can imagine the colors in accordance with each chakra.
Muladhara - red
Swadisthana - orange
Manipura - yellow
Anahata - green
Vishuddha - blue
Ajna - indigo
Sahasrara white, gold or purple
By visualizing colors, you intensify your work with the chakras.
Finally, take a supine position, relax and focus on the flow of energies in your body.
2ND STAGE REIKI
Under the influence of the Universal vital energy, an intensive process of comprehending both the positive and negative content of our Consciousness begins.
Reiki opens the door to our subconscious and also to our Higher Self.
From an energetic point of view, all four energy bodies (physical, etheric, emotional/astral and mental) are cleansed of the negative vibrations of our Ego, after which their harmonious interaction begins. Vibrations at all levels become higher, thereby stimulating the awareness of more subtle worlds. This is a very intensive process and it naturally takes time.
Initiation into the 2nd level of Reiki enhances this process and covers ever deeper layers of the subconscious and brings us closer to the Higher Self. The throat chakra and third eye are even more activated, which increases the thirst for knowledge and the resulting spiritual growth. Develop intuition, clairvoyance, perhaps the vision of the aura, as well as "visual" perception of other worlds.
Compared with the 1st degree of Reiki, the time of a full session is shortened by one third. The initiate is attuned to the energy of three symbols, with the help of which he can send Reiki energy beyond time and space. Moreover, the third symbol adjusts the giver to the level of Vital Energy (ie focuses consciousness and inner attention), while both other symbols have a harmonizing and strengthening effect. All 3 symbols act as a "bridge" between the Reiki energy giver and the recipient. Thus, the recipient is given the opportunity to receive as much energy as he needs.
With the help of the 2nd stage, huge new opportunities open up for the application of the Universal Energy and, accordingly, the responsibility of the initiate increases.
REIKI SYMBOLS
First character
Meaning: Strength, energy.
All cosmic energy come!
This symbol draws energy from the space around to focus it in the desired direction.
Meaning (meaning)
- a curved sword describing a line;
- implementation to achieve a single whole, the creation of a space in which there is nothing;
- transcendent Spirit.
A task:
- serve as a catalyst;
- activates and enhances energy.
Application possibilities:
gives other symbols additional energy and "focuses" it;
- cleansing;
- protection;
- energy self-defense;
- purification and energization of water and food;
- purification and charging of crystals and any other healing stones;
- purification and energization of material objects.
Second character
Meaning: Healing, harmony, happiness.
Possible direction of consciousness: Man and God are reunited.
Meaning (meaning) embedded in the mantra (name) of the symbol:
- embryonic state;
- unborn in the secret, the beginning of the external form;
- root chakra, connection with the earth, contact with vital energy.
A task:
- soothe, relax the mind;
- open direct access to the subconscious;
- bring harmony and healing.
Application possibilities:
- elimination of blockades;
- mental and emotional treatment;
- harmonization.
Third character
Meaning: connection, unity, connection.
Possible direction of consciousness: The God in me recognizes the God in You.
Meaning (meaning) embedded in the mantra (name) of the symbol:
- source or beginning;
- shine;
- forward on the right course;
- goal;
- silence, peace.
A task:
- to establish communication outside of time and space;
- creation of unity between the Beginning and the End;
- to build a bridge between the divine in me and all Existence.
Application possibilities:
- treatment at a distance;
- mental and emotional treatment at a distance;
- Self-healing with the use of technology of treatment at a distance.
TECHNIQUES FOR USING SYMBOLS
The possibilities for using Reiki symbols are endless. Below are some of them. Anyone working with Reiki can discover new techniques through experimentation. The main thing is to trust your own intuition, feel the impact of each symbol and find your own, personal approach to the use of Reiki symbols.
When applied, the symbol is drawn by hand in the air or in the imagination and then, to activate it, its mantra is pronounced aloud or mentally three times.
The symbols must be applied in a state of complete concentration and at the same time in complete relaxation, without expecting any results. It is best to be in a state of complete trust in the mind, power, intuition of Reiki, relying on the correctness of what is happening, trusting in higher guidance and trusting that healing is taking place. We let go of everything and rely on Existence.
Of course, it will take time for this state of relaxed concentration, inner concentration and the ability to let go of all expectations to appear.
Some additions at work
with 2nd stage
The rules for preparing for a Reiki session are the same as for the 1st stage, the fundamental difference is that with the 2nd stage we work with symbols.
Applying characters before
Reiki session
I recommend that before each Reiki session, regardless of the technique used, draw symbols on yourself in the following order: 3rd, 2nd and 1st symbols. Thus, there is a stronger connection with Reiki, as well as with our Higher Self and with our subconscious, there is a better sense of our state or the state of the person to whom we give Reiki. As a result, intuition grows faster, consciousness expands, and so on. Based on my own experience, I recommend trying this method of using symbols. If we give Reiki to another person, then after smoothing his aura, we apply the symbols. With the help of the 3rd symbol, an additional contact is established with the recipient, with the help of the 2nd symbol, contact is established with all the subconscious levels of the recipient, and with the help of the 1st symbol, the power of Reiki is enhanced.
Full Reiki session
Also, as with the 1st stage, work with the 2nd stage begins with full sessions for four days in a row, and then, if necessary, until complete recovery, but at least 1 time in the next 3 weeks to consolidate the healing effect. Also, more attention should be paid to diseased areas of the body or areas that take a lot of energy, or that cause a feeling of cold.
Reiki is given for all basic positions!!!
The only difference is that before the session we establish contact with the symbols (3rd, 2nd, 1st) and then, during the session, let the 2nd symbol from the palms into each position to stimulate harmony and then 2 The th character is fixed by the 1st character. The first symbol can be used indefinitely to enhance the power of Reiki.
The minimum duration of a full Reiki session is 20 minutes!!!
Short Reiki session
The scheme of the short session is identical to the scheme given in the corresponding chapter, which describes the 1st stage.
The only difference is that before the session we establish contact with the symbols (3rd, 2nd, 1st) and then, during the session, let the 2nd and 1st symbols from the palms into each position.
The first symbol can be used indefinitely to enhance the power of Reiki.
WORKING WITH THE CHAKRAS
The tasks and functions of the chakras have already been discussed in previous chapters. The use of symbols and related techniques greatly expand our ability to work with the chakras.
In the second stage, the same techniques of working with chakras are used (balancing and charging the chakras), but at the same time, the strengthening effect of the symbols on the Reiki energy is used (the 2nd and 1st symbols are let in from the palms into each chakra).
The use of symbols can be combined with the color of the corresponding chakra, i.e. you can imagine the symbols flowing into the chakra in the color corresponding to this chakra.
The second stage provides us with the opportunity to quickly balance the chakras (methods are described below). I personally prefer the menorah with the technique of the second stage.
Fast balancing is achieved with the 1st symbol.
The first symbol is drawn in a circle, starting from the 1st chakra through all the chakras and ending at the heart chakra. Thus, we energize the chakras and connect them together.
Fast charging is also achieved with the 1st character.
To activate a single chakra or all chakras, we imagine the first symbol (of the corresponding color) circling the chakras.
MENTAL TREATMENT
AND DEPROGRAMMING
The technique of mental treatment is based on direct contact with the subconscious, which is established with the help of the second symbol. This technique dissolves subconscious resistance to the healing process and gives impulses for healing.
For mental treatment, it is especially important to completely remove our Ego and approach with love, respect for the personality of the person who has trusted us.
The technique of mental healing makes it possible, with the help of a purposeful affirmation (i.e., a positively formulated attitude), to rewrite unwanted programs or ideas.
It is necessary to develop appropriate affirmations together with the recipient of mental treatment. More often than not, we do not know what is best for us at the moment, and it is even more difficult for us to know what the other person needs. In addition, what we desire is not always the best for us and, especially, for another. Therefore, it is better to develop affirmations intuitively at the time of treatment. Work with only one affirmation. After a cycle of mental treatment, it is necessary to take a break, and only after the person has processed and accepted a new program, can one begin work with the next program.
With the help of a universal affirmation, such as: "This energy is for my highest good, from the point of view of a higher plan," it is possible to deprogram already existing structures. With the so-called deprogramming, the programs that subconsciously interfere with our integrity dissolve, healing occurs without the need for knowledge of relationships. In the process of so-called deprogramming, certain parts of our subconscious rise to the surface, which we can then consciously experience. In the case of deprogramming, we trust the mind and power of Reiki.
Before starting mental treatment or deprogramming, it is recommended to use relaxation techniques or meditation.
The duration of the session should not exceed 10 minutes (also with self-treatment) and be carried out 6 days in a row and 2 times in the next week.
I worked out a certain scheme for myself in difficult mental states, for example, in the case of depression. First, I give the person a series of complete Reiki sessions to strengthen their general well-being.
Then I begin mental treatment with deprogramming, which perfectly eliminates subconscious resistance to treatment and, in addition, blurs a number of programs that hinder our development.
After that, I take a break from 2 weeks to 3 months, depending on the condition of the person. Then, if the condition is even and stable, you can proceed to targeted mental treatment with affirmation. If further treatment is needed with a new affirmation, I take a break again before doing so.
The scheme of mental treatment suggested below can be changed, if necessary, depending on the situation of the recipient. Rely on your intuition!
Scheme of metal treatment
Preparation is similar to preparing for a full Reiki session. The following diagram should be followed:
1. Discuss and formulate affirmations with the recipient of Reiki;
2. The receiver sits on a chair, his feet are parallel on the floor, his eyes are closed;
3. Draw all three symbols on yourself (3rd, 2nd, 1st);
4. Smooth out the recipient's aura three times, draw an energy stroke;
5. Stand behind the receiver, put your left hand on the back of the head, draw the second symbol above the crown chakra of the receiver, mentally repeat the mantra of the symbol three times and with your right hand give Reiki to the crown of the head for several minutes. At the same time, imagine a white or golden light flowing into your crown chakra and reaching your feet, and how this light flows through your hands into the crown chakra of the receiver and flows through his body to the feet, and at the same time dissolves dark places and blocks;
6. Keep your left hand on the back of the head, with your right hand draw over the crown of the recipient of the first character. Repeat three times the mantra of the symbol and place Your right hand on the top of the head;
7. Mentally repeat three times the name of the recipient. It is extremely important to realize that the established connection with the cosmos goes through you to the deepest layers of the recipient's subconscious.
You can mentally reinforce this connection by saying: "I have the key";
8. Continue to visualize a stream of golden or white light coming through you to the receiver (as described above);
9. Mentally or aloud say the formulated or given universal affirmation: "This energy is for my highest good, from the point of view of the highest plan."
The receiver can also mentally or aloud repeat the agreed phrase;
10. Simultaneously imagine the receiver in the desired state, i.e. healthy, happy, radiant, etc. Intuitively repeat all affirmations as many times as necessary;
11. Break contact with the recipient. Flatten his aura three times, draw an energy stroke from the sacral chakra through his head;
12. Consciously entrust the subsequent healing to the power of Reiki;
13. Finally, don't forget to thank Reiki for allowing You to be His channel. Then hold your hands under running water.
Replacement positions
Having the 2nd degree of Reiki, you can work with the so-called "substitute" positions. This is a contact position on the body, which, as it were, replaces all other positions.
After establishing contact with Reiki through the symbols, you can determine the replacement position in which you will place your hands and at the same time say the affirmation.
Below I offer a few affirmations that you can adopt.
Possible formulations in application
replacement positions
"Universally" applicable wording.
From the moment I lay my hands on (for example, on the stomach) - this position is a substitute for all parts of the body that need Reiki energy from a higher plane, to stimulate holistic and harmonious development, health and well-being at all levels.
Formulation for the coming day
The Reiki energy flows into the coming day and flows where, from the point of view of the higher mind, it is most needed by me and all those around me (relatives, friends, colleagues) and into any possible situations that we directly and indirectly come into contact with today. We are surrounded and permeated with Reiki energy everywhere!
Chakra Harmonization Formula
As needed, you can tune into individual chakras or all at the same time.
From the moment I place my hands on (for example, the heart chakra), Reiki affects all my chakras most effectively, from the point of view of the higher mind, for the optimal and harmonious development of my external and internal existence.
RAIL TRANSMISSION AT A DISTANCE
Distance healing is one of the least understandable methods of Reiki. This is not about technique (it is quite simple), but our mind, which must realize that Reiki can be transmitted over long distances in the absence of direct contact.
From modern medicine, we know that depending on the type of activity, the human brain has different oscillation frequencies. We radiate our thoughts in the form of waves, and the mechanism of the emission of thought and its meeting with the addressee (recipient) is similar to the mechanism of propagation of radio waves. According to this principle, the power of Reiki is transmitted at a distance.
Reiki symbols focus the mind of the initiate in such a way that Reiki energy can be transmitted to any distance (i.e. beyond time and space).
Treatment at a distance is used if the possibility of contact treatment is excluded. Treatment at a distance is equivalent to contact treatment, with the only difference being that the recipient may feel the power of Reiki to a lesser degree. Distance treatment is most effective when both participants (sender and recipient) have the opportunity to relax at the same time, so it is recommended to agree on a session time in advance.
The recipient of Reiki should (if possible) be in the supine position, especially in the case of a distance treatment with several senders, as he receives a concentrated charge of Reiki energy.
As with other Reiki therapies, under no circumstances should treatment be used at a distance without the consent of the recipient.
The rhythm of sessions during treatment at a distance remains the same, i.e. at least 4 days in a row and then regularly as needed, but at least once a week for the next three weeks.
In addition, it is very convenient to carry out self-treatment, especially treatment of the back, using the method of treatment at a distance.
Technique
The following instructions are intended for both self-treatment and the treatment of another person.
1. Take a comfortable position for you (lying or sitting).
3. Draw all three symbols on yourself (3rd, 2nd, 1st).
4. Hold a photo of the recipient in front of you, or imagine that person, or yourself (in self-healing), or a plant, or a desired situation where you want to send Light, etc. If you do not know the recipient and do not have his photograph, then you need to know his full name and his exact address.
5. Establish contact with the 3rd symbol by drawing it on an imaginary person or above his crown (or imaginary situation, etc.), then say the mantra of the 3rd symbol three times.
6. Say the full name (and address, if necessary) of this person (or situation, etc.) three times. Ask his higher self if he is ready to accept Reiki.
8. If yes, ask Reiki to send energy to the recipient. At the same time, imagine a white or golden Light flowing into the crown chakra and reaching the feet of the receiver, and at the same time dissolving dark places and blocks in his body.
9. To reach the recipient's subconscious, draw the 2nd symbol and activate it (i.e. say out loud or mentally his name three times).
10. To stabilize the contact and increase the energy, draw the 1st symbol and activate it in the same way.
11. You are now able to give Reiki in any form. Trust your intuition.
12. Choose a hand position that is comfortable for you when giving Reiki at a distance:
A) Imagine the receiver as very small and place his image or his photograph between your palms;
b) Determine for You a comfortable "replacement position" on your body, on which you will put your hands;
c) Place Your hands along the body with palms up, or raise your palms in the direction of the energy flow.
13. Simultaneously imagine the receiver in the desired state, for example: healthy, happy, smiling, etc.
14. Ask Reiki to energize the recipient's entire body (or yours in self-treatment);
list in detail all the areas that are filled with Reiki energy:
"Reiki fills every bone of Your (my) skeleton, every joint, every organ of Your (my) body, every cell of Your (my) body and every atom of Your (my) body. Reiki flows into You (me) as long as You (I) do not turn (I am) into Light.
15. If Reiki is given to a situation, then ask Reiki to energize the situation.
16. Let go of everything and don't forget that You don't give Reiki, You only serve as a channel! You can meditate during the session and consciously entrust the subsequent healing to the power of Reiki.
17. During the session, try to feel the recipient, his problems, condition, and also determine the moment when his need for Reiki energy is satisfied. After that, you can end the session by rubbing your hands.
18. Finally, don't forget to thank Reiki for allowing You to be His channel. Then hold your hands under running water.
MY PRACTICAL TRANSFER EXPERIENCE
REIKI IN THE DISTANCE
A) I highly recommend when transmitting Reiki at a distance, even in the case of an agreement, ask the recipient again (point 6) if he is ready to receive Reiki. I had this case:
One elderly woman asked me for help. She suffered from severe headaches and ringing in her ears. All the following days I was busy, and could not visit her to conduct a contact treatment session. We agreed that I would treat her at a distance and set the time for the session. At the appointed time, I lay down, relaxed, thanked Reiki and visualized this woman. When I asked her higher self if she wanted to accept Reiki, everything went dark before my inner eye and blackness and denial came over me. The answer was clear. I immediately cut off contact.
Apparently, the host wasn't ready to let go of her headaches, no matter what the reason. She still needed them to go through some process.
B) To increase the power of Reiki, you can apply the following technique:
When filling the receiver's body with Reiki energy (p. 14), imagine your hands on the diseased areas of the receiver's body and imagine how the 2nd, and then the 1st Reiki symbols flow from the palms into these areas of the body.
The recipient experiences a subjective sensation of heat in these places. This technique leads much faster to complete healing.
Reiki transmission at a distance
several people
I came to this method spontaneously. I somehow had a situation that I had to give Reiki at a distance to several people living in different parts of the world. I came home from work, had time to eat in a hurry and immediately began to work. I gave Reiki to everyone in turn and worked late.
After a few days of such a difficult regimen, quite unexpectedly for myself, I imagined a transparent ball filled with Reiki and began to give symbols (3rd, 2nd, 1st) to the ball. Then I began to place in this ball all those to whom I was supposed to give Reiki, while I repeated three times the full name of the person being placed in the ball. After accommodating everyone, I asked Reiki to give them energy and visualized them in the desired form (healthy, ... etc.). I folded my palms, as if I were holding a ball in them, and conducted the session until the energy flowed. After the session, I called a few of the hosts to make sure the energy had reached everyone. How great was my joy when everyone confirmed to me that the sensations were the same as usual.
Since then, I often use this technique in order to energize my loved ones, of course with their consent.
One day, when I wanted to place a few more friends in addition to the usual circle of my "patients", an interesting phenomenon occurred. On a certain number of people, the ball did not want to receive anyone else, it no longer stretched.
Mental healing and deprogramming
on distance
In general, the scheme of mental treatment at a distance is identical to the scheme of conventional treatment at a distance. The difference is that it is necessary to discuss individual affirmations in advance or dwell on the universal affirmation described above.
Don't forget to schedule a Reiki session as well. The position of the hands is possible as when transmitting Reiki at a distance.
Scheme of mental treatment at a distance
1. Take a comfortable position for you (lying or sitting).
2. Center in the heart and say the words of thanksgiving.
3. Draw all three symbols on yourself (3rd, 2nd, 1st).
4. Hold a photo of the recipient in front of you, or imagine this person, or yourself (for self-treatment). If you do not know the recipient and do not have his photograph, then you need to know his full name and his exact address.
5. Make contact with the 3rd symbol by drawing it on an imaginary person or over their crown, then say the mantra of the 3rd symbol three times.
6. Say the full name (and address, if necessary) of the person three times. Ask his Higher Self if he is ready to receive Reiki.
Even in the case of an agreement, it is necessary to ask for permission.
7. If the answer is no, immediately break contact by rubbing your hands.
8. If yes, ask Reiki to send energy to the recipient.
9. Imagine yourself standing behind the recipient, placing your left hand on the back of your head, drawing the second symbol above the crown chakra, mentally or aloud repeating the mantra of the symbol three times, and giving Reiki to the crown of the head with your right hand for several minutes. At the same time, imagine a white or golden Light that flows through Your hands into the crown chakra of the recipient and flows through his body to the feet, and at the same time dissolves dark places and blocks.
10. Imagine how you continue to keep your left hand on the back of your head, and with your right hand draw over the crown of the recipient of the first symbol. Repeat aloud or mentally three times the mantra of the symbol and imagine how you place your right hand on the crown of the represented person.
11. To better reach the receiver's subconscious, say: "I have the key."
12. Hold the visualization of a flow of golden or white light through Your hands to the recipient.
13. Mentally or aloud say a pre-formulated or universal affirmation.
14. Simultaneously imagine the receiver in the desired state, for example: healthy, happy, smiling, etc. Intuitively repeat all affirmations for as long as necessary.
15. Let go of everything and don't forget that You don't give Reiki, You only serve as a channel. You can meditate during the session and consciously entrust the subsequent healing to the power of Reiki.
16. During the session, try to feel the recipient, his problems, condition, and also when his need for Reiki energy is satisfied. After that, you can end the session by rubbing your hands.
17. Finally, don't forget to thank Reiki for allowing You to be His channel. Then hold your hands under the flow
water.
MY PRACTICAL EXPERIENCE OF THE MENTAL
TREATMENTS AT A DISTANCE
I had to do mental treatment at a distance with one of my students. After the death of her husband, she suffered from a severe form of depression and was not able to cope with it herself, since she only had the first level of Reiki. We worked the affirmations together and the next day I started the mental treatment. When I imagined her mentally, she visualized to me completely physically exhausted, and I spontaneously began to give her a full Reiki session at a distance. For four consecutive days, I continued to give her a full Reiki session. The strong internal resistance that I felt in her during the second session passed by the end of the cycle of full sessions. Only after that I started mental treatment. When I got to affirming, then an affirmation spontaneously flowed in the form of a ribbon of letters from which it consisted, into the crown of my student. I continued to give affirmations with this technique further until I felt that saturation had come and the energy was no longer flowing. I terminated the session as usual. I continued to give subsequent sessions using the technique described above. Unexpectedly quickly for me, a shift towards healing began.
My subsequent experience has shown that mental treatment (both contact and at a distance) is much more successful using the above scheme and using the above technique.
When is the long form used?
Reiki transmissions at a distance
When a person needs urgent help and you are unable to give Reiki by contact.
When is the short form used?
Reiki transmissions at a distance
In case of time trouble;
- before important conversations (at the same time, it is necessary to imagine a positive course of the conversation);
- before exams;
- in the implementation of important projects;
- on material desires;
- to increase concentration;
- in all crisis situations;
- when contacting Reiki with a request;
- on jammed doors;
- on frozen locks, etc.
3rd STAGE REIKI (Master)
Initiation into the Reiki Master stage raises the vibrational level of the initiate's energy system again. At initiation, the Master symbol (the fourth and final Reiki symbol) is activated and the student connects with their inner Master. However, this does not mean that the initiate automatically becomes a Master in the application of Reiki. Initiation creates the prerequisites for becoming a "Master of one's own life." The Step of the Master carries the realization that everything serves the process of purification and transformation, and, as a result, leads to the acceptance of "blows of fate", illnesses, suffering and problems.
With initiation into the stage of the Master, the student embarks on the path of transition from duality to unity. In addition, he connects with all living beings, and most importantly, with all previous Reiki Masters. From the moment of initiation, the student takes over the skill, i.e. responsibility for your life.
On the one hand, the symbol of the Master reveals to the initiate a level of inactivity, i.e. action becomes inaction. On the other hand, this symbol creates a resonance for the transfer of Reiki power in accordance with the steps.
The path to Mastery leads through the physical level of the 1st and through the emotional-mental level of the 2nd stage to the integration of the spiritual level of the 3rd stage. From the deliberate inaction of the 1st stage through the deliberate action of the 2nd stage and again, through a higher level of the spiral of spiritual development, to an unintentional admission, i.e. to inaction.
The universal energy begins to flow freely as soon as the Master is internally freed from all claims of his Ego to power. The true Master trusts the divine energy and its guidance. With the growth of its filling with vital energy, its creative potential, inspired by the laws of the universe, grows. He chooses the path of the middle, of balance.
copying, saving on a hard disk or otherwise saving works posted on this library is strictly prohibited . All materials are presented for informational purposes only.
Copyright © 2000 - 2011
When we talk about the chakras and the human energy system, most often we mean 7 main chakras and 5 additional ones, and we forget about the less known, but no less significant centers. In particular, about the chakras in the hands and feet. But it is the centers of the palms that are directly connected with the balancing of the energy flows passing through the heart center. Many have noticed that the sensations in the palms of the hands are different. In some, the sensitivity and susceptibility of the right hand is higher, in someone of the left.
The RIGHT hand GIVING, symbolizes the channel of bestowal.
LEFT hand RECEIVING, symbolizes the channel of acceptance.
If you feel well the energy passing through the right hand, and there are no special sensations in the left palm, this is a signal that the bestowal channel works well for you, but you have problems with acceptance.
If, when working with energies, you feel hot, there are more tingling in the left palm than in the right, it means that you are used to taking more than giving, which again leads to imbalance in many areas of life.
Maintaining the health of the palm chakras is necessary both to balance the entire chakra system and to maintain balance in the heart.
Exercise 1.
A charge of energy in the palms
Place your hands in front of you at the level of the solar plexus. The left hand looks down, the right hand looks up. The palms do not touch.
1. Take a few deep breaths - exhalations, relax. Focus your intention on opening the chakras in your palms.
2. Start clenching and unclenching your fists at a fast but comfortable pace. Continue until you feel slightly tired. Make sure that your wrists are not tense.
3. Swap the palms: now the right palm is on top and looks down, the left is on the bottom and looks up.
4. Repeat step 2, clenching and unclenching your fists.
5. Raise your hands to chest level and fold them in front of you as if you were praying. Press your palms together, finger to finger.
6. Rub your palms together 6-7 times, as if warming them.
7. Say out loud or mentally, whichever works best for you, "OPEN" and clap your hands 3 times.
8. Slightly spread your palms apart and concentrate on the sensations and on the energy between the palms.
This exercise physically activates the circulation of energy in the palms, which allows it to flow more freely and efficiently through the energy channels.

Exercise 2. Lotus Opening
Get into a comfortable sitting position. Make sure your spine is straight and your feet are flat on the floor. Place your hands on your knees, palms up. Close your eyes and imagine that you have closed lotuses on both palms. It can be completely closed buds or slightly open flowers.
Once you see them clearly with your mind's eye, imagine the lotuses opening until you feel a constant flow of energy spiraling into your palms. You may feel warmth and tingling in your hands.
Whatever exercise you use to open the chakras in the palms, remember that sensitivity comes with practice. Spend a few minutes on this every day - as a separate technique, as an element of meditation, or when working with the heart center. The more you practice, the faster and easier your chakras open.
There are three sets of exercisesdestined
for charging and opening the chakras:
The first complex physical exercises.
Second complex mental exercises (visualizations).
The third complex a combination of breathing exercises and postures.
Physical exercises to open and recharge the chakras
Chakra 1
Stand with your legs wide apart, turn your socks outward as far as possible, but so as not to experience discomfort in the knee area. Bend your knees as much as possible. As you train, you should be able to lower your buttocks to knee level. Get down and up a few times.
 Now add pelvic rocking. Move it back and forth as much as possible. Emphasize forward movement especially. Do the movements three times when moving down. Stop, freeze in the lower position and again shake your pelvis three times. The main part of the exercise is performed with the strongest bending of the knees. Repeat the exercise at least 3 times.
Chakra 2
 Legs shoulder width apart. Slightly bending your knees, move your pelvis back and forth. Repeat the exercise several times.
Now imagine that you are inside a cylinder that needs to be polished. You will polish it with your hips. Put your hands on them. Start rotating your hips so as to polish the entire surface of an imaginary cylinder.
Chakra 3
 Jumping. This exercise requires a partner. Hold hands tight. One partner supports, and the second at this time bounces as high as possible. When jumping, try to bring your knees to your chest. Jump for several minutes without a break. Take a rest. Do not hunch over while resting. After the break, the partner will jump, and you will support him.
Chakra 4


This is an isometric positional exercise. Get on your hands and knees as shown in the picture. In this position, your elbows should not touch the floor. Hands are used as a support. By changing the angle between the buttocks and thighs, make sure that you begin to feel the tension between the shoulder blades. Men with developed shoulder girdle muscles will first feel tension in their shoulders, so be careful. Feeling the tension, take an isometric pose, bending forward, then arching back. You can push off from the hips and shins. The exercise is designed to open and charge the heart chakra, or will center.
 For opening the front of the heart chakra, find a large round object such as a barrel, ottoman, or bioenergetic chair for your back to lean on. With your feet firmly on the floor, lean your back on the support. Relax and let your chest muscles stretch.
Chakra 5
 Rotational movements of the head and neck. Start moving your head in different directions. Looking forward, several times move your head forward, up and down, then from side to side, up and to the left, down and to the right.
Repeat the exercise in reverse order. Now make rotational movements of the head several times in opposite directions. The throat chakra responds very well to sound. Sing! If you don't want to sing, make any sounds.
Chakra 6
Repeat the movements described in exercise for chakra 5, but only with the eyes.
Chakra 7
Rub the top of your head with your right hand in a clockwise direction.
Visualizations for opening the chakras
To perform this exercise, sit comfortably in a chair or in the lotus position on the floor with a pillow. Straighten your back.
- First, after calming down through meditation, focus on your first chakra. Imagine it as a whirlpool of red light rotating clockwise (when looking at your body from the side). The chakra is located directly below you: its funnel is directed downward, and its tip is directed to the lower end of your spinal column. Watching the chakra, inhale its redness, then exhale. Visualize red as you inhale. When exhaling, do not visualize, just see what color your exhalation is. Repeat the exercise until you can see the red light consistently on both inhalation and exhalation. If the red light on the exhale is dimmer or paler than on the inhale, then you need to balance your red energy. If the color is pale, then you need to add red to the auric field; if the color is cloudy and dark, then you need to cleanse your lower chakras. To do this, repeat the exercise until the color on the exhale is the same as on the inhale. This holds power for all chakras.
- Having held the picture of the first chakra in front of your inner eye, go to the second, which is located 5 cm above the pubic bone. Visualize two whirlpools: one on the front of the body, the other on the back. See how they rotate clockwise, casting a red-orange light. Breathe in this light. Breathe it out. Repeat the exercise. Before moving on, make sure the color of the exhalation is the same as the color of the inhalation.
- Having achieved a stable visualization of the first two chakras, move on to the third, located in the solar plexus area. In this place, you need to visualize two yellow whirlpools. Breathe yellow. Breathe in that color, breathe it out. Repeat the exercise until the color of the exhalation is the same as the color of the inhalation.
- Move on to the heart. Take a closer look at the green whirlpools rotating clockwise. Inhale and exhale this color until the colors of exhalation and inhalation are equal. Look down to see all the other chakras (which you have already charged). Watch them rotate before moving on to the throat chakra.
- For the throat chakra, inhale and exhale blue light from clockwise swirling whirlpools.
- At the third eye chakra, one must visualize clockwise rotating whirlpools on the front and back of the head. The color of the whirlpools is purple. Repeat the above breathing exercises.
- Now move on to the crown. This chakra has an opalescent white color. The chakra is located at the top of the head and rotates clockwise. Breathe in the white spit. Breathe it out. Repeat the exercise.
- Look at all seven chakras rotating clockwise. Take a closer look at the flow of energy flowing through the main energy channel in the spinal column. This stream pulsates in time with your breath. When you inhale, the pulse wave is directed upwards, and when you exhale, downwards. See how all the chakras connect at their tips to this main stream, how the crown chakra forms the main entrance and exit of the stream, and the root chakra forms the entry gate for the energy entering your energy field. Observe how the energy enters your aura as you inhale. Now your entire field is filled with light energy, and the lower chakras are fully charged with positive energy.
Breathing exercises and special postures for opening and charging the chakras
Chakra 1
 Sit on the floor on your heels. Place your palms on your thighs. Inhaling, lean forward, bending the lower back. Exhaling, lean back. With each exhalation, if you like, say a mantra. Repeat the exercise several times.
Chakra 2
 Pose 1. Sit on the floor with your legs crossed. Grasp your ankles with your hands and take a deep breath. Bend forward, pushing your chest out and pushing your pelvis back. Exhale as you arch your back back and push your upper pelvis forward, resting on your sitting bones. Repeat the exercise several times, reciting the mantra if desired.
 Pose 2. Lie on the floor and raise yourself up on your elbows. Raise your feet to a height of 30 cm from the floor. Spread your legs and inhale. Exhaling, cross your legs at the level of the knees: the legs should be straight. Repeat the exercise several times, then raise your legs even higher and repeat the same exercise again several times. Do the exercise until then. until your feet are 70 cm from the floor. Then gradually lower your legs, performing the same movements. Relax and repeat the exercise a few more times.
Chakra 3
 Pose 1. Sit on the floor with your legs crossed. Grab the front of your shoulders with your fingers and the back with your thumbs. Inhale and turn your body to the left: exhale, turn to the right. Breathe deeply and slowly. The back must be straight. Repeat the exercise several times in both directions. Rest one minute. Repeat the exercise on your knees.
 Pose 2. Lie down on the floor. Keeping your feet together, lift your heels 20 cm off the floor. Raise your head and shoulders 20 cm. Look at your toes. With your arms outstretched, point your fingers at your toes. Keeping this position, exhale slowly but vigorously through your nose for 30 seconds. Relax. Rest 30 seconds. Repeat the exercise several times.
Chakra 4
 Sit on the floor with your legs crossed. Rest your straightened fingers on the heart area, elbows wide apart. Move your elbows like a saw. Pull your arms up to your chest. Breathing should be slow and deep. Repeat the exercise several times. Rest one minute. Repeat the exercise sitting on your heels. This increases the energy level. Don't forget to pick up a basin.
Chakra 5
Sit on the floor with your legs crossed. Firmly grab your knees with your hands, straighten your arms at the elbows. Begin to gradually bend the spine in the thoracic region. Inhale as you move forward, exhale as you move backward. Repeat several times. Take a rest.
Now bend your back while shrugging your shoulders as you inhale and lower them as you exhale. Repeat several times. Inhale and freeze with raised shoulders. Relax.
Repeat the same exercise while sitting on your heels.
Chakra 6
 Sit on the floor with your legs crossed and wrap your fingers around your throat. Breathe in; hold your breath; tighten your stomach and sphincter, trying to squeeze the energy up like toothpaste from a tube. Release the energy through the top of your head by raising your arms above your head, locking your fingers together. Repeat the exercise.
Repeat it again, sitting on your heels.
Chakra 7
 Sit on the floor with your legs crossed and arms outstretched above your head. Weave all fingers, except for the index fingers, which should be raised up. Inhale as you pull in your navel and say “sat”. Exhale as you say “us” and relax your navel. Breathe in this way at a fast pace for a few minutes. Now inhale and squeeze the energy from the base of the spine to the top of the head, tensing the sphincter muscles first and then the abdominal muscles. Hold your breath. Then slowly, maintaining muscle tension, exhale. Relax. Take a rest. If you do not like the mantra "sat - us", then use another one at your discretion. Repeat the exercise sitting on your heels. Take a rest. Repeat the exercise without reciting the mantra. Instead, breathe vigorously through your nose.