Hip mobility and deep squats. Familial spastic paraplegia
Pathologies of leg mobility can occur both on their own and accompany bursitis. Either way, they cause a lot of trouble. They can be treated with anti-inflammatories, physical therapy, or orthopedic shoes, but surgery is essential if the pain becomes unbearable.
What are the features of the pathology of leg mobility
Pathologies of leg mobility occur due to damage to the articular surfaces, or osteoarthritis. Here's an example of how biomechanics can be very painful. Almost always, the cause of the disease is excessive pronation and improper distribution of the load, so that all of it falls on the thumb, on a joint that is not intended for this. The pain occurs because the cartilage at the ends of the bones wears out very quickly. And as a result, the bones rub against each other, and this causes inflammation of the joint. Here you can draw an analogy with the mechanism, in the gear of which sand was poured.
Pain in the thumb joint is often mistakenly attributed to gout or rheumatoid arthritis. But in 99% of cases, osteoarthritis is to blame. It is sad to see when a patient is treated for gout, although this diagnosis is not even confirmed by the results of studies. I will talk about this disease in chapter 10, although gout belongs to the class of systemic diseases, and not to violations of biomechanics.
Non-surgical treatment of limited mobility and stiffness of the first metatarsophalangeal joint is possible, it is similar to how we treat mild forms of bursitis, and is very effective if the disease is detected at an early stage. Despite this, if the deformity is extensive and the pain is too severe, surgery is necessary. For this, three types of operations are currently used.
In the 70s and 80s. 20th century Silastic thumb prosthesis was very popular. Unfortunately, later it turned out that these implants can be very dangerous for the patient's health, so their use is now reduced.
Postoperative foot care
Nowadays, after operations on the thumb, patients are discharged from the hospital, but one should not think that the wound will miraculously heal by itself. Patients must follow strict rules during the recovery period. It is forbidden to play sports and actively move. Since these rules vary greatly depending on what kind of operation was performed, I will not go into details of what can and cannot be done. I just want to emphasize that it is very important to visit a doctor as often as possible, especially your surgeon. It is easy to guess that the more complex the operation was, the longer the recovery will take. And of course, you will not be able to participate in the 10K race immediately after discharge. But if you strictly follow your doctor's advice, you can be back to normal within a few weeks.
The effectiveness of the treatment of pathologies of leg mobility
Regardless of how far the disease has progressed, treatment with orthopedic shoes is necessary to correct the disturbed biomechanics and prevent further deformity of the joint. Treatment with the help of medicinal methods will not bring a visible result, only if it is not a systemic disease (psoriasis, gout or rheumatoid arthritis).
It is necessary for pathologies of leg mobility to maintain constant communication with your orthopedic doctor. You must know exactly which joint and with what method the surgeon is going to operate. Be sure to tell your doctor exactly what you expect from the treatment.
The patient always expects that his arthritis will be completely cured. Even if the doctor does not say this, people believe that after the operation the joint will become completely healthy. Patients rarely ask about side effects of treatment. Either they don't think it's possible or they just don't want to know. The doctor, on the other hand, may forget to warn the patient about the negative effects, or simply consider that the patient will not understand this anyway. And as a result, after the operation, the patient hopes to see a healthy finger that does not hurt and moves freely, but does not get what he expected at all. He or she suddenly notices that the finger has lost some of its mobility and curses the operation. The surgeon says that the operation went just fine, because his main goal was to eliminate pain in the joint.
The bottom line is: if you are a patient, feel free to ask any questions that come to your mind. If you are a doctor, then explain to the patient what kind of disease it is, how it will be treated and what side effects exist. These simple rules will significantly reduce the number of disappointments.
by Notes of the Wild MistressThey strengthen the muscles of the ankle joints, maintain their mobility, and if they do not solve possible problems of the ankle, they significantly reduce the risk of their occurrence. The feet and ankles are responsible for the correct biomechanics of movements, performing the function of shock absorbers and stabilizers of our body during movements (walking, running, dancing).
The following muscle groups are involved in the work of the foot:

- gastrocnemius and below it soleus muscles (carry out plantar flexion of the foot);
- anterior tibial(the main muscle of the foot, responsible for its flexion);
- peroneal muscles located on the outside of the lower leg;
- posterior tibial(responsible for stabilizing the ankle).
What are the consequences of a violation of the biomechanics of the foot?
Frequent injuries, improper biomechanics of the foot cause chronic pain in this area, lead to discomfort and stiffness of the ankle joint. Ankle problems as a consequence can disrupt the entire kinetic chain of our body and provoke injuries to the knees, hips and lower back. That's why it's so important to take the time to do foot strengthening exercises, especially since many of them can be done while sitting in front of the TV.
Foot Strengthening Exercises
Before doing foot exercises, do a 10-minute light cardio and joint warm-up.
- Standing on the floor, pick up 20 small items with your toes. Do at least two sets. You can connect a competitive moment.
- Sitting on a chair, curl your toes and hold your foot in this position for 5 seconds. Repeat three times. Over time, this exercise for the feet can be made more difficult by doing it while standing on one leg.
- While holding on to the wall, stand on the step with most of your feet hanging off the step. Perform 15-20 calf raises, rest a little. 3 approaches are expected. A more advanced version of this foot exercise is done on one leg.
- At the end of this complex, work on stretching the foot (exercises for small joints). Sitting, pull the leg bent at the knee towards you and fix the foot with one hand. Alternately with each finger to perform rotational and flexion-extensor movements. The range of motion should be as wide as possible, but without pain. For each finger, 6 approaches.

For development large joints at three levels (immediately under the fingers, in the middle of the foot and between the calf and foot), similar exercises are performed with the previous one. The foot is fixed by hand, then massage rotational and flexion movements are carried out at each of the three levels. To work out large joints, movements must be performed smoothly, feeling every turn, tilt and rotation. This exercise is designed for 15 minutes (5 minutes per level 1).
Complete the set with exercises to strengthen the muscles of the foot, ankle and lower leg. To do this, take 30 seconds to walk alternately on toes and heels.
Effective foot exercises for flat feet
Flat feet are often caused by muscle imbalances. To cope with the consequences, and this problem can be accompanied by pain in the ankle, throughout the leg and in the back, exercises for the feet with flat feet, which are performed while sitting on a chair, will help. To begin with, 2-3 approaches in each exercise will be enough, gradually their number should increase to fifteen. Determining the number of approaches, you need to focus on your well-being.
- From bottom to top, run your big toe along the front surface of the lower leg of the other leg. Change leg.
- With the inside of the sole of the left foot, stroke the right shin. Change leg.
- Roll along the arch of the foot alternately with each foot a hard tennis ball. The foot and the ball are in close contact.
- Make "raking" movements with the soles of the feet (imagine that you are on a sandy beach and with the help of your feet you are building a hill of sand).
- With straight knees, connect the soles of the feet (putting the foot on the outer edge of the foot).
- Grab and collect a piece of fabric with your toes; lift and move small objects (buttons, pencils, etc.) with your fingers.

The benefits of foot exercises are not only to strengthen the muscles and keep them in good shape. This is another effective way to help fight problems and diseases such as leg numbness, heel spurs, hyperlordosis, and arthritis. Daily walks, walking barefoot on pebbles, grass and sand are the same strengthening exercises for the ankle joints that we do without thinking.
There are different lanes in every person's life. Of course, I want them to be only light and bright, but even from difficult situations there is always a way out.
Almost a month ago, my dad was hospitalized with a stroke, he spent two weeks in intensive care, and it's been more than a week since he was discharged home. Yesterday he was able to sit up on his own, and his legs are slowly starting to return mobility.
Recently, I have read and reviewed a huge amount of information on how to recover from such difficult situations. However, one of the most effective methods was suggested to me by a rehabilitation therapist friend.
Foot exercises
When a person has limited mobility as a result of a disease (heart attack, stroke, polyarthritis), the thirst for life is still alive in him, the thirst for movement, and nothing can force him to remain chained to a wheelchair or bed. In these cases come to the rescue recovery exercises. Well, the one I want to tell you about, dear reader, is simply a miracle!
This method was developed hundreds of years ago by Tibetan lamas, but it has become known to modern man only recently. We invite you to discover the amazing exercise - interlacing fingers which will help restore youth and mobility of the legs.
It is also worth doing this exercise for the prevention of feet, if you do not want old age to take you by surprise.

Healthy feet and knees mean the difference between independent walking and a wheelchair. Diligent performance of this exercise will help to correct the damage caused to the feet during a lifetime.

INTERFACE OF FINGERS AND TOES IN SITTING POSITION
- Sit on a chair or on the floor. Bend your left knee, pull your leg towards you, and then grab your left foot with both hands.

- Interlace the fingers of the right hand with the toes of the left foot.
- Pull the tips of the toes with the heel muscles towards the knee and spread them apart.

- Hold this position for 1 minute and then repeat the exercise with the other leg. After doing the exercise, pay attention to how the color of the foot changes due to increased blood circulation.
- If you can't get your fingers between your toes, try wrapping your hands around your toes from the sole side, pressing the bottom of your hand against the rounded bone under your toes on the sole. Pull your toes towards the knee and spread them as wide as possible to the sides.

- After a week of doing this stretching the muscles of the foot you can begin to simultaneously press the thumb of the various reflex points on the big toe. In this case, with the thumb of the other hand, you can give the big toe an additional stretch, pulling it further away from the second toe. And also spread the little fingers and big toes in opposite directions. Try to increase the duration of the exercise every day. Start with 5 minutes a day.

INTERFACE OF THE FINGERS AND TOES IN THE LYING POSITION

Even the ancient Chinese noticed that the legs begin to age first, and then the whole body. After all, it is on the legs that a lot of nerve endings and reflex zones are concentrated.
Therefore, I suggest that you learn some useful recommendations that will help keep your feet healthy, and with them the youth and good condition of the whole body.

As you can see, everything is much simpler than it seems. Use this exercise as a preventive measure, and in severe cases as an effective recovery method.
Interlacing fingers and toes will help learn to walk again if you are patient enough and demanding of yourself. Do not forget that you have 10 toes on your feet and each one needs to be given due attention!
We hope that this simple exercise will help you keep your legs young and mobile for longer. Tell your friends on social networks about this truly miraculous method, perhaps it is very important for some of them now!
Familial spastic paraplegia, Strümpel's disease, is a chronic progressive disease, the main symptom of which is a bilateral lesion of the spinal pyramidal tracts.
The disease is hereditary and can be transmitted both dominantly and recessively. Most cases of familial spastic paraplegia are inherited in a recessive manner. These cases tend to be more severe. Pure forms of familial spastic paraplegia are mostly inherited dominantly. The high percentage of sibling disease in both dominant and recessive inheritance has made it possible for some authors to suggest the existence of several pathological genes responsible for the development of the disease with familial spastic paraplegia syndrome, and each of these genes is characterized by a certain age of onset of the disease.
The pathological anatomy of familial spastic paraplegia is characterized by "combined systemic disease of the spinal cord". The degeneration of the lateral pyramidal pathways is most pronounced, which is often joined by less pronounced degenerations in the columns of Gaulle, the anterior pyramidal bundles, and the spino-cerebellar pathways. There are also changes in the cerebral cortex, mainly in the recentral gyrus.
Clinically, familial spastic paraplegia is a rather heterogeneous disease. Only a relatively small proportion of published cases fit the picture of pure familial spastic paraplegia originally described by Strümpel. In these families, the main manifestation of the disease is spastic paraparesis of the lower extremities with a predominance of spasticity over paresis. According to modern concepts, this is due to the predominant lesion of extrapyramidal fibers originating in the 6th field of the cerebral cortex and going as part of the pyramidal systems.
The disease develops gradually, at first there is rapid fatigue of the legs, their stiffness. Objectively, in the early stage of the disease, there is an increase in muscle tone in the legs, an increase in tendon reflexes, and a pathological Babinsky reflex. In the future, as the disease progresses, clonuses of the feet and kneecaps appear, other pathological reflexes of the extensor and bending type (Oppenheim, Rossolimo, Gordon, Bekhterev-Mendel, Zhukovsky), the tone increases significantly and weakness in the muscles of the legs appears. Complete paralysis, however, is not observed. Gradually, a characteristic spastic gait develops - adducted hips, per equino-varus. Contractures and joint deformities may occur. Protective reflexes are called. Skin reflexes in most cases are preserved, as well as the functions of the pelvic organs. Sensitivity disturbances, coordination disorders are absent, intelligence is preserved. Hands are involved in the pathological process much later and not in all cases of the disease. There is an increase in the tone in the muscles of the hands of a spasmodic type, an increase in tendon reflexes, analogues of pathological reflexes are evoked; pseudobulbar symptoms are common.
In most cases, the syndrome of spastic paraplegia is accompanied by signs of damage to other systems. The combination of signs of family spastic paraplegia and hereditary ataxias - Friedreich and Pierre-Marie - is most often noted. Various transitional forms between these diseases, as well as between familial spastic paraplegia and amyotrophic syndromes, have been described. The question of whether these forms are caused by an independent pathological gene or are different phenotypic manifestations of the same process has not yet been resolved.
Atrophy of the optic nerves, nystagmus, weakness of the external muscles of the eye, dysarthria, various degrees of mental changes, intentional trembling, extrapyramidal hyperkinesis, and epileptic seizures can also join the picture of family spastic paraplegia.
With familial spastic paraplegia - even within the same family - there are large fluctuations in the age of onset of the disease. In some families, the appearance of the first signs of the disease ranged from early childhood to 40-60 years. In cases of pure familial spastic paraplegia, the disease usually begins in the second decade of life. The course of the disease is slow, steadily progressive. Patients can live to old age. In some cases, the appearance of the first signs of the disease or a significant increase in existing symptoms after various infections was noted.
Familial spastic paraplegia must be differentiated primarily from multiple sclerosis. In contrast to the latter, in familial spastic paraplegia, a steadily progressive course is noted, the predominance of spasticity over paresis, the long-term preservation of skin reflexes, the functions of the pelvic organs, the absence of sensory disturbances, and changes in the cerebrospinal fluid. Of decisive importance are data on the hereditary nature of the disease.
A clinical picture similar to familial spastic paraplegia can be given, especially in the initial stage, by tumors, arachnoiditis and other processes that cause compression of the spinal cord. Making the correct diagnosis in this case helps to identify sensitive disorders that indicate a certain level of damage to the spinal cord, changes in the cerebrospinal fluid.
Syphilitic lesions of the spinal cord, in which damage to the lateral columns can also occur, in most cases is accompanied by other symptoms (characteristic pupillary disorders, etc.), indicating a multifocal process, pathological changes (cerebrospinal fluid. There are no indications of the hereditary nature of the suffering.
In cases of a combination of familial spastic paraplegia with amyotrophies, it is necessary to carry out a differential diagnosis with amyotrophic lateral sclerosis. Unlike the latter, familial spastic paraplegia in the vast majority of cases begins at a young age, is not accompanied by bulbar disorders, fascicular twitches. Amyotrophic lateral sclerosis is characterized by atrophy of small mice of the hands, which are not observed in familial spastic paraplegia.
A clinical picture similar to familial spastic paraplegia can be given by Little's disease, in which lower spastic paraparesis is also noted. Unlike familial spastic paraplegia, the latter disease is congenital and, in some cases, is characterized by a gradual improvement in clinical symptoms.
Treatment is symptomatic. Drugs that reduce muscle tone are used: seduxen, elenium, midokalm, melliktin. Of the physiotherapeutic procedures, the use of diadynamic therapy (the impact of currents of various characteristics) and paraffin applications on tense muscles of the lower extremities is shown. Massage should be selective and used to reduce muscle hypertension. Remedial gymnastics uses passive movements, exercises to relax muscles.
What is familial spastic paraplegia and other articles on the topic of neurology.
Stand barefoot, leaning lightly on the back of a chair. The hips should be positioned exactly above the ankles. Make sure your weight is on your heels. To do this, lift your fingers and move them.
Keep both legs straight (very important not to bend your knees!), press your right foot into the floor and let your left thigh lift, lifting your leg off the floor a little.
Relax your arms and shoulders. Feet and ankles must be motionless. Practice this exercise on a regular basis until you notice that you can better balance and stand comfortably on one leg (relaxed shoulders, neck, face, etc.). It's not difficult, but few people can imagine what role tight feet play in maintaining balance until they test themselves!
Want to improve your foot health? Go barefoot more often
What is called "barefoot movement" has gained popularity in the last few years thanks to good books and magazine articles, and the spread of foot pain. People want to know why they hurt, and it's only a matter of time before anyone notices that shoes have a pretty big impact on the mechanics of the foot.
It would be much better if the “barefoot movement” started about a hundred years ago - before it was decided to lay asphalt and tiles everywhere. There is no proof that our feet were not made for shoes. Another fact that does not require proof is that people need a natural walking surface in order not to damage soft tissues and bones.

We Westerners have a habit of taking something “natural” and incorporating it into our unnatural lives, such as running long distances barefoot on cement or asphalt. So we take something good (the natural movement of the foot) and create an impact load that can lead to cracking and overloading of the bones of the foot, as well as soft tissue injuries. Train smart. If you want natural foot movement for optimal health, walk on natural surfaces. Shoes have protected us from too harsh environments for some time, and it takes time (perhaps years) to restore bodily functions. To help your feet heal faster, I highly recommend a plan to increase the mobility and function of the internal muscles of the foot, as well as restore the proper length of the tense external muscles of the feet and lower legs.
You can regularly see people getting so excited about the latest gimmicky trends that they run out to buy shoes that mimic walking barefoot because it's "better for their health." You can also see how these people, lacking sufficient motor skills, put on these new shoes and make long runs on the paved roads of the surrounding areas, their upper body leaning forward, increasing their landing force with each step.
Tips to improve foot health
- Start with a daily massage and stretch on your heels, midfoot, forefoot, and toes.
- Do exercises for the foot of the legs - and more often. Do them all the time.
- Understand that the position of the feet is supported by the muscles of the thighs, so make sure that you have optimal development of the lateral thigh muscles, hamstrings, glutes and adductors (inner thigh) through stretching and a full range of motion. Tight hips limit the function of the foot.
- Get super flexible shoes with minimal heels (or better, no heels at all).
- Before you take off your shoes, understand your posture and gait mechanics. Orthopedists are seeing a huge increase in forefoot fractures in those (even very experienced runners) who land on their forefoot with excessive force. The step should go from heel to toe, and not vice versa - from toe to heel. You need to run on a natural surface and with a properly distributed body weight (without tilting the torso forward).
- Go! If you prefer running, exercise for at least a year before you try to run barefoot.
- Accumulate your kilometers on natural terrain where slopes and rocky areas meet. The urban jungle is not a natural walking environment; friction and special grip, coupled with a lack of obstacles, can be quite traumatic for the human body.
An interesting note: as people become more aware of the steadily declining strength and dexterity of the legs, special parks for walking barefoot and street areas are beginning to appear, where there are litter-free pebble surfaces with many close-to-natural obstacles that train balance. At the moment, such parks are found mainly in Europe, but it is hoped that when their importance is realized, such sites will appear in schools and parks throughout the shoe-wearing world.
Are flip flops bad for foot health?

Can they be worn? Of course. This is the main way to protect the feet in public areas for swimming, when moving around the pool or walking on the beach. The negative impact of this type of shoe becomes significant only if you wear them often and thereby create a certain muscle pattern. If you like the feeling of openness and freedom in flip-flops, try to find a shoe with a minimal but well-constructed upper that allows your foot to breathe, but doesn't have to make the grabbing movement that changes your gait. There are many options for outdoor shoes that can be worn both in water and on land, making water sports safe for the foot and at the same time much more comfortable than heavy closed shoes.
Foot exercises
Regardless of the condition of your feet (and your shoe rack!) you are guaranteed to make significant progress towards healthy feet, and simple exercises and habit changes will help to do this. Our body at any age easily adapts to the situation.
Before you start doing the exercises, take a few minutes to determine your level of fitness.
Choose from the list below the items that are most true.
Some foot exercises can be more difficult than others, especially for athletes who put a lot of effort but little exercise on their feet.
Since most of us wear shoes from a very young age, we have not learned to control 25% of our muscles. The exercises in this section will help to work the smallest muscles of the fingers, as well as those that support the instep, connect the large muscles of the upper and lateral parts of the foot. These exercises are designed not only to reduce years of damage to the feet and knees, but also to help align the hip joints, increase bone density, and strengthen the pelvic floor muscles that control the bladder and support the internal organs.
Place to do foot exercises
To truly restore the feet, the exercises must be performed without shoes. Those with advanced neuropathy or diabetes should step on objects that will painlessly tingle the foot. If you have a very inflexible foot, exercising on hard surfaces can also be challenging. To avoid hurting your feet, prepare a surface suitable for bare feet.
- Vacuum the exercise area. This will allow you to remove small objects that can damage the foot and are difficult to see.
- Make room for a yoga mat or large bath towel.
- If you have very sensitive feet, place your exercise mat on a carpet or lay out several layers of sheets or towels to soften the surface.
- Make sure you don't miss anything.
Thoughtfully complete all tasks, do not rush. Many factors influence the effectiveness of the exercises, such as the position of the foot, the bend of the knee, and the tilt of the torso.
When stretching, you need to understand which muscles are involved - this will increase the effectiveness of the exercises.
Exercise #1: Calf Stretch
The calf muscles belong to the group of external muscles of the foot. Frequent wearing of heeled shoes puts a lot of strain on the back of the foot. It has been proven that long-term wearing of shoes with heels shortens the fibers of the lower leg by 13%!
You may think your calves are getting enough exercise, but I'm sure you've never experienced such a stretch before. There are many different options for working this muscle group, and many of them really work, but not all exercises are created equal!
To complete the exercise you will need:
- Full size bath towel, folded and rolled
- Chair or wall for balance
- Stand directly in front of the rolled up towel.
- Place the front of your foot on the roller and gently lower your heel to the floor.
- Stop for a few seconds, stretching and relaxing tense muscles.
- As you get used to this position, take a small step forward with one foot.

If your body starts to lean forward or you have to bend your knee, return your leg back to the floor until you can continue the stretch. If you find it difficult to balance, use a chair or a wall as a support. Return to starting position and repeat with the other leg.
Correct rotation of the pelvis during the exercise for the feet
After doing this exercise several times, pay attention to the position of the hips.

Incorrect (left): The pelvis is pushed forward relative to the calves.
Correct (right): The pelvis is in line with the calves.
The weight of the pelvis should be directly over the stretched leg. Drive your pelvis back until it is vertically above the knee and ankle of the back leg. Maintain this position as you pull your other leg forward.
Postures to follow when doing foot exercises
If your torso leans forward while stretching your leg, you have taken too much of a step forward. Reduce your stride until your body is vertical. If you can maintain the correct position, try increasing the distance between your legs.
Helpful Hint: The thickness of a rolled up towel can make the stretch more or less intense. If you feel tension in your knee, use a thinner towel or don't fold it all the way. If the stretch on a lower surface is still too intense, lift your leg slightly to decrease the angle at the ankle. The same is true for increasing the intensity of the stretch. To stretch harder, use a thicker or longer towel.
Why is this stretch so important? Optimal, upright walking should be an action that causes little to no tissue trauma. Humans, however, have developed a "falling instead of walking" habit that puts extra stress on the joints and bones.
Proper calf length will allow you to step without too much tension on the back of your leg, which shortens your stride in the long run.
The calf stretch is an easy way to measure how far you can go without being "pulled back". Also, this stretch is a good way to restore length to a muscle that has been shortened by years of wearing positive heel shoes. The longer you wore heels and the higher they were, the more difficult this exercise will be for you.
Be patient and careful with this stretch. If you've been contracting these muscles all your life, they won't stretch back in thirty days. To increase their length, you can slowly wean yourself from a high heel, moving to a smaller one and then to a flat sole, and also pay attention to the position of the pelvis and torso when walking. Stay upright!
Exercise number 2: Stretching the "grasping" muscles
Not all exercises are useful for every person at any point in life. On the contrary, some exercises can make the condition worse, depending on which muscles they cause to contract and how that contraction affects the joints involved. Towel rolls and ball lifts are fairly common foot strength exercises and are often recommended for patients with weak or stiff feet in the hope that increased activity will help resolve the problem. While this towel roll might help someone with generalized foot or knee weakness from recent surgery, I'm not a fan of using these exercises as a healthy long-term habit.
Similar to the mechanics of flip-flops, the grasping movement of the fingers tends to shorten the muscles of the fingers in the future, which can lead to reduced joint mobility. "Twisting the fingers" is also very similar to the movement that leads to curling the fingers under each other.
The muscles in the forefoot become strained due to overload as a result of wearing positive heeled shoes, wearing flip flops too much, or simply bad posture.
This exercise stretches not only the front of the ankle, but also the fingers, if they have a grasping habit.
To complete the exercise, you will need: A chair or a wall to maintain balance.

There are two ways to do this exercise. If you are at a beginner fitness level, start from a seated position. Those with more "one" and "two" responses may choose to start standing up if they wish.
- Step one leg back so that the outside of your toes touches the floor.
- If you are standing, you can start by bending your knee or, if you want to make the exercise harder, move your entire leg back from the hip.
- Try to straighten both knees and keep your body upright.
- Keep an eye on the pelvis: it will move forward to minimize the stretch, but this should not be done.

When the foot is very tight, the ankle will twist to the side, putting stress on the outer toes. It is not right! Align it with respect to the axis of symmetry so that the weight is evenly distributed on all fingers, from the thumb to the little finger.

Not properly

Correctly
Helpful Hint: Fingers often cramp during stretching, as you've been tensing them with every step for years. Feel free to start with a short stretch, literally a few seconds, and alternate legs. You will see that over time the cramps will stop.
Muscle tension during the exercise for the feet
If your main goal is to relieve muscle tension, pay attention to the choice of shoes. If you regularly wear minimal-top shoes, flip-flops, ill-fitting sandals, pumps, and clogs, your toe muscles work overtime to keep your shoes on. And all the stretch will disappear as soon as you strain the foot again.
If you find yourself sticking your pelvis forward, or if you like shoes with heels, then you are tensing your muscles, placing additional stress on the forefoot. By gradually lowering your heel and returning to the ground, as well as keeping your pelvis in mind, you can relax your toe muscles and increase the long-term effectiveness of all foot exercises.
Exercise number 3: Lengthening the muscles of the back of the thigh
If you've been wearing positive-heeled shoes all your life (and who hasn't?), it's not just the muscles in your lower legs that are stressed, but also the tissues in the back of your thighs connected to them. Super-tense calves can turn into super-tight hamstrings, especially if you adapt to the geometry of the shoe by bending your knees. Let's move the stretch area a little higher!
- roll of towel
- Stand straight facing the chair seat with your feet pointing forward.
- Bend forward with your hands on the chair seat.
- Push your pelvis back until it is just past your ankles. To make it easier for you, you can move a little closer to the chair.
If the back of your thigh is too tight, the muscles will pull your tailbone down towards the floor. In this position, try to gently lift the tailbone up off the floor, increasing the tension in the muscles of the back of the thigh.

If your pelvis twists a lot during this exercise, do it with your entire foot on the floor. However, to increase the stretch, you can place a towel roll under the forefoot. As with stretching the calf muscle, the height of the roll affects the intensity of the stretch. For even stronger stretch, increase the thickness of the towel, and to reduce, on the contrary, take a thinner towel or remove it altogether.
Stretching the back of the thigh during the exercise
The hamstring muscle often becomes tight, not only because we wear shoes all the time, but because of the daily long hours of sitting, which also cause it to contract. Stretching can (and should) be done throughout the day, especially if you have a sedentary job. Keep a towel in your office desk drawer so you can stretch your legs three or four times a day.
Exercise number 4: the wall is the best support for balance
This is another way to stretch and relax the back of your leg. Often, too tight muscles in the lower leg will pull the foot down with regular stretching. Using the wall as a support will prevent this movement and increase the effectiveness of the leg stretch.
For this exercise you will need:
- Cushion or ottoman for sitting
- Wall

- Starting position - sitting with straight legs. Sit on a rolled up towel, pillow, or small ottoman; this will be ideal if you have tight hamstrings - stretching will be more comfortable.
- Move to the wall and rest the soles of both feet against it. Make sure your heels are firmly pressed against the wall.
- Relax your hips. The knees should not be bent, but they should not be pulled towards the floor either. If your legs are so tight that they can't fully extend, you can move back a little from the wall to give your feet a little relaxation.
- Relax your body and slowly bend it forward, trying to bend at the hips, not at the back. If you can, reach the wall with your hands. In this position, you can rest against the wall with your palms, or at least reach it with your fingers; if you can't, just reach for it.
- Finally, you can relax your neck and lower your head forward. Take a few deep breaths, exhaling - relax and do not spring.
The springy movements during stretching are called dynamic stretching.
Similar exercises can be found in many martial arts, and this vigorous technique of rapid stretching is also found in contact sports. If this is not your case, remember that long static stretching, which will help the muscles to contract less and be healthier, is preferable.
Exercise #5: Finger Raise
The internal muscles of the foot are small but very important. The toes should move no worse than on the hands. But since they have been compressed and locked for a long time, it will take you some time to get the desired result.
Simple finger raises are five exercises rolled into one!
- Starting position - barefoot, socks pointing forward.
- Try to isolate the thumb muscle and lift it up so that the other fingers do not come off the floor!
- If it turns out to be easy, raise the second finger along with the thumb, then the third finger, and so on, until all five are off the floor.


When you lift only the toes, the foot and ankle should not change their position, that is, you should not twist the ankle slightly to help the toes rise. They have their own muscles!
If you're having trouble at the very beginning, you can lean forward slightly to hold the rest of your fingers - this will help your brain pick out the tissue you're trying to use.
To make things more difficult, once you have developed the ability to raise your fingers in turn, you can try lowering them back the same way, one at a time, in reverse order.
When you have mastered the raising and lowering of your fingers, you can try lifting each of them off the floor individually. It's much more difficult. Try to raise only the second finger. Everyone else should stay pinned to the floor. Once you figure out how to do this, you can start practicing with the third finger, then the fourth, and finally the little finger. This one takes a lot of practice!
If you develop hallux valgus, pay attention to your big toe as you lift it off the floor. Is he going straight up or is he still looking at the little finger? In addition to the levator muscle, during this exercise you can begin the difficult task of training the thumb abductor (the muscle that pulls the thumb away from the rest). Who would have guessed that foot exercises could make you sweat?
Foot Exercise #6: Toe Spread
Toes packed into narrow toe shoes adapt to tight spaces by squeezing together. This causes the muscles that pull the fingers towards each other (adductors) to become stiff and tight, while the muscles that pull the fingers apart (abductors) become weak.
To train the spreading fingers muscles, you just need to spread them. Spread your fingers! As often as you can, when you're barefoot, or even when you're shod, think of spread toes!
To complete the exercise you will need:
- Foot
- Something to sit on
- Look at your bare, straight feet.
- Try to spread your fingers apart so that there is space between them.
- See the floor between your toes? As you try to spread them out, notice if they are trying to lift off the floor or twisting into intricate positions.

When you first start this exercise, your fingers may not be very wide apart. To make it easier, stretch the muscles between your fingers with the following exercise.

How to do foot exercises?
- Sit in a comfortable position in which you can easily reach your toes (it is best to place one ankle on the knee of the other leg).
- Insert your fingers between your toes, starting as far from the base of your fingers as you can.
- Simply placing your fingers between the tips of your toes will already give you a good stretch, and as the muscles begin to recover and lengthen, move your fingers closer to the base of your toes until you can finally interlock a tight lock from the palm and foot.
- To stretch the muscles we need even more, you can start spreading your fingers, thus moving your toes even more apart. Stretch your foot as much as possible. Take your time - it may take you a long time to improve your foot health, because for a long time you have not thought about it at all!
- After freeing your fingers, try to stand up and spread your toes using only their own muscles. Is it better? Helpful Hint: If you have trouble reaching your toes, you can ask someone to help you.

Additional ways to perform exercises for the feet
Remember that most shoes squeeze your toes together while you're shod, so hours of stretching is needed to neutralize damage. Don't worry, I don't expect you to sit all day with your fingers between your toes. There are several low-cost solutions that will help you while you do your business - watch TV, read, and even sleep.
If you've ever gone to a salon for a pedicure, you must have seen the soft sponge inserts that fit between your toes. These "finger separators" are available at most beauty supply stores and pharmacies and are very inexpensive. Get a couple - they will help your muscles stretch while you rest. Sometimes stretching is really enjoyable, especially if you've been on your feet all day!
The only downside to these spacers is that after a few uses, they stretch quite a bit, making it impossible to walk or sleep in them.
Fortunately, there are new products on the market designed specifically for this purpose. For example, toe socks work great because they don't restrict your movement, they're softer, and they're machine washable.
Our mother quite reasonably made us wear formal brown shoes in elementary school, and we hated her for it! When we were eleven years old, we were allowed to wear whatever shoes we wanted. I was in love with a pair of light blue ballerinas, so I bought the only size that was available, even though my foot was already a size larger by this point. I paid a high price to make my leg look smaller! Years later, I had bunions, flat feet, tucked under each other, and developed severe arthritis in my knees.
Foot Exercise #7: Get on the Ball
Shoes protect our feet, and even when walking on uneven or rocky ground, on soft sand or hard ground, we only feel the flat, always the same surface of the insole. Numerous joints and muscles of the legs have neither the ability nor the need to move individually. To restore their mobility, you need to walk on various types of surfaces, and for training, a small but elastic ball is quite suitable.
Starting to stand on a tennis ball is a safe way to get your leg joints to move in ways they never did before.
For this exercise you will need: Tennis ball.

- Place the front of your foot on the ball. Let your foot gently embrace it.
- Place both feet side by side, and then start slowly, a couple of centimeters at a time, for twenty to thirty seconds, move the foot with the ball forward.
- Having reached the maximum position at which your heel has not yet come off the floor, return to the starting position and change legs.
When you have completed the exercise for both feet, start over. With the ball locked under the forefoot, move the foot forward, rolling it towards the heel so that the sides of the foot feel it. Make sure your heel stays on the floor! Take your time, the speed of the exercise should be comfortable for you. It is desirable that the contact area of the foot with the ball is maximum - this will help tone more muscles and joints, while without a traumatic effect!
Helpful Hint: If you feel your foot is too stiff, try this exercise while sitting. This will reduce the weight on the ball, and hence the pressure.
Make it harder gradually
The ball is a convenient sports equipment for starting exercises! It is easy to work with him, and the effectiveness of the exercises is quite high. If you want to improve the mobility of all thirty-three joints of the foot, first work out with the ball, and then complicate the task. On sale you can find special mats for walking - with smooth stones sewn or glued to the surface. They will allow you to walk on the "paved" surface without having to take off your shoes on the street.
If the transition from tennis ball to small pebbles seems too abrupt for you, try spreading a bath towel over the surface of the mat - this will reduce the intensity of the impact and allow you to adapt to the surface.
Key points for performing a set of exercises for the feet
- Before embarking on a wellness program, prepare a surface that is safe for bare feet.
- Try all of the above exercises. Which ones seem simple to you, and which ones make you sweat?
- For the exercise that will be the most difficult for you, take as much time as you need, based on your own feelings.
- Increase the time of each exercise and the number of repetitions or change the angles of the body to increase the stretch and make the program more intense.
Toe exercises
- Place your feet straight.
- Align the outside of your foot along a straight line, such as the edge of a carpet or a plank on a hardwood floor.
- Don't worry if your fingers start to "look" at the center of your body, with time and practice they will get into the correct position.

Vertical line from hips to ankles

Stand sideways to the mirror, holding a stick of some kind, such as a mop, perpendicular to the floor (so you can see the vertical line).
Still standing sideways to the mirror, place your ankles at the base of the stick and place the center of your pelvis on a line.
Don't bend your knees, but don't tense your kneecaps either.
Healthy Feet Exercise #1: Move Your Toes Independently

Start by raising only your thumb without moving the others.
Then raise the second finger, and only that.
Just like with your fingers, try moving your toes one at a time (practice!).
Healthy Feet Exercise #2: Calf Stretch

Feet pointing straight, heels on the floor, hips vertical above the ankles.
Healthy Feet Exercise #3: Finger Stretch

Grab your left leg with your right hand, and then vice versa.
For a stronger stretch, place your fingers deeper between your toes, closer to your foot.
Healthy Feet Exercise #4: Foot on the Ball

Stand up (or sit down, for less pressure) with your feet close together.
Keep your heels on the floor and press down on the tennis ball with the front of your foot. For a more intense stretch, use a golf ball.
Move the ball under the sole while continuing to apply pressure. Hold in each position for 20-30 seconds.
Healthy Feet Exercise #5: Forward Bend Against the Wall

Sit on a rolled up towel or ottoman with your knees and hips straight and relaxed.
Put your heels on the wall
Reach your hands up to the wall, bending at the hips, not at the back.
Breathe calmly and do not spring.
Healthy Feet Exercise #6: Hamstring Extension
Stand facing a chair with your knees straight. Feet point forward, heels on the floor, and the front of the foot is raised on a rolled towel.

Bend forward, bending at the hips (not at the back), stretch your tailbone up off the floor.
Healthy Feet Exercise #7: Spread Your Toes

Stand or sit with your feet facing forward.
Take your fingers away from each other, spreading them, from side to side, and not from top to bottom.
Healthy Feet Exercise #8: Finger Flexor Stretch

Starting position: the leg is laid back, the toe is extended with nails to the floor. The second leg is straight.
For more stretch, straighten your back knee and pull your hip back.

Human foot anatomy
The feet are an important part of your body. Once upon a time they were probably in your mouth, then you stood on them, and later they were more than once squeezed into a pair of shoes that were considered "the latest fashion".
But chances are good that you have no idea how complex the mechanism is below your calves.
There are about 200 bones in the human body, and 25% of them are below the ankles! The same applies to the muscles - a quarter of all the muscles and motor nerves of our body are connected with the feet. All of these parts are movable, and yet I'm more than sure that you can't control your toes the same way as your fingers, although you were born with such potential!
An ardent supporter of the natural sciences, Leonardo da Vinci spoke of the foot as the most complex mechanism. However, don't let this statement fool you into thinking you understand your own anatomy beyond your powers.
The structure of the foot
While the function of the foot is fantastically detailed, you'll be surprised how easy it is to navigate this complex area with a good "map".

1 - talus
2 - scaphoid
3 - intermediate sphenoid bone
4 - medial sphenoid bone
5 - bones of the metatarsus
6 - proximal phalanges
7 - distal phalanges
8 - intermediate phalanges
9 - cuboid bone - calcaneus
Most likely, you do not need to know the structure of the foot in such detail in order to successfully cope with the task of improving your own legs. But it is absolutely necessary to understand the following:

When it comes down to it, it turns out that most of us know more about our car than we do about our bodies. Knowing the basic operating characteristics and maintenance rules of the machine can significantly reduce wear and tear, the same applies to various parts of the body.
To significantly improve foot health, it is not at all necessary to remember the name of every bone, muscle, tendon and ligament, but it is extremely important to understand the big picture and the main points.
You must be able to independently evaluate your range of motion, this will be an indicator of the health of your feet. Knowing anatomical terms will also help you quickly understand the situation if you suddenly need medical help. At the age of five, I had to point the finger when the doctor asked where my pain was. It's a little embarrassing to do the same at thirty, forty or sixty. It's time to take responsibility for your own health!
The anatomical structure of the feet
In the modern world, shoes are designed to protect our feet from injuries and other troubles that occur when walking. In a time before antibiotics were invented, a simple cut could be fatal even to a healthy person, and shoes have evolved from light, protecting our feet to complex hiking, stabilizing the whole body. Recently, a completely new look has emerged - healthy shoes, and with it promising claims that a particular model can have a health or athletic effect through just wearing it.
The protection of the foot is inextricably linked to its insulation, which is achieved through dense and often rigid materials. Just think how many muscles, joints and bones help your hands to make a variety of movements! The ability to type, play the piano, operate on microscopic tissue, and even pluck your eyebrows are all the result of learning how to use your arm muscles and keep them toned. Now imagine that when you were two years old, someone put tight, thick leather mittens on your hands, squeezing all the bones together every day from morning to evening. Your body will adapt to the situation, learning to use your forearm muscles and wrist joints more. You will learn to use the outer edge of the palm as one "finger" and learn to work the entire hand as a whole. This method will seem absolutely normal, because it will be the only one known to you.
Now think about this: the original structure of your feet suggests the same potential for dexterity as your hands. Seriously! But wearing shoes every day creates a situation of hands in mittens for your feet, and you didn’t even know about it! We have weak, underdeveloped muscles within the foot, overworked lower leg muscles and joints, and passive tissues (those that cannot accommodate stress) such as fascial systems and ligaments.
The good news is that by learning a little more about your foot, you can regain many of the lost features and begin the recovery process immediately. Because your feet are made up of living tissue, they can change, grow, and improve despite what they have done (or haven't done) so far!
Why are the toes separated from the foot?
Usually when we talk about the foot, we mean everything below the ankle. The mental unification of this entire zone leads to the fact that we use all these tissues together. Each toe, like each finger, contains its own set of muscles that allow it to move independently. Although modern activities do not require us to use our toes individually, there is a certain sense in this. Each muscle is connected to its own nerve, which, when activated, supports the nutrition of that part of the body. Although in everyday life it is not required to write with your toes, thank God! My handwriting is already far from ideal! The ability for this kind of movement is required for optimal health in this area.
Toes move separately from the foot and from each other
Many people, especially those with chronic foot conditions, are unable to lift their toes while standing on their feet. Try it yourself. Stand up, take off your shoes and see if you can use your toe muscles in isolation so that the whole foot does not follow them. If you don't succeed, move your pelvis back so that your body weight is on your heels and try again. You'll be surprised how fast your fingers move if you put in a little effort.
Your fingers should move separately See how many unique movements you can make with your fingers: lift them one or two, play the piano, and even type. The toes have the same potential, but we neglect these muscle groups all our lives, so our tissues are rough, weak and atrophied, and the foot joints degenerate. No wonder they hurt! If you enjoyed the previous exercise, you will enjoy the next one too. Try lifting your fingers one at a time while keeping the rest motionless. I suggest starting with the thumb.
Don't worry if you don't get anything right now. In the end, in the course of training, you will learn this. In fact, many people who, for one reason or another, don't have arms have learned to handle everyday tasks with their feet, from changing a baby's diaper to writing and playing the piano. All bones, muscles and joints are in place, we just need to learn how to use them.
The front of the foot must move separately from the back.
Now that I've told you that your toes can work individually, keep in mind that the foot is not one giant, immobile bone, but is made up of twenty-six bones and thirty-three joints! The main reason our bodies have joints at all is to ensure smooth movement. Can you imagine how difficult it would be to use your arms and legs if there were no elbows and knees? Your movements would be extremely rigid! The same applies to the feet: the less you engage the small joints inside the foot, preventing them from performing their unique movements, the less control you have over the smoothness of your body weight stabilization. Stabilization of body weight involves distributing it to the most stable part of the foot (i.e. the heel) while walking, rather than allowing the entire body weight to push and compress the more delicate ligament and bone systems.
Believe it or not, there is not a single anatomical "part" that supports the instep of the foot. If you have problems with this part, whatever they are, you will need to deal with issues of endurance and foot mobility in one way or another.
Foot muscles
It is very important to understand that each muscle has its own nerve. When you do not exercise a muscle, the connection between it and the nerve is weakened, resulting in poor health for both of these tissues. The opposite is also true: if you tense a muscle more, it will positively affect its health and the health of the nerve, since the blood supply to the area will improve - more oxygenated blood will flow to it, and cellular waste that may otherwise accumulate and provoke disturbances in the tissues, will be excreted more often.
The nerves responsible for the movement of the muscles of the foot originate in the lower part of the spine. They run along the entire back and through the legs to the feet and are among the longest in the body.
The muscles of the foot are divided into two groups: external and internal. External muscles - those, one end of which is fixed at the foot, and the other - outside it. For example, these include the calf muscles - they move the foot, but are not completely enclosed in it.
Internal muscles - those that are completely in the foot. They are much smaller and are responsible for the small movements that control the numerous joints of the foot. An example is the abductor muscle of the little finger, which allows it to move away from the others.
If we remember our example with leather mittens, it is the internal muscles that will remain underdeveloped due to lack of movement. But the external muscles will have to work harder to compensate for the missing help. This is what causes leg pain. Ideally, the intrinsic and extrinsic muscles should work together to provide toe mobility, optimize the shape and position of the ball of the foot, and maintain muscle-nerve interconnection.
Joints of the toes

In the medical community, it is customary to number the toes from the big (No. 1) to the little toe (No. 5).
The bones in the toes are called the foot phalanges.
In all fingers, except for the thumb, there are three phalanges, and in the thumb only two. This allows them to bend more.
What role do the phalanges play in the foot?
FINGER #1: The Latin name for the thumb is hallux. It comes from the Greek verb meaning "to jump" or "to spring". The secret is that the thumb is the last to leave the ground when your pelvis (where your body's center of gravity is) moves into the next step.
FINGER #2: The second finger, also called the index finger, can be the same length or even longer than the thumb. This phenomenon is called Morton's finger. Often people say that the cause of the pain is a too long second finger. And while the long second phalanx does change the load on the foot, the discomfort is due to the combination of this factor with a certain gait pattern. If this is your case, you can change the mechanics of your movements and reduce the pain!
FINGER #3: Those with an overgrown webbing between the second and third fingers (a not-so-uncommon occurrence known as syndactyly) usually feel they are tightly tied. Here's an interesting fact: Dan Aykroyd, Ashton Kacher and Joseph Stalin have been among celebrities with fingers fused this way.
FINGER #4: This finger has no proper name. Perhaps that is why many people wear rings on it, in order to somehow designate it. This finger has the highest risk of brachymetatarsia ("brachi" - short, "metatarsia" - the bones of the feet), that is, stopping the growth of the bone at a young age. Many people with a shortened fourth toe find that adjacent toes shift under it, resulting in pain when walking and injuries such as calluses and corns.
FINGER #5: The smallest finger is called very cute - little finger. This toddler is usually unable to resist fashionable shoes and is often highly displaced, and due to friction and pressure, dense calluses develop on him.
Calluses and calluses of the foot
The appearance of calluses and corns is a clear signal that your feet are subjected to excessive pressure and friction.
Have you ever wondered what a corn is and how it got its name?
The top layer of your skin is made up of dead cells and is called the stratum corneum. The name comes from the Latin word horned, meaning "horned", as it is the oldest and hardest of the five layers that make up the surface of the skin.
The normal physiological response to mechanical stimulation (including friction and compression) is a seal that protects the irritated area of the skin.
The process of thickening is called hyperkeratosis ("hyper" - excessive, "kerat" - a form of the word "keratin", a family of structural proteins, "oz" - a suffix denoting a long process).
A callus is a small, grain-shaped result of hyperkeratosis, which is the result of how your foot interacts with its environment (shoes or surface). A corn is about the same, but it is flatter and wider than a corn.
Calluses can appear anywhere there is pressure on the skin, but they are most common on the outside of the little finger.
Calluses often form on the sole of the foot, where the pressure is greatest.
Curiously, in fact, the circulation of blood in corns is even better than in other parts of the skin. It's just a small patch of healthy but denser skin, but it makes us uncomfortable.

The best way to get well regenerating skin is to let your feet come into contact with the outside world without shoes. By allowing them to gradually adapt the thickness of the skin, we will be better able to cope with the sensations that walking barefoot causes.
What do you need to know about the foot?
- The anatomy of our feet suggests that we have the potential for much more complex movements than we are used to.
- If the complex mechanism of the foot is not used or not used enough, the muscles will atrophy.
- Most foot problems are the result of some fabrics not being used and others being overused.
- The muscles in your foot are exactly the same as those in the rest of your body, they adapt to regular stress and special exercises.
- Foot muscle training can improve tissue regeneration, which in turn relieves pain and improves overall foot health.
The effect of running on the joints
Running with sore joints - good or bad?
Scientists conducted a study on runners to see if they developed arthritis. According to Dr. Benno Nigg, there is no difference in the incidence of osteoarthritis between runners and sedentary non-runners. Runners choose this sport themselves. If you have a light, flawlessly built skeleton, running can be your life's work.
Conversely, an overweight person with flat feet and different leg lengths may experience pain on the first attempt to run, and he will find running a burdensome activity.
Twenty years ago, I made the decision not to run. Why? To put it bluntly: because of the fear of arthritis. Looking back, I ask myself if I would not have retained more flexibility and less wear and tear on my joints if I had continued to run. But having a hollow foot and a minor knee injury, I think I made the right choice. Some researchers, on the contrary, believe that by leading a mobile lifestyle, we help the bones to respond normally to age-related changes. One study supported this notion and showed that people who stopped running had more signs of bone buildup than those who continued to move.
However, not all studies confirm that exercise - running has a positive effect on health. A study conducted at the University of South Carolina College of Medicine found that "the development of osteoarthritis in men under 50 years of age (30 km or more) was associated with a high level of physical activity." Among recreational runners who make smaller runs, a large number of cases of osteoarthritis have not been identified. Epidemiological studies of activities that have less impact on a healthy joint have not shown an increased risk of knee pain or radiographic evidence of arthritis. The key phrase in this case is “on a healthy joint”.
One of the main risk factors for such exercises for the joints can be undetected old injuries. Recreational runners with micro-cracks in the cartilage or minor damage to the bone underneath may be prone to progressive cartilage wear. Among other things, Dr. Gabriella Wernicke and Dr. Richard Panush of St. Barnabas Medical Center, in an article in the Bulletin of Rheumatic Diseases, noted that running can affect the musculoskeletal system, especially if you have any mechanical damage or defects. . They state: “Given that excessive rolling of the foot in a flat foot increases stress on the internals of the ankle, shin, and knee, and that the foot expends tremendous amounts of energy per kilometer run, the combination of flat foot and high load on the lower extremities increases the risk of injury in the foot. result of too long use.
Running surface for sore joints
Each type of coating has a specific effect on the joints.
- Slag was the standard treadmill material in the 1970s until it was replaced by rubberized surfacing. Cinder tracks are more preferable for training because they spare the joints and muscles, preventing them from moving too fast, unlike modern surfaces. Slag is made from ash by mixing it with soil or crushed stone. Pat Newnan says: “Slag was one of the best choices. I mean, he slowed down like hell, but at the same time spared the body. Many cinder tracks have now been replaced with polyurethane synthetic surfacing.
- Concrete. “The worst coating is concrete. It is merciless to the joints,” says Dr. Newnan.
- Asphalt. It is slightly better than concrete, but only if it is not very old.
- Brick is a fairly hard surface compared to asphalt.
- Monolithic polyurethane synthetic coating. Some tracks made of this material are designed to produce a strong cushioning effect. The very best are designed to soften the impact of your run while increasing your speed at the same time.
- Grass and soil. Considered one of the best surfaces, but remember: if you have weak muscles or damaged joints, an uneven surface can contribute to further destruction of them.
A ride on the bicycle
Exercises on a bicycle for joints
Kevin Wilk agrees with my opinion: "The bike is very gentle on the joints and is a very good device in terms of resistance." Mickey Levinson, a physiotherapist at the Clinic for Special Surgery, confirms this point: "Cycling is probably the best sport because it puts less stress on the joints."
In addition, a bicycle can lead to positive changes in the knee area, even if its resistance is zero! Exactly. Even if you set the load to zero, you reduce the stiffness around the joint. “In fact, in my last study, I was interested in the response of the cardiovascular system, so all the subjects were exposed to aerobic exercise and noted a reduction in pain,” says Dr. Kathleen Magnon, a physical therapist from the University of Arcadia. Patients with arthritis of the knee often report that their condition is deteriorating rapidly, meaning that their heart and lungs are less able to exchange oxygen efficiently. They will be happy to know that this ability can be easily restored by cycling. A prone exercise bike with a chair-like seat is the best option for those who find it difficult to move around. My father had a very difficult time walking - partly due to osteoarthritis of the hip. Cycling helped him stay in good shape. During Dr. Magnon's study, even those subjects who did not exercise very intensively showed significant improvements.
Joint stress while cycling
At first, cycle three times a week for ten minutes at a time, and gradually add five minutes each week. Another helpful tip: buy a comfortable seat. If you use an exercise bike at the gym, get a gel seat cover. For your own bike, get an ergonomic saddle that specifically adjusts to the anatomical structure of a person. As you increase the speed, notice a significant increase in the number of calories burned per hour.
Riding a scooter
This is a great portable sports equipment. I have taken my scooter with me to Chile, Africa, Pakistan and the Middle East. Scooters fit perfectly into a suitcase. I use a model with large wheels and a solid base that allows me to do longer, safer and more comfortable workouts. Riding a scooter is a great aerobic activity with very low impact. To increase the effectiveness of the training, I look for hills and hills. A scooter is a great alternative to walking if you have joint pain. If you are no longer a child, try the "XCooter", a luxury scooter for adults.
Aerobics for joints
The traditional doctrine of aerobics is as old as the world. Of course, it strengthens muscles, accelerates the process of weight loss, increases mobility and improves well-being. Nothing to complain about, but the most compelling reason to do aerobic exercise is that it can have an immediate beneficial effect on cartilage.
- The hamsters that ran on the wheel produced better the main component of cartilage, the so-called proteoglycan, and the cartilage itself was less damaged.
- In humans, physical activity causes hardening of the cartilage.
- Pain relief observed: Patients with osteoarthritis of the hip or knee who walked three times a week reported a reduction in pain.
- Dr. Marian Minor, a physiotherapist at the University of Missouri, has seen patients with rheumatoid arthritis accompanied by joint swelling. She determined that after performing aerobic exercise, the tumor decreased by almost 50%.
- One study compared walking and cycling to isometric exercise. Scientists were able to measure the blood flow into the inner cavity of the joint - the synovial membrane. They found that people who walked and cycled had much better circulatory function than those who did isometric knee exercises, which have always been considered the best exercises for knee swelling. In addition, researchers have found that when the leg is bent at the knee, its blood supply is disrupted.
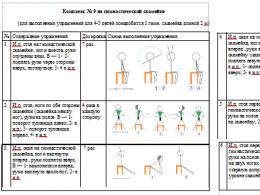
Squats and joints
Position. The main condition for the safety of doing squats is the so-called hip dominance strategy, that is, moving the buttocks back. The regular squat is performed using only your own body weight.
Instructions. Place your feet shoulder-width apart. Keep your feet straight or turn outward a little, which will allow you to use your muscles more. Lower your body by bending your knees and hips. Imagine that you are sitting in a chair that is behind you. Pay special attention to certain parts of the body. Keep your head up. Tighten your abdominal muscles. Extend your arms out in front of you to balance your movements. While squatting, you should be able to see the tips of your socks. Lower yourself only until the thighs are parallel to the floor and a right angle forms between the lower leg and thigh. If you put your weight on your toes too much, there will be too much pressure on your knees due to shear and compression forces. Rise from a deep squat in the same well-coordinated movement. Look ahead with your head up and your back straight. You can lower your arms along the body. Do repetitions until your muscles get tired. To develop the necessary strength, perform more repetitions or use weights, but only under the supervision of a trainer.
Warning. When you squat, there is a lot of stress on your kneecaps. In addition, squatting compresses the knee joint. The deeper you squat, the more compressive force is exerted on it. Among physiotherapists, the term "arc" is used. For example, a physical therapist may limit your range of motion from 0 to 60°. These 60° are the "arc". If you suffer from kneecap pain, there are two ways to deal with this problem. First, you can do half squats, which are limited to 45 to 60 degrees. Secondly, when you squat by sliding your back up and down the wall, this method puts less pressure on your knees and causes almost no pain. Dr. Neil Roth adds, "I'm not a big fan of weighted squats and I find them to put a lot of strain on the patella, but with little or no weight they're pretty effective and harmless."