Push-ups in the horizon without support on the legs. Handstand push-ups without support
We will try to teach you an unusual way of push-ups - "Push-ups without the help of legs." Their essence lies in the fact that a person focuses on the muscles of the arm, without helping himself with the muscles of the legs, because their legs should be above the floor surface. Planche is the basis of the exercise, while the body is in a horizontal position.
This is difficult to do and in order for you to do everything right, you will have to train intensively. First of all, it is good to master the classic push-ups. Without such a foundation, it makes no sense to go further. The obligatory minimum is fifty push-ups performed with a narrow grip, and the same number with a wide one. If you can't do that yet, train by doing exercises, such as the horizontal bar, to strengthen your muscles.
There are special schemes, thanks to which you can master the implementation of exercises without legs.
How to learn push-ups without legs?
Scheme No. 1.
Step 1.
The very first and main thing is to do push-ups with your hands at waist level. Every day, put your hands closer to your waist. If it does not work out, do not be discouraged, hard training - and you will succeed. Get yourself in shape when you can do 20 push-ups. It may take you several months to prepare, but it's not scary. The main thing is that you will achieve results and strengthen your muscles.
Step 2
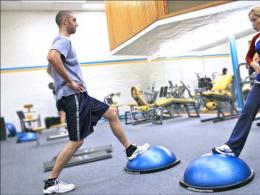
After successfully mastering the first stage of training, you can safely move on to the next - push-ups near the wall. This is far from push-ups without legs, but still closer. Put your feet on the surface of the wall and do the usual push-ups. It is recommended to wear socks to ensure slip. Do arm extensions due to the muscles of the arms, without placing a strong emphasis on the legs. The more of these exercises you can do, the better. But, as in the previous stage, the required minimum is twenty times.

Step 3
This step is transitional, after it you can easily do classic exercises without legs. So, lie down in an emphasis lying down and try to do push-ups with your legs raised and slightly apart to the side. You will certainly succeed if before that you did everything following the instructions. Try to get as low as possible during push-ups. And thus get to the point where
You can push up 20 times. This can take quite a lot of time, but still, it's worth it.

Step 4
And finally, the final stage. It is similar to the previous one, but the difference is that you must perform the exercise with closed legs above the floor. This is an extremely difficult exercise and you will master it only after months of intensive, exhausting training. And remember, if you can’t immediately get one of the elements, don’t give up!

In this video, you can find additional information regarding the preparation for doing push-ups without legs:
Scheme No. 2.
This training scheme is also suitable for learning how to do push-ups without legs.
Step 1.
Group on the floor and lower your straight arms to support, while slightly lifting your legs, this is the “float” pose. Stay in this position for as long as possible. When performing the float, keep the pelvis as high as you can.
Step 2
Try doing push-ups while in the float position. The number of push-ups is at least twenty. Only now it is worth starting to master the next type of push-ups.
Step 3
Try to get into a push-up position with your legs up and out. Stay in this position for as long as possible. Now move on to training the push-ups themselves in this position. And again, only after completing at least 20 times, you can proceed to the next step.
Step 4
Now the exercise "Push-ups without legs" should work for you. First, bring your legs together and stay in such a plank. Do this until it becomes easy enough for you. Now you can move on to the push-ups themselves. You should succeed!
Instruction
It is necessary to carry out training in a complex way (since not only the arms, but also the shoulder area, torso, and the entire body need loads). In order to make your arms stronger and pumped up, you need to perform special exercises. Here are some of them: 1) take the expander and stretch your arms forward; then, without bending your arms at the elbows, try to stretch the expander as wide as possible;
2) take one handle of the expander in your hand, and step on the other, then rest your elbow on your thigh and bend your arm at the elbow. Do these exercises as many times as you can, rest a bit and do two more sets. Please note that it is worth increasing the load gradually, otherwise you can only harm yourself.
Do not forget about the muscles of the body and the press. It is necessary to lie on your back, fold your hands behind your head and tear your legs off the floor first, and then the upper part of the body. You can also pull your knees to your chest, trying to touch your right knee with your left elbow each time (and vice versa). Here is another exercise: you need to lie on your stomach, stretch your arms forward, bend over with a "boat" and sway. Perform all exercises at a fast pace for three sets each (with five minutes). Adjust the number of times in any of these exercises according to your abilities (do not overdo it, otherwise you can "tear" the muscles or pull them).
Push-ups will also help make your arm muscles stronger. Spend them at a fast pace, keep your hands a little wider than your shoulders (this way you will make the necessary muscles "work"). If you place your arms too wide, the load will fall on the shoulder. To begin with, 20-30 push-ups are enough, gradually increase their number to 50, and then up to 100 per day.
Pull-ups will help you achieve your desired physical shape faster. Pull-up exercises should be carried out with your hands shoulder-width apart, and at the same time touch the crossbar with your chin. There is another option: spread your arms as wide as you can, and then pull yourself up, trying to touch the crossbar no longer with your chin, but with your neck. Do two or three sets each time, after each take a ten-minute break.
Tip 2: How to do push-ups correctly: we achieve the effect in 2019
The push-up is a great exercise to visibly improve the shape of your chest and shoulders and strengthen the muscles of your entire body. The big advantage here is that you can perform it almost anywhere and in any conditions. Push-ups do not require any special equipment, no gym, or even some special clothes or shoes. The only thing that is required to achieve a positive effect is the correct execution technique.
Instruction
Starting the exercise, choose a suitable starting position for yourself. You can do push-ups while lying on the floor or from a small elevation (a gymnastic bench or a low sofa). The second option is simpler and requires less load, it is more suitable for poorly trained people. Pay attention to the position of your body and legs. Throughout the exercise, the body should be elongated in a straight line and tense.
Pay special attention to the position of the hands. Usually, small children also begin to do push-ups, leaning on the inside of their open palms. The fingers are turned forward. This is a fairly comfortable and safe position for the hands, although it does not directly stress the muscles of the hands and wrists. But if your goal is not to strengthen them, but the shoulder girdle and chest muscles, this pose is quite suitable.
Start doing push-ups by bending your elbows and trying to touch the support with your chest. Then, slowly, unbend your arms and return to the starting position. Take your time and do not try to throw the body with a jerk. Firstly, it significantly reduces the load on the trained muscles, and, accordingly, decreases from the exercise, and secondly, such jerky movements can be traumatic for the elbow joints.
Perform push-ups in series in several sets with short breaks in between. Start with a small number of repetitions in the series, with 5 or 8. If you see that the number of push-ups you perform is quite easy, gradually increase it, bringing it up to 15-20. But do not try to bet at one time - it is better to increase the number of approaches. However, do not push yourself to the point of exhaustion, otherwise you will not be able to train effectively next time.
If you have a lot of weight or very weak arms and you can't do push-ups correctly, don't worry. Just change the starting position: slightly bend your knees and lean on them, and not on your toes. In this case, most of the body weight will be on your knees and it will be easier for you to perform the exercise. However, do not forget to make sure that your body is extended in a straight line, and the buttocks do not bulge upward.
An excellent exercise for strengthening the fingers is push-ups from the floor on fingers. This type of push-up is practiced most often in martial arts to strengthen joints and develop tenacity in wrestling. Strong fingers are the most resistant to injury.

Instruction
Push-ups on fingers- this is really the most difficult level of exercises. To start, use all five fingers and gradually remove one at a time. The mass of your body will act on the thumb, and the rest will sag down. Try to keep your fingers straight and slightly protruding upwards.
It is unlikely that you will be able to do push-ups on the first try. fingers so learn to stand on them first. Twenty seconds to start, then forty and gradually increase the time. Do push-ups from your knees first, but when you feel confident, start doing push-ups from your toes.
Spread your fingers in the shape of a spider and rest on the floor with straight arms. Slowly lower yourself down, while bending your elbows and spreading them to the sides. Then return to the starting position. If during the exercise you feel severe discomfort, stop push-ups to avoid injury.
In several approaches with a short break. Remember: it is better to do ten push-ups in four sets than twenty-five times in two sets. Do the exercises until you feel moderate fatigue in fingers and muscles. Set a sixteen-hour daily allowance for yourself and do push-ups according to your work schedule or mood.
Perform the exercise correctly, the main thing is that the body is straight throughout the exercises. Try not to stick your buttocks up, your back does not bend, your head should look at the floor. The deeper the seat, the better, ideally touching the support with your chest or the tip of your nose. Breathing is systematic: when lowering the body, inhale, when lifting, exhale.
Intensive systematic loads will help to achieve the desired result over time, but it will take a very long time to wait. While doing special exercises and doing them correctly, you can learn to push up much faster. When performing new exercises, it is necessary to monitor the correctness of all actions, and even more so to ensure that there are no gross errors, otherwise it is possible that a person will even harm himself.
Push-ups from various surfaces
Training in push-ups from the floor occurs on the principle from simple to complex. Mastering the simple, gradually complicate the actions. There are three options for classes: push-ups from the wall; further - on a hill that the body is able to overcome; and gradual decline. In the end, the ability to push up from the floor is developed.
Wall push-ups are very easy for beginners. It is enough just to stand a meter from the wall and start push-ups. Try to push out exactly as much as you can, and then repeat, making five approaches. After the walls, they gradually “approach” the floor, using the elevation and acting according to the previous scheme.
The last thing to do is to remove the elevation, but do push-ups from your knees. This allows you to reduce the load. Having got used to these exercises, you can start doing push-ups with the classic version.
It is important to adhere to a certain scheme during classes, that is, systematicity.

Without legs, better known to all knowledgeable in the sport under the name "push-ups in the horizon." This interesting exercise is not very common due to its complexity - as a rule, novice athletes do not include it in their training program.
First, let me explain the name of the exercise itself. Horizon (planche) is a sports term denoting the horizontal position of the athlete's body (parallel to the floor). In this case, the emphasis is only on the arms and, in general, on the shoulder girdle, the legs are in the air (the legs can be apart, which is an easier option, the legs can also be together, and this option is more beautiful and more difficult).
This type of exercise, as mentioned above, is not suitable for every beginner. Only those who have initial physical training, perseverance and patience can master it. You can only move to legless push-ups if you can easily do 50 push-ups with narrow and wide stances.
If you want to learn how to make a planche but can't seem to get the bare minimum, you might be interested in the following articles:
So, the horizontal position of the body in sports is called planche or horizon, and the exercise itself, where it is used in dynamics, if I may say so, is called push-ups in the horizon. In principle, you can also say “push-ups in planche”, but no one seems to say that.
I want to offer you two push-up strategies without legs. Both of them are effective, so choose the one that is more convenient for you.
Strategy one
We put our hands at the waist, and in this way we do push-ups - and this is the first exercise that will bring you one step closer to the desired element. I’m willing to bet that if you tried to do push-ups like this from scratch, you wouldn’t succeed. Yes, this exercise is difficult to perform, but do not despair - everything is achievable, the main thing in sports is patience and perseverance!
The exercise is aimed at developing triceps, shoulder girdle and back muscles.
How to do push-ups with hands at the waist
- Take an emphasis lying down. The body at the same time forms a straight line from the neck to the toes.
- Place your hands as close to your waist as possible. You can put your palms parallel to the body or spread them apart - this does not play a special role, but the load on the wrists changes. If your hands are not flexible enough, then it is better to spread your fingers apart.
- Follow the correct breathing! The body rises - exhale, the body falls - inhale.
- You may not be able to do push-ups with your hands at waist level right now, but it's not scary. With each workout, try to put your hands closer to the pelvis.
To learn how to do push-ups without legs, repeat step #1 until you can easily do 20 push-ups with your hands at your waist.

The next task is push-ups in the horizon against a wall or other support. This exercise is more similar to planche push-ups, but differs from them in that here the legs rest against the wall, and not stay in the air.
How to push up from a wall
- Take an emphasis lying down. Keep your body straight, do not bend.
- Place your hands at waist level. Put your feet up against the wall (you will need to slide your feet up the wall, put on your socks).
- Raise and lower your body on your hands without resorting to the help of your legs. They are just support. In this exercise, they must slide along the wall just to keep the body balanced.
- You should be free to do 20 (better if more) reps before you start learning unassisted horizontal pushups.

We complicate the task. Now you need to take an emphasis in the horizon with legs apart (they should be in weightlessness, without support). Try push-ups while staying in this position.
If you performed the first two stages with high quality and conscience, then 5-10 times you should wring out without problems.

Finally, we proceed to the most important thing - push-ups without legs with legs together. In fact, we performed them in the third stage, but this is still a lead-up exercise, since push-ups with legs apart are still an order of magnitude easier.
- Take an emphasis lying down.
- Place your hands at your waist.
- Bring your legs together.
- Push up from the floor at the horizon.

For advanced: do all the exercises on the fists and fingers.
Strategy two
An exercise called "float".
- Place straightened arms on the ground. Put your palms in any of two positions - either moving your fingers to the sides, or placing your palms parallel to the body.
- Group up (pull your legs towards you) and hold the body in your arms for as long as you can.
- Raise your pelvis to the highest possible height for you. With each new workout, try to raise it higher until you reach the highest point.

We do push-ups without legs in the position that was discussed in the previous step. Remember that the pelvis must be raised high. Having reached 20 repetitions, we move on.

- From the “float” position, slowly move to the horizon, spreading your legs.
- Hold the body in this position for as long as possible.
- We return to the starting position.
When this exercise is effortless, start push-ups with legs apart (without using a support). After you reach twenty repetitions, you can move on to the next step.

- From the “float” position, stand in the horizon with your legs together.
- Hold the body as long as possible.
- Return to starting position.
Then proceed to horizontal push-ups with your legs together.
Either of these two programs will help you do legless push-ups over time. The study time is up to you. You can choose one of these strategies and work with it, or use them together.
And remember, patience and work will grind everything!
Push-ups without legs or in the horizon (Planche) is an advanced exercise for athletes with a good level of physical fitness. If the classic push-ups no longer bring you the necessary satisfaction, try to master this spectacular and complex element at the junction of gymnastics and workout. With some patience and hard work, you will be one of the few athletes who have succeeded.
About the exercise
Performing horizontal push-ups requires mandatory basic training. The muscles of the arms and shoulder girdle, as well as the entire muscles of the body, actively participate in the movement. As a preparation, you can use push-ups with a narrow stance (for triceps), classic push-ups, push-ups with legs above the head, etc. When you can easily perform any standard push-ups 50 times, you can start mastering the horizon.
In addition, do not forget about training the muscles of the press and back. After all, in order to keep the body in a position parallel to the floor, you will need to maintain perfect balance, and the coordinated work of the muscles of the body will help in this.
Learning push-ups in the horizon takes place in several stages - from simple to complex. Breathing plays an important role. Everything here is like in ordinary push-ups - exhale on the rise, inhale on the lowering. Horizontal push-ups involve significant tension in the muscles of the upper body, which makes it difficult to breathe. At this point, it is important to pay attention and learn to breathe evenly no matter what.
Teaching methods
In order to understand how to learn how to do push-ups without legs, it is enough to clearly imagine the intermediate steps that will allow you to bring the body to a horizontal position. There are two approaches here.
- A gradual increase in the complexity of push-ups from ordinary triceps to horizontal. Mastering the balance on the hands occurs gradually in the process of complicating the exercise.
- Initial training in balancing on the hands with legs drawn up to the body, spread apart and stretched horizontally. Further training in push-ups in each of the mastered positions.
You can choose any of the above methods or combine them. The end goal is one way or another.
Method one
With this approach, you gradually increase the difficulty of push-ups, finally reaching the horizon.
So the steps are as follows.
- The first step is to learn how to perform triceps push-ups, gradually moving your hands closer to your waist. At the same time, the brushes are placed shoulder-width apart, and the fingers are directed forward, the elbows are pressed against the body. If the flexibility of your hands is not enough for this position, turn your fingers to the sides. These push-ups need to be brought to a minimum of 20 times in three approaches.
- At the second stage, you are already starting to raise your legs, while leaning against the wall. You touch the walls a little with your feet, insuring yourself from lowering your legs to the floor. During push-ups, take small sliding steps up and down the wall. Gradually try to keep touching the wall to a minimum. Bring the number of such push-ups to 20, as in the previous case.
- The third stage - push-ups without support, legs apart. When your legs are not joined together, but slightly apart, balance is much easier to maintain. At the same stage, you learn to go into the horizon not from a lying position, but from a squatting position, hands on the sides of the body. To do this, while squatting, you transfer your body weight to your hands and straighten your legs back and to the sides. Your muscles are already sufficiently prepared for this movement in the previous stages, you only need to develop coordination. Learn to go to a horizontal position and push up in this way 3 sets of 5 times.
- The final is the same as in the previous step, only now you join the legs together. These are the same horizontal push-ups that you originally aspired to. Congratulations, you have reached a new level of ownership of your own body! Perform 3 sets of 5 times.
Method two
This method implies that you first learn to support the weight of the body on your hands alone, without using your legs. After mastering this skill, you begin to perform push-ups without legs in a tucked position. And then you unbend your legs back and learn to hold the body and do push-ups horizontally.
Let's take a closer look:
- The first step is hand balancing. Squat down, place your hands on either side of you. Shifting your weight onto your hands, gradually raise your pelvis. Try to stay in this position for as long as you can. Once you've worked out how to maintain your balance, try doing push-ups in this position. Bring the number of push-ups to 20.
- In the second stage, from a squatting position, learn to raise your pelvis higher and extend your legs to the sides. Stay in this position for as long as possible. Then start push-ups with legs apart.
- The third stage involves the exit from a sitting position immediately to the horizon with legs brought together. Once you have worked out the balance, start training push-ups. Bring the exercise up to 5 reps in three sets. You have achieved your goal, reap sports laurels!
This method, just like the previous one, will lead you to the result. Important points to pay attention to in both cases are complete control over the muscles of the body and even breathing.
Horizontal push-ups are a challenging and beautiful exercise that shows that your level of fitness is truly admirable!
Most people will tell you that just push-ups will not work to pump up your arms. They are both right and wrong at the same time. And now we will try to explain why.
What are push-ups for?
Of course, with the help of push-ups, you can develop the muscles of the arms, chest and shoulders. This is a favorite exercise of karatekas. For physical education teachers, this is a favorite way to punish disobedient students. And for you, it can become an effective tool for pumping up your hands.
However, we will immediately make a reservation that it is impossible to achieve such hands as those of the iron Arnie with push-ups alone.
- The thing is that for a significant increase in muscle volume, it is necessary, firstly, to increase working weights. And your body weight is relatively stable. With standard, you lift 70% of your torso mass. Raising your legs on the bench - you increase this percentage. A solution to this problem is the use of weights.
- Secondly, the mechanics of movement itself implies a load on the pectoral muscles and triceps. it is forbidden.
But, do not immediately discard this exercise as ineffective! It is quite possible to increase the volume of the shoulder by a couple of centimeters and increase strength indicators.
In addition to developing upper body muscle strength, push-ups are good for:
- Normalization of blood pressure.
- Development of the respiratory and cardiovascular systems.
- Increasing endurance.
- Vivacity of the body and spirit, if you do push-ups in the morning.
This exercise is an easy and painless way to train your torso when you don't have the time or money to go to the gym.

How many pushups to do
The frequency of training using push-ups, as well as the number of repetitions and sets depends on your goals:
- If you want to pump up the arms and muscles of the upper body, develop strength - you need to do push-ups 3 times a week, in 4-5 sets of 6-8 times with weights. What is weighting and how to apply it in this case, we will tell a little later.
- As one of the charging elements, we recommend doing 10-30 push-ups every morning.
- To increase endurance - we do push-ups 2 times a week for a maximum of 2-3 sets. Over time, the number of repetitions will increase, volumes may decrease. You're not training strength, but endurance.
Push-up techniques for all occasions
To warm up your muscles before training, do a little warm-up. Warmed up? Then let's get to the exercise!
Reverse push-ups for triceps
Let's talk about back push-ups. With their help, you can maximize the loading of the triceps and relieve the load from the chest.
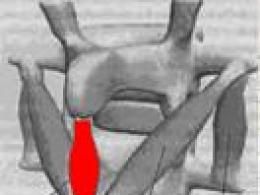
Pumping up triceps means, for the most part, pumping up arms. After all, triceps make up to 70% of the muscles of the upper arm, and biceps - only 30%. In particular, therefore, it is useless to pump only one biceps for the sake of the thickness of the arms.
To pump up the triceps, you can perform the exercise in two versions: legs on the floor and legs at the same level as the hands, that is, raised to a support.
Option 1 (easier):
- We take a chair (it is necessary that it be stable and not fall apart during the exercise - we swing triceps, and do not break the coccyx). Ideally, of course, use a sports bench.
- We turn our backs to him and lean on him with straight arms. Elbows look back and they are strictly parallel to each other! That is, the hands are shoulder-width apart.
- Legs together, stretch them forward so that the lower back is next to the chair. Try to go as low as you can. Elbows will go up. Keep them parallel.
- Extend your arms and rise to the starting position. The legs should not move back and forth.
- Repeat this movement as many times as needed.
Option 2 (harder):
- We take two chairs! We repeat the first two points from option 1. That is, we steadily put our hands behind our backs on one.
- Now attention: we put our legs slightly bent at the knees with our heels on another chair. We keep the feet together. Thus, your body rests on your hands and heels.
- Lower your pelvis as far down as possible. Heavier? That's right, this is a more difficult version of the reverse push-ups. And more efficient. Watch for sensations in the shoulder area. If discomfort occurs, return to the previous version of the exercise.
- The movement of the body occurs strictly up and down. Down - on the inhale, up - on the exhale. Breathing is the foundation!
Now about the use of weights. In reverse push-ups, you can increase efficiency with additional weights. We recommend only for the second option when you use two chairs. The exercise becomes really difficult and it is for them to really pump up the volume of the triceps, and hence the thickness of the arm.
If you have a barbell at home, take the plates and put the desired weight on your thighs. If there are no pancakes, use any convenient weight (for example, a dumbbell, weights, a satchel). A good idea always comes with a desire. Most importantly, stay safe!
It is allowed to use the help of a partner - put him on top (better than a partner, she is lighter). Try it if you are strong enough.
You should only switch to weights when your muscles are strong enough. And for the first time, you should learn how to do reverse push-ups without weight.
We will give 4 options for the position of the palms and 2 positions of the elbows. There will be 5 exercises in total. Experiment which muscles you feel more in each case.
- Palms fingers forward, elbows pressed to the body. The classic pose, the load is distributed between the deltas and triceps.
- Palms fingers to each other. Elbows when lowering the body go in opposite directions. The chest receives most of the load.
- Fingers look back, elbows are pressed to the body. Maximum load on the front deltas. The participation of triceps is secondary.
- Fingers to the sides, palms wide apart. Strengthening the load on the pectoral muscles.
- Classical pose - arms wide apart, fingers pointing forward. The distribution of the load between the deltas, chest and triceps.
You can combine these options, doing 10-15 repetitions for each case. This exercise (without additional weight) cannot build muscle, but it will work great as a charge or to maintain the overall tone of the muscles of the chest and arms.
Technique:
- Choose the desired hand position. Put your feet together or slightly apart from each other (10-15 centimeters).
- On inspiration, we lower ourselves to the floor, but do not lie down on it (the body should be absolutely straight, the press and buttocks should be tense). Hold on like this for 1-2 seconds. You can't linger.
- We rise to the starting position and repeat the exercise the required number of times.
- The body must be kept straight. The angle between the legs and the body is 0 degrees.
Common mistakes - the pelvis falls down or bulges up. You don't need to do that!
Push-ups upside down
This is both the most spectacular and technically most difficult version of push-ups. It is used to train the arms and shoulders. The chest in this case does not work. We recommend that very strong and trained people practice such push-ups.
Vertical push-ups are not suitable for everyone, as a sudden change in body position can lead to loss of consciousness.
Useful accessory for push-ups
If you are a fan of push-ups, we recommend that you purchase special stops for this. Each stop allows you to hold steady on your hand. Thanks to such devices, you can put your hands at any angle, training various parts of the arms and shoulders, chest.
If you've had a wrist injury, this is a great way to avoid joint pain because your arm doesn't bend like floor push-ups.